
Dhawan Sagar
- Posted on
This is Script#1 (Cisco_IOS)
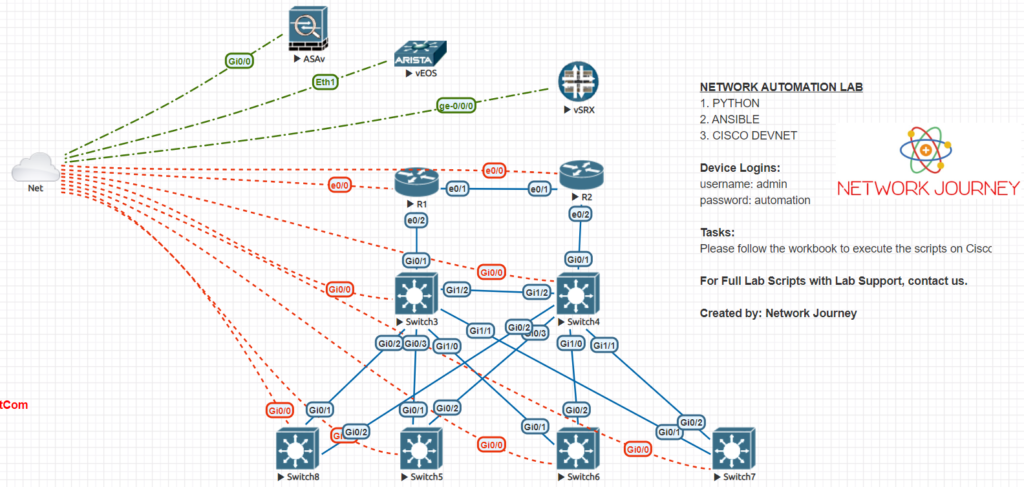
(this is lab topology required to execute this script#1)
Task#1: Open Pycharm on your local laptop.
You must have installed Pycharm IDE on to your local laptop. You can google it to get a free “community” version
On eve-ng pro make use of all NAT or VMNET8 adapters for receving the DHCP IP’s
(to integrate pycharm with eve-ng, contacts us on networkjourneydotcom@gmail.com) [additional one-time cost $50]
Pre-req:
1. You must also have installed latest Python3.x (https://www.python.org/downloads/)
Task#2 The below script is for testing on Cisco_ios switch. From the topology given, the Ios_switch is labbelled with ip address : 192.168.32.245
Task#3 Copy paste below script on pycharm, change the IP address inside the script.
Make sure you have enabled “telnet” feature on the cisco_ios
switch(config)#
username network password automation
username network pri 15
line vty 0 4
exec-timeout 0 5
transport input telnet
login local
import telnetlib #calling module telnetlib

HOST = "192.168.32.222" #defining ip address
user123 = "network" #username of your cisco_ios switch
password123 = "automation" #password of your cisco_ios switch

tn123 = telnetlib.Telnet(HOST) #taking telnet connection

tn123.read_until(b"Username: ")
tn123.write(user123.encode('ascii') + b"\n")
if password123:
    tn123.read_until(b"Password: ")
    tn123.write(password123.encode('ascii') + b"\n")

tn123.write(b"term len 0\n")
tn123.write(b"show run\n") #sending cisco_ios cli command

print(tn123.read_all().decode('ascii')) #getting output on pycharm console
In our next script, we will discuss this script integrating with Arista switch.
Stay tuned!!!!
For more live labbing exposure and scripts follow us on https://www.youtube.com/c/NetworkJourney
To watch this script in action with many other scripts, you can watch one of the video from our Instructor-led online batch, Class#1
This is Script#2 for Arista switch
Task#1: Open Pycharm on your local laptop.
You must have installed Pycharm IDE on to your local laptop. You can google it to get a free “community” version
On eve-ng pro make use of all NAT or VMNET8 adapters for receving the DHCP IP’s
(to integrate pycharm with eve-ng, contacts us on networkjourneydotcom@gmail.com) [additional one-time cost $50]
Pre-req:
1. You must also have installed latest Python3.x (https://www.python.org/downloads/)
Task#2 The below script is for testing on Arista Switch. From the topology given, the Ios_switch is labbelled with ip address : 192.168.32.238
Task#3 Copy paste below script on pycharm, change the IP address inside the script.
Make sure you have enabled “telnet” feature on the Arista_switch:
arsita(config)#
interface eth1
no shutdown
no switchport
ip add dhcp
username network pri 15 password automation
management telnet
idle-timeout 1
no shutdown
import telnetlib #calling python module telnetlib

HOST = "192.168.32.238" #defining ip address on arista switch
user123 = "network" #username of your arista switch
password123 = "automation" #password of your arista switch

tn123 = telnetlib.Telnet(HOST) #taking telnet connection

tn123.read_until(b"Username: ")
tn123.write(user123.encode('ascii') + b"\n")
if password123:
    tn123.read_until(b"Password: ")
    tn123.write(password123.encode('ascii') + b"\n")

tn123.write(b"enable\n")
tn123.write(b"show run\n") #sending arista switch cli command

print(tn123.read_all().decode('ascii')) #getting output on pycharm console
In our next script, we will discuss this script integrating with Cisco ASA security firewall.
Stay tuned!!!!
For more live labbing exposure and scripts follow us on https://www.youtube.com/c/NetworkJourney
To watch this script in action with many other scripts, you can watch one of the video from our Instructor-led online batch, Class#1
This is Script#3 for Cisco ASA Firewall
Task#1: Open Pycharm on your local laptop.
You must have installed Pycharm IDE on to your local laptop. You can google it to get a free “community” version
On eve-ng pro make use of all NAT or VMNET8 adapters for receving the DHCP IP’s
(to integrate pycharm with eve-ng, contacts us on networkjourneydotcom@gmail.com) [additional one-time cost $50]
Pre-req:
1. You must also have installed latest Python3.x (https://www.python.org/downloads/)
Task#2 The below script is for testing on Cisco_ASA Firewall. From the topology given, the Ios_switch is labbelled with ip address : 192.168.32.238
Task#3 Copy paste below script on pycharm, change the IP address inside the script.
Make sure you have enabled “telnet” feature on the Arista_switch:
ciscoasa(config)#
interface GigabitEthernet0/0
nameif INSIDE
security-level 100
ip address dhcp
no shutdown
username network password automation privilege 15
aaa authentication telnet console LOCAL
telnet 0.0.0.0 0.0.0.0 INSIDE
telnet timeout 1
------------------
1st method:
------------------
import telnetlib #calling python module telnetlib
import time #calling time module

HOST = "192.168.32.251" #defining ip address on cisco asa firewall
user123 = "network" #username of your asa firewall
password123 = "automation" #password of your asa firewall

tn123 = telnetlib.Telnet(HOST) #taking telnet connection

tn123.read_until(b"Username: ")
tn123.write(user123.encode('ascii') + b"\n")
if password123:
    tn123.read_until(b"Password: ")
    tn123.write(password123.encode('ascii') + b"\n")

tn123.write(b"enable\n")  #sending cisco asa cli command
time.sleep(1) #Wait for 1 seconds between commands.
tn123.write(b"\n")
time.sleep(1)
tn123.write(b"terminal page 0\n")
time.sleep(1)
tn123.write(b"show run\n")
time.sleep(1)

print(tn123.read_very_eager().decode('ascii')) #getting output on pycharm console

------------------
2nd way (optional)
------------------
import telnetlib #calling python module telnetlib
HOST = "192.168.32.251" #defining ip address on cisco asa firewall
user123 = "network" #username of your asa firewall
password123 = "automation" #password of your asa firewall

tn123 = telnetlib.Telnet(HOST) #taking telnet connection

tn123.read_until(b"Username: ")
tn123.write(user123.encode('ascii') + b"\n")
if password123:
    tn123.read_until(b"Password: ")
    tn123.write(password123.encode('ascii') + b"\n")

tn123.write(b"enable\n")  #sending cisco asa cli command
tn123.write(b"\n")
tn123.write(b"terminal page 0\n")
tn123.write(b"show run\n")
tn123.write(b"exit") #define
print(tn123.read_until(b"exit").decode("ascii"))
In our next script, we will discuss this script integrating with Juniper Junos_vSRX
Stay tuned!!!!
For more live labbing exposure and scripts follow us on https://www.youtube.com/c/NetworkJourney
To watch this script in action with many other scripts, you can watch one of the video from our Instructor-led online batch, Class#1
This is Script#4 for Juniper vSRX
Task#1: Open Pycharm on your local laptop.
You must have installed Pycharm IDE on to your local laptop. You can google it to get a free “community” version
On eve-ng pro make use of all NAT or VMNET8 adapters for receving the DHCP IP’s
However here in Junos_vSRX, I have used static IP address 192.168.32.201 (one of the IP from my Nat or VMNET8 adapter)
(to integrate pycharm with eve-ng, contacts us on networkjourneydotcom@gmail.com) [additional one-time cost $50]
Pre-req:
1. You must also have installed latest Python3.x (https://www.python.org/downloads/)
Task#2 The below script is for testing on Junos_vSRX. From the topology given, the Ios_switch is labbelled with ip address : 192.168.32.238
Task#3 Copy paste below script on pycharm, change the IP address inside the script.
Make sure you have enabled “ssh” feature on the Junos_vSRX:
root@Junos_vSRX#
set system host-name Junos_vSRX
set system domain-name networkjourney.com
set interfaces ge-0/0/0 unit 0 family inet address 192.168.32.100/24
set routing-options static route 0.0.0.0/0 next-hop 192.168.32.1
set security zones security-zone trust interfaces ge-0/0/0.0 host-inbound-traffic system-services all
set system login class super-user-local idle-timeout 192.168.32.201/24
set system login class super-user-local security-role security-administrator
set system root-authentication plain-text-password
New password: cisco@123 or Automation@123
Reconfirm: cisco@123 or Automation@123
set system login user network class super-user-local authentication plain-text-password
New password: Automation@123
Reconfirm: Automation@123
from netmiko import ConnectHandler

junos_vsrx = { #netmiko_class
'device_type': 'juniper', #platform here is juniper
'ip': '192.168.32.100',
'username': 'root',
'password': 'cisco@123',
}

commands = ["show interface"] #send command

net_connect = ConnectHandler(**junos_vsrx) #calling netmiko_class using **arg
output = net_connect.send_config_set(commands)
print (output)
This ends the free trial version of scripts.
You can definitely get all my 75+ scripts designed for Cisco IOS, XE, XR, Juniper, ASA, Arista and many more.
You can use it for you own self-practice or modify to meet your projects or production environment.
Stay tuned!!!!
For more live labbing exposure and scripts follow us on https://www.youtube.com/c/NetworkJourney
To watch this script in action with many other scripts, you can watch one of the video from our Instructor-led online batch, Class#1
This ends the free trial version.
To purchase complete 75+ workbook with Lab 24×7 support, please whatsapp/email me : https://wa.me/919739521088 || networkjourneydotcom@gmail.com
To join our Instructor-led Online Network_Automation batch, full syllabus PDF, Demo video, Paypal button, click here
Regards
![Git and GitHub for Network Engineers – Version Control Made Easy [CCNP ENTERPRISE]_networkjourney](https://networkjourney.com/wp-content/uploads/2025/07/Git-and-GitHub-for-Network-Engineers-–-Version-Control-Made-Easy-1.png)

![[Day #17 Pyats Series] Creating a device inventory report (hostname, model, OS) using pyATS for Cisco](https://networkjourney.com/wp-content/uploads/2025/07/Creating-a-device-inventory-report-hostname-model-OS-using-pyATS-for-Cisco.png)