
Trainer Sagar Dhawan
- Posted on
[Day 13] Cisco ISE Mastery Training: Configuring Device Admin via TACACS+
Table of Contents
Introduction
In large networks, managing administrative access to switches, routers, and wireless controllers requires strong authentication, granular authorization, and complete activity logging. This is where Cisco ISE Device Administration via TACACS+ shines — it centralizes control, ensures compliance, and gives security teams full visibility into admin actions.
With ISE’s TACACS+ Device Admin capability, you can enforce role-based access to network devices, control command execution per user, and audit every configuration change in real time. Whether you’re a network engineer in an enterprise or preparing for CCIE Security, mastering this feature is a must.
Problem Statement
Without centralized device administration:
- Admin accounts are often local to devices — making password changes cumbersome and inconsistent.
- No clear visibility into who did what on devices.
- No role-based control — junior engineers might have the same rights as senior admins.
- Auditing device changes for compliance becomes manual and error-prone.
This results in security gaps, operational inefficiency, and compliance risks.
Solution Overview
Cisco ISE TACACS+ Device Admin provides:
- Centralized authentication for all network devices (AAA).
- Authorization policies to assign roles (e.g., full admin, read-only).
- Command authorization to limit risky CLI commands.
- Accounting logs to track every session and command.
ISE integrates with Active Directory for user identity verification and logs every admin action for compliance.
Sample Lab Topology
Lab Environment:
- Platform: VMware/EVE-NG running Cisco ISE, CSR1000v Router, Catalyst Switch, WLC
- Endpoints: Admin PC (SSH Client), Active Directory Server
- ISE Role: TACACS+ Server
- Integration: ISE ↔ AD ↔ Network Devices
Diagram Description:
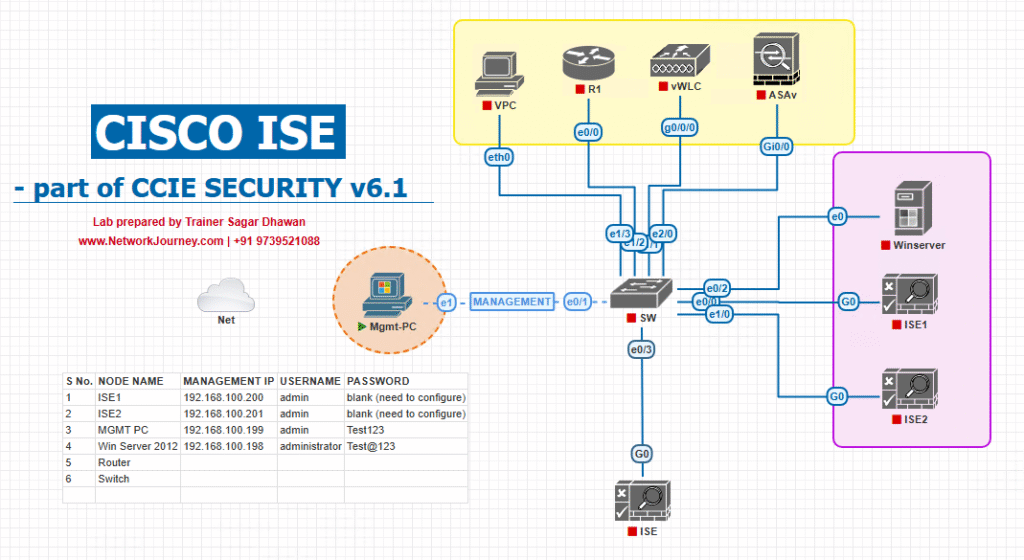
- Admin PC → SSH → Switch/WLC
- Switch/WLC → TACACS+ (TCP/49) → Cisco ISE
- Cisco ISE → AD (TCP/389/636) for credential verification
- ISE applies TACACS+ policies and logs actions
Step-by-Step GUI Configuration Guide
ISE Configuration Steps:
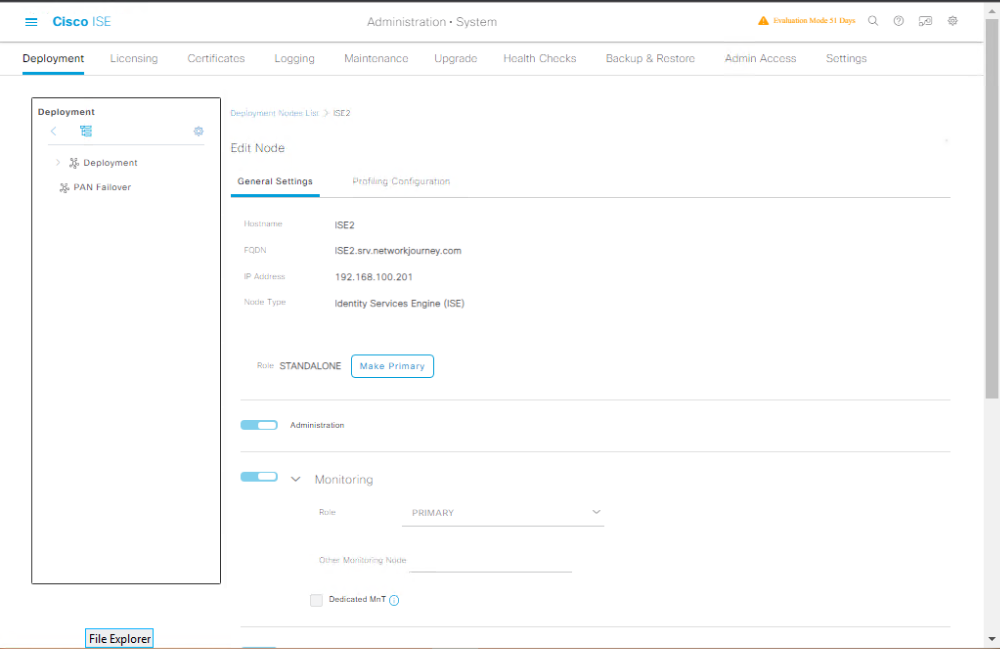
Step 1: Enable Device Admin Service in ISE
- Navigate to Administration → System → Deployment.
- Select your ISE node → Enable TACACS+ Service.
- Save & Restart application services.
- CLI validation:
ise/admin# show application status iseEnsure TACACS+ Service is running.
- CLI validation:
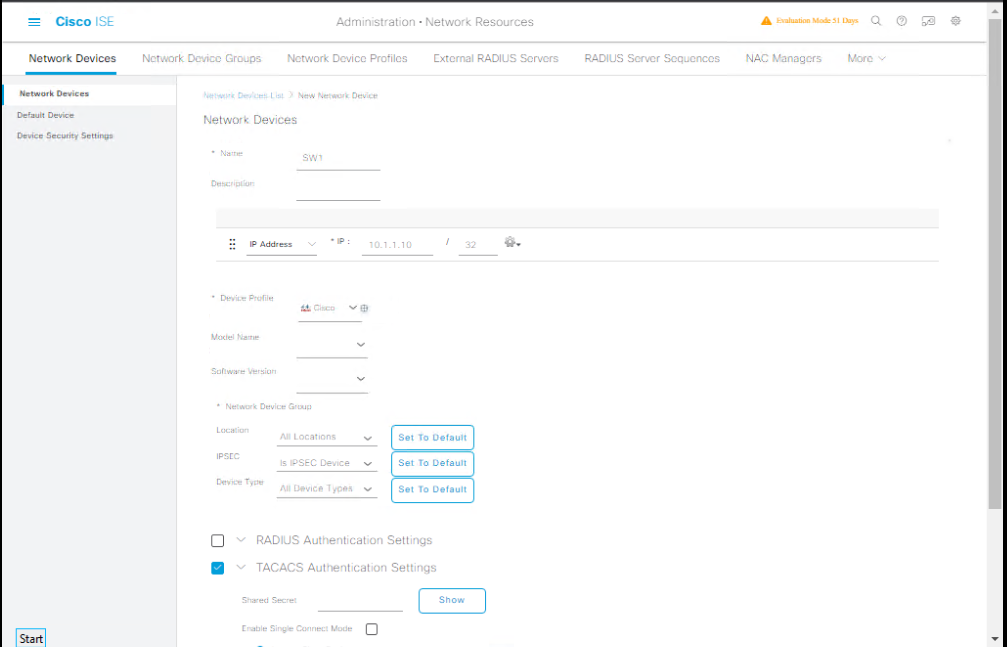
Step 2: Add Network Devices
- Go to Administration → Network Resources → Network Devices.
- Click Add → Enter:
- Name:
SW1 - IP:
10.1.1.10 - Device Type:
Switch
- Name:
- Enable TACACS+ Authentication Settings → Set shared secret (match on switch).
[Screenshot: Add Network Device with TACACS+ Enabled]
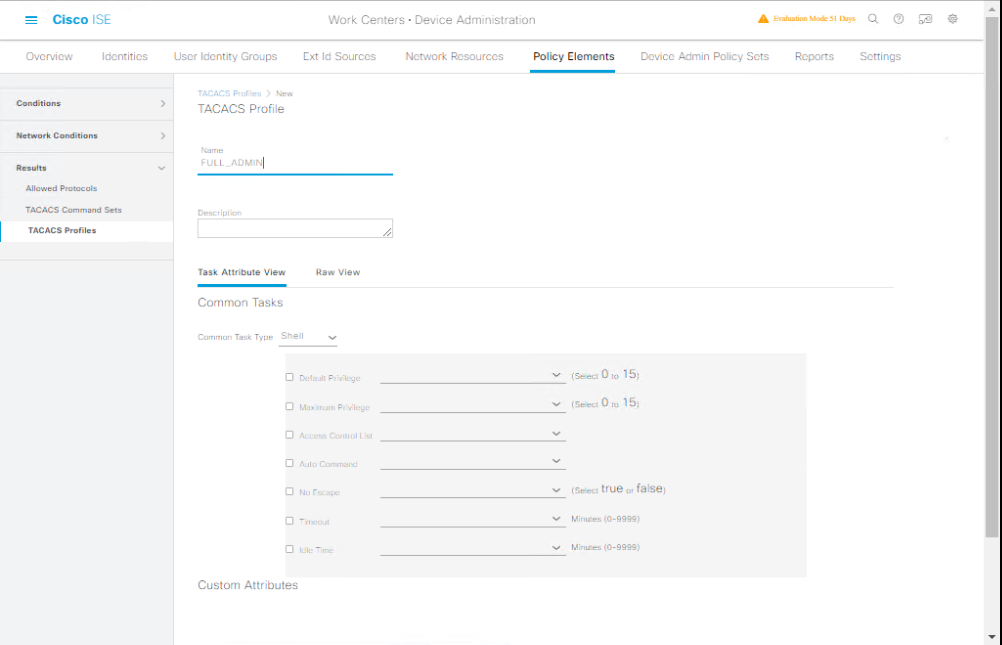
Step 3: Create TACACS+ Profiles
- Navigate to Work Centers → Device Administration → Policy Elements → Results → TACACS Profiles.
- Click Add → Name:
Full_Admin. - Privilege Level:
15. - Command Set:
PermitAll.
[Screenshot: TACACS Profile Configuration]
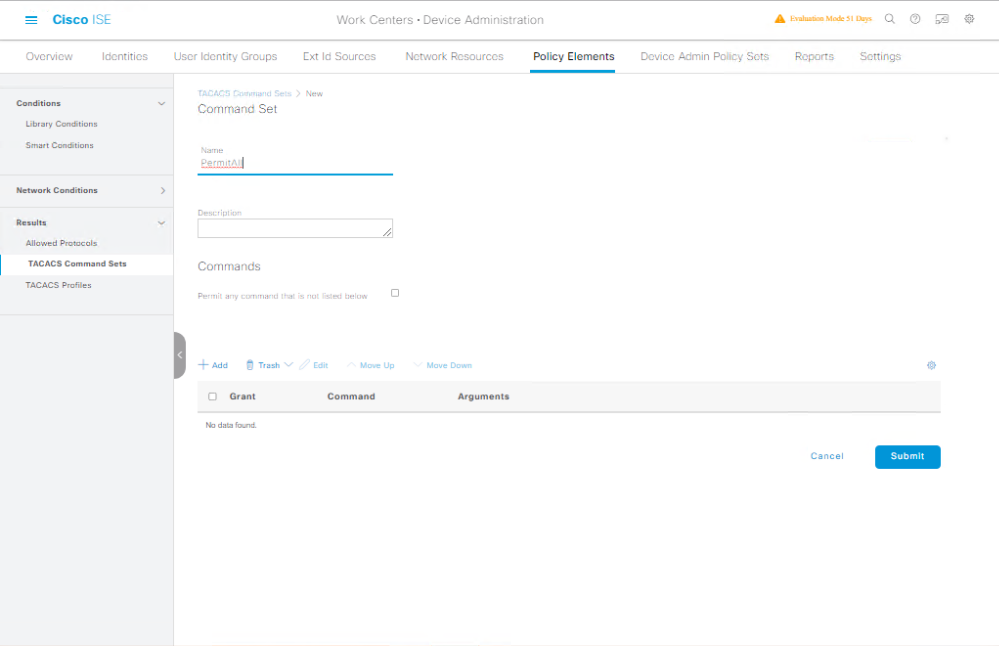
Step 4: Define Command Sets
- Go to Work Centers → Device Administration → Policy Elements → Results → Command Sets.
- Click Add → Name:
PermitAll→ Permit.*(all commands). - Optionally create Read-Only Command Set (e.g., block
configure terminal).
[Screenshot: Command Set Screen]
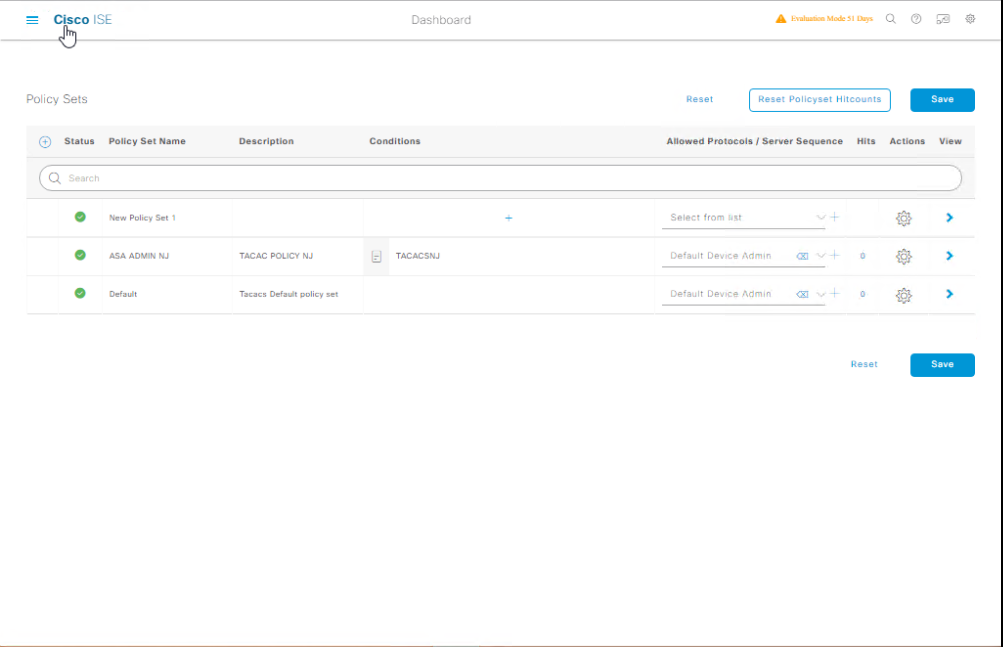
Step 5: Create Device Admin Policy Set
- Go to Work Centers → Device Administration → Policy Sets.
- Click Add → Name:
Switch_Admin_Access. - Conditions: Device Type = Switch, Protocol = TACACS+.
- Authentication Policy: AD Join Point.
- Authorization Policy: Map AD Group → TACACS+ Profile + Command Set.
[Screenshot: Policy Set Screen]
Switch/WLC Configuration (CLI)
Example on Catalyst Switch:
aaa new-model
tacacs server ISE
 address ipv4 10.1.1.20
 key TACACSSECRET
aaa authentication login default group tacacs+ local
aaa authorization exec default group tacacs+ local
aaa accounting exec default start-stop group tacacs+
line vty 0 4
 login authentication default
 transport input ssh
Validation Steps
On Switch CLI:
SW1# test aaa group tacacs+ admin password legacy
Expected: Authentication successful via ISE.
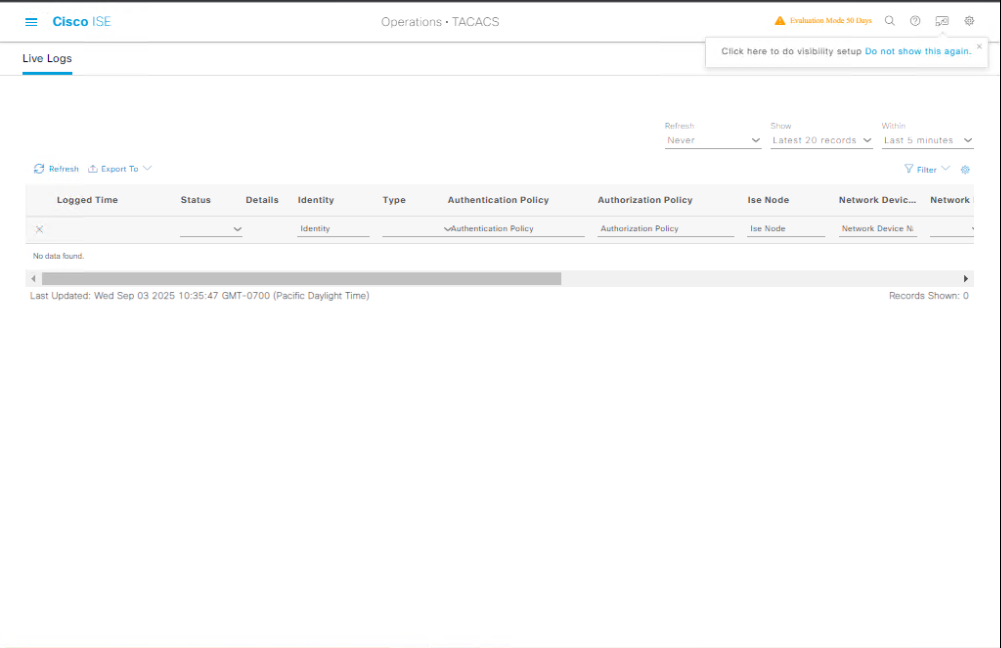
On ISE GUI:
- Go to Operations → TACACS Live Logs.
- Verify the login attempt, assigned profile, and command log.
[Screenshot: TACACS Live Logs Screen]
FAQs
1. What is the main difference between TACACS+ and RADIUS in Cisco ISE?
Answer: TACACS+ separates authentication, authorization, and accounting (AAA) into independent processes and is preferred for device administration because it allows granular command authorization. RADIUS is generally used for network access control and combines authentication and authorization. TACACS+ uses TCP port 49, while RADIUS uses UDP ports 1812/1813.
2. Why do we need Device Admin policies in Cisco ISE?
Answer: Device Admin policies define who can access network devices (switches, routers, firewalls, WLCs), what commands they can execute, and track their activity. This ensures that only authorized engineers perform administrative tasks, reducing the risk of misconfigurations or security breaches.
3. How do I add a network device (switch/router) to Cisco ISE for TACACS+ authentication?
Answer:
- Navigate to Administration → Network Resources → Network Devices.
- Click Add and enter the device name, IP address, and device type.
- Enable TACACS+ Authentication Settings.
- Enter the shared secret (must match device configuration).
- Save the configuration.
4. How can I validate TACACS+ connectivity from the CLI?
Answer:
On the device (switch/router), use:
test aaa group tacacs+ <username> <password> legacy
You can also check logs on ISE under Operations → TACACS → Live Logs to confirm the request and policy hit.
5. What’s the recommended TACACS+ configuration on a Cisco switch for ISE?
Answer:
tacacs server ISE1
 address ipv4 10.1.1.10
 key MySharedSecret
!
aaa new-model
aaa authentication login default group tacacs+ local
aaa authorization exec default group tacacs+ local
aaa accounting commands 15 default start-stop group tacacs+
line vty 0 4
 login authentication default
 transport input ssh
Replace 10.1.1.10 and MySharedSecret with your ISE server IP and shared key.
6. How can I restrict certain commands for specific user groups?
Answer: In ISE, create a TACACS Command Set (e.g., permit only show commands, deny conf t). Assign this command set to a policy that applies to a specific AD group or internal user identity.
7. How can I check why a TACACS+ login failed?
Answer:
- Go to Operations → TACACS → Live Logs.
- Check Failure Reason (e.g., wrong shared secret, no matching policy, wrong credentials).
- If needed, enable debug tacacs on the network device for deeper troubleshooting.
8. How do I integrate TACACS+ authentication with Active Directory users?
Answer:
- Integrate ISE with AD under Administration → Identity Management → External Identity Sources → Active Directory.
- Map AD groups to ISE Authorization Policies.
- Use those groups in TACACS Device Admin policy conditions.
9. How can I monitor which commands a user executed on a device?
Answer:
ISE logs all authorized commands under Operations → TACACS → Accounting Logs. You can search by username, device, or time to see exactly which commands were executed.
10. Can TACACS+ and RADIUS be used on the same device for different purposes?
Answer: Yes. Many organizations configure TACACS+ for administrative logins and RADIUS for end-user network access. The AAA configuration simply specifies different methods for login (TACACS+) and dot1x or network access (RADIUS).
YouTube Link
For more in-depth Cisco ISE Mastery Training, subscribe to my YouTube channel Network Journey and join my instructor-led classes for hands-on, real-world ISE experience
Closing Notes
Today you learned how to configure Device Admin via TACACS+ in Cisco ISE, validate with both GUI and CLI, and enforce granular admin control over network devices.
Mastering this skill ensures your network is secure, compliant, and operationally efficient.
Fast-Track to Cisco ISE Mastery Pro
Ready to become a true Cisco ISE Expert?
I run a focused 4-Month Instructor-Led CCIE Security Mastery Program — a complete hands-on journey covering ISE, Firepower, VPNs, ASA/FTD, and advanced security automation.
- Gain access to live labs, lifetime recordings, job-ready skills, and personal mentorship.
- Seats are limited! Reserve your spot here https://course.networkjourney.com/ccie-security/
Enroll Now & Future‑Proof Your Career
Email: info@networkjourney.com
WhatsApp / Call: +91 97395 21088
![Multicast in SD-WAN and Cloud Networks – Bringing One-to-Many to the Next Gen WAN [CCNP ENTERPRISE]_networkjourney](https://networkjourney.com/wp-content/uploads/2025/07/Multicast-in-SD-WAN-and-Cloud-Networks-–-Bringing-One-to-Many-to-the-Next-Gen-WAN.png)
![Git and GitHub for Network Engineers – Version Control Made Easy [CCNP ENTERPRISE]_networkjourney](https://networkjourney.com/wp-content/uploads/2025/07/Git-and-GitHub-for-Network-Engineers-–-Version-Control-Made-Easy-1.png)
![Ticket#19 – DHCP Clients Getting APIPA Address: Troubleshooting DHCP Snooping and Relay Agent Issues [CCNP ENTERPRISE]](https://networkjourney.com/wp-content/uploads/2025/07/Ticket19_DHCP-Clients-Getting-APIPA-Address-Troubleshooting-DHCP-Snooping-and-Relay-Agent-Issues_networkjourney.png)