Trainer Sagar Dhawan
- Posted on
[Day 77] Cisco ISE Mastery Training: Advanced Profiling Configuration
Table of Contents
Introduction
“Who is on my network?” is only half the question—what they are matters even more. Cisco ISE’s Profiler turns raw signals (DHCP, RADIUS, SNMP, HTTP, device-sensor, NetFlow, etc.) into precise endpoint identities (e.g., “HP LaserJet Pro M404dn”, “Cisco 88xx IP Phone”, “Axis M30 camera”, “Windows 11 laptop”). With advanced profiling, you design custom policies, certainty scoring, and re-profiling triggers that feed straight into Authorization and TrustSec SGT assignment—at scale.
Problem Statement
- Heterogeneous devices (laptops, phones, printers, cameras, OT/IoT) often lack 802.1X and change network locations/IPs.
- MAC lists & manual identity groups don’t scale and go stale.
- Wrong policy (e.g., a camera treated like a PC) leads to over-privilege or broken access.
- Security teams need repeatable, evidence-backed identification that survives roaming/VLAN changes and brownfield realities.
Need: A signal-rich, scored, auditable profiling framework that auto-classifies endpoints and drives enforcement the instant identity changes.
Solution Overview
ISE Profiler ingests probes (RADIUS, DHCP/DHCP-SPAN, SNMP Query/Trap, HTTP, device-sensor from Catalyst, optional NetFlow/NMAP*) and matches profiling policies with certainty factors (CF). You author custom conditions, logical profiles, and re-profiling rules; when a profile hits its Minimum Certainty Factor (MCF), ISE assigns Endpoint Profile, can place it into Endpoint Identity Group, and your Authorization/SGT policies react immediately (CoA).
* (NMAP availability depends on ISE version/licensing—omit if not present in your build.)
Sample Lab Topology
Platform: VMware ESXi + EVE-NG
ISE: ISE 3.x (PAN+MnT in one VM)
Switches: C9300-A (Access), C9500-D (Distribution)
WLC (optional): 9800-CL (for wireless probes/device-sensor)
Endpoints:
- Win11 laptop (802.1X)
- HP printer (MAB)
- Cisco 88xx IP Phone (MAB)
- Axis IP camera (MAB)
- Random IoT (DHCP only)
Topology Diagram:
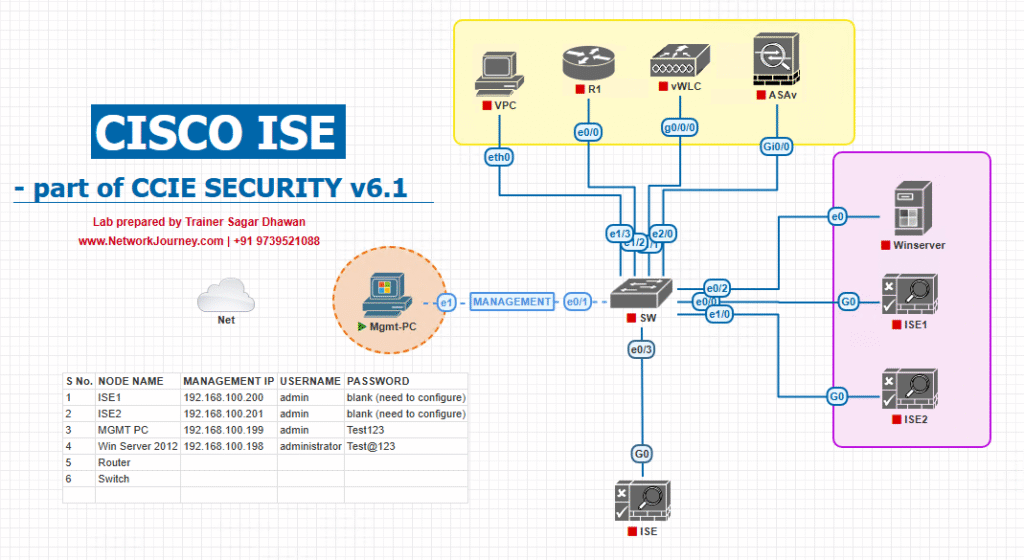
*Choose either DHCP helper to ISE or SPAN/RSPAN for DHCP visibility; add SNMP RO to query devices that speak SNMP.
Step-by-Step GUI Configuration Guide (+ CLI)
A) Enable & Tune Profiler in ISE
- Turn on Profiler:
Administration → System → Settings → Profiler → Enable Profiling Service.
[Screenshot: ISE Profiler Global Enable]
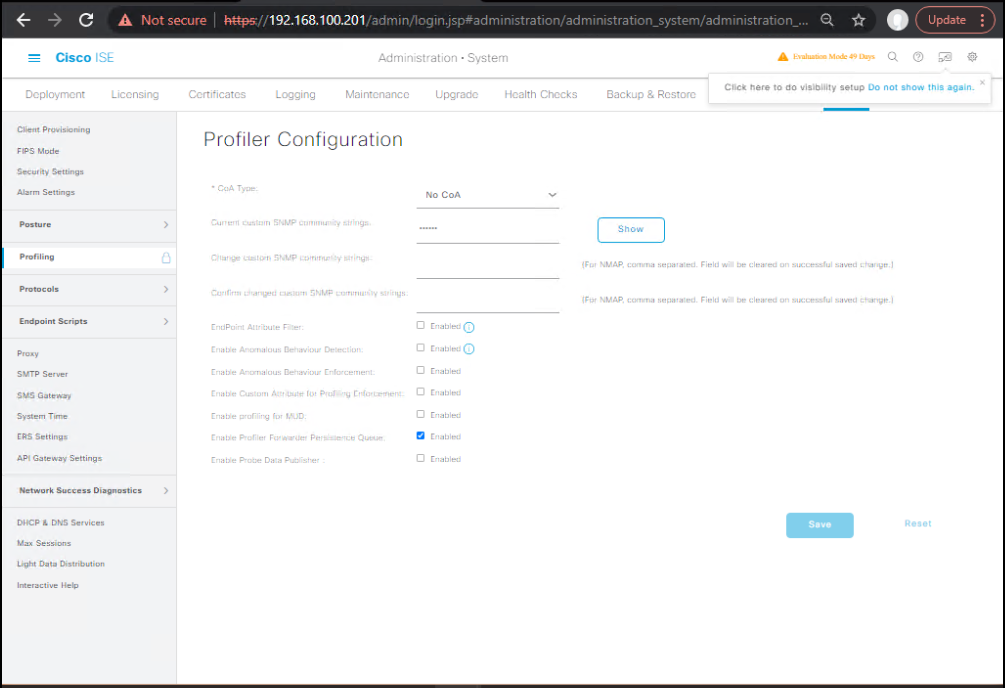
- Enable Probes (tick only what you’ll use):
- RADIUS, DHCP, DHCP SPAN, SNMP Query, SNMP Trap, HTTP, Device Sensor, (NetFlow/NMAP if available).
[Screenshot: ISE Profiler Probes Selection]
- RADIUS, DHCP, DHCP SPAN, SNMP Query, SNMP Trap, HTTP, Device Sensor, (NetFlow/NMAP if available).
- CoA on profile change:
Profiler → General Settings → Trigger CoA when endpoint profile changes = Enabled.
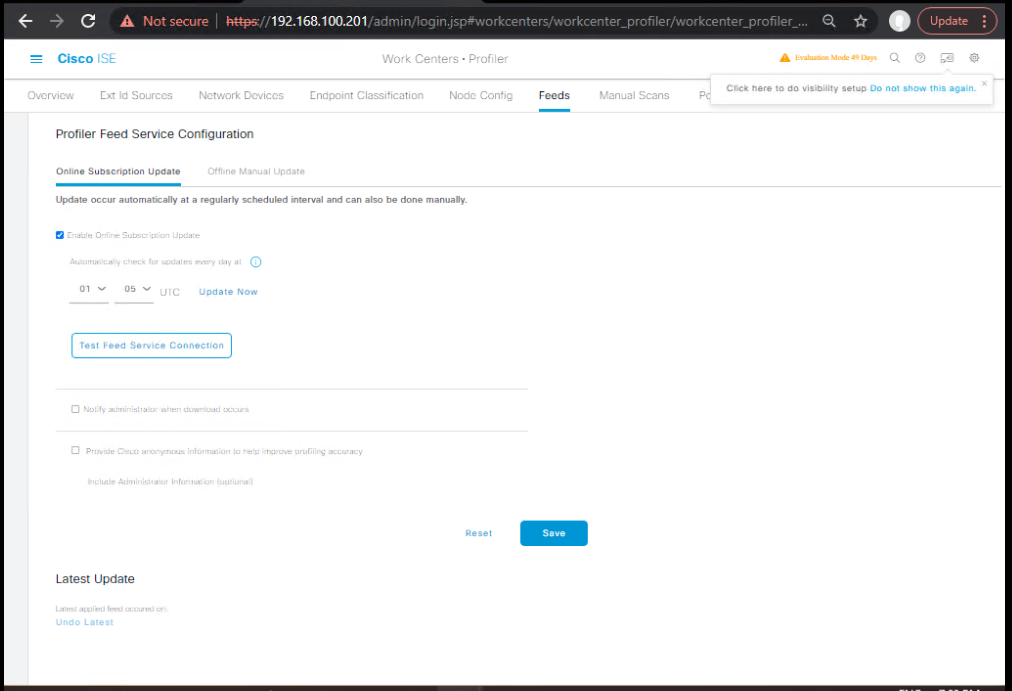
[Screenshot: ISE Profiler CoA on Profile Change] - Feed Service (signatures/OUI/vendor updates):
Work Centers → Profiler → Feed Service → Enable Cisco Feed and schedule daily sync.
[Screenshot: ISE Profiler Feed Service]
Quick validation:
Operations → Reports → Profiler → check last feed sync status.
[Screenshot: ISE Profiler Feed Sync Report]
B) Network Device Plumbing for Rich Signals
Option 1 — DHCP helper to ISE (simple & reliable)
On SVI where endpoints live:
conf t
interface Vlan20
 ip address 10.20.0.1 255.255.255.0
 ip helper-address 10.20.0.10        ! DHCP server
 ip helper-address 10.10.10.50        ! ISE (DHCP probe sink)
 ip dhcp relay information option
end
ISE listens only, it won’t offer leases. Validate packets reach ISE (ISE Live Logs → DHCP Probe).
Option 2 — SPAN/RSPAN/ERSPAN DHCP to ISE
conf t
monitor session 1 source vlan 20 both
monitor session 1 destination interface Gi1/0/48    ! ISE-connected port
end
(Use RSPAN/ERSPAN if ISE sits elsewhere.)
Device Sensor on Catalyst (recommended)
Collect CDP/LLDP/DHCP attributes and send via RADIUS:
conf t
ip device tracking
device-sensor accounting
! (Platform CLIs vary; enable DHCP/CDP/LLDP attribute export)
aaa accounting update periodic 5
end
Validate:
show device-sensor cache all
show authentication sessions interface Gi1/0/10 details
SNMP Query to endpoints/L2 gear (for phones/printers/cameras)
On devices (or access switch), configure SNMP RO and allow from ISE:
snmp-server community READONLY ro
!
snmp-server host 10.10.10.50 version 2c READONLY   ! (optional Trap to ISE if used)
In ISE: Administration → Network Resources → Network Devices → → SNMP tab → add RO credentials.
[Test] Work Centers → Profiler → Endpoints → Tools → SNMP Query against IP/MAC.
[Screenshot: ISE Network Device SNMP Settings]
C) Build Custom Profiling Conditions & Policies
Goal: Precisely identify HP LaserJet printer, Cisco 88xx IP phone, Axis camera, and a Generic Windows 11.
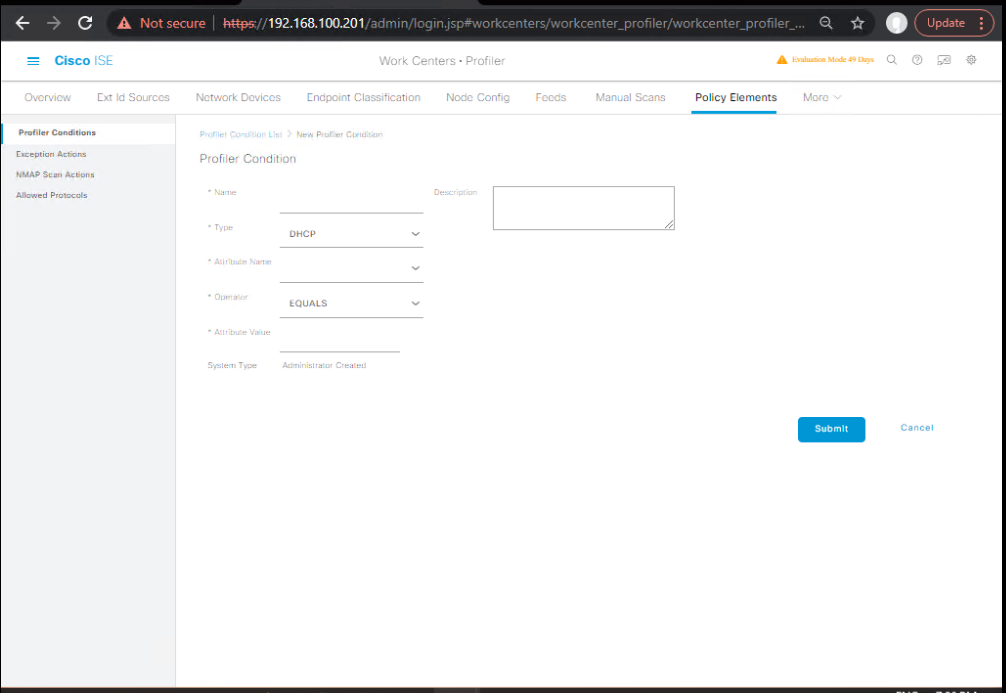
- Create Reusable Conditions
Work Centers → Profiler → Policy Elements → Conditions → AddCOND_DHCP_Opt60_HP→ DHCP: option 60 (vendor-class-identifier) contains “HP”COND_SNMP_OID_HP_PRINTER→ SNMP sysObjectID startswith .1.3.6.1.4.1.11.2.3.9 (HP print OIDs)COND_LLDP_CAP_PHONE→ LLDP System Capabilities includes “Telephone”COND_CDP_Device_CiscoPhone→ CDP Platform contains “CP-88”COND_HTTP_UA_Windows11→ HTTP User-Agent contains “Windows NT 10.0” (Windows 10/11 UA—refine as needed)
[Screenshot: ISE Profiler Condition Builder]
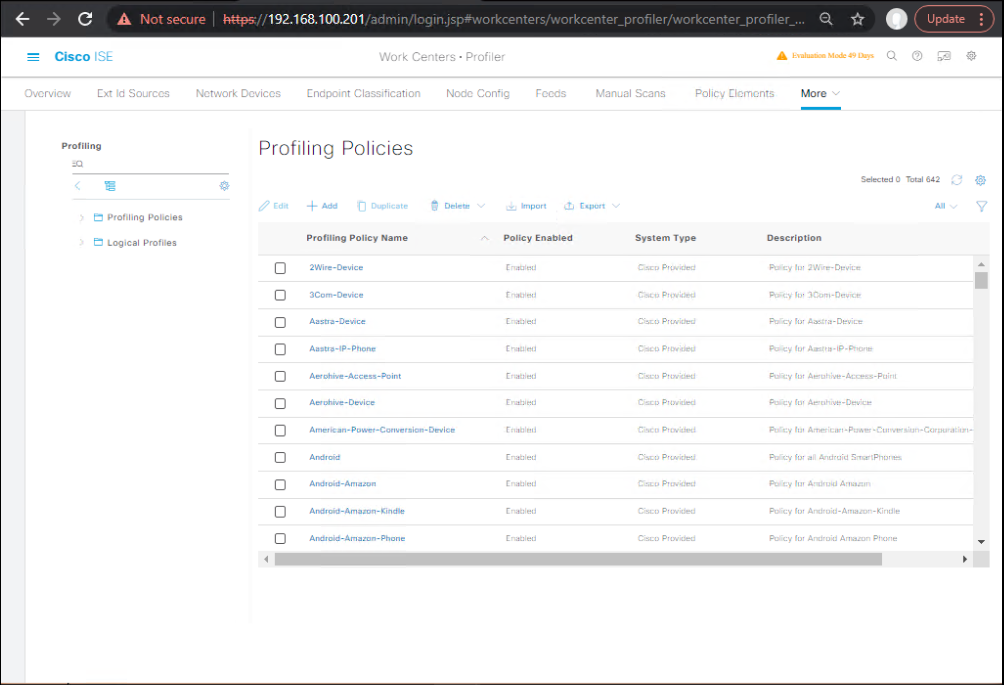
- Create/Adjust Profiling Policies (with CF)
Work Centers → Profiler → Profiling Policies → Add- HP LaserJet Printer
- Rules:
COND_DHCP_Opt60_HP(+30 CF) ANDCOND_SNMP_OID_HP_PRINTER(+70 CF) - MCF: 80 → Endpoint Profile:
HP-LaserJet→ On Match: Put into Identity Group: Printers
- Rules:
- Cisco 88xx IP Phone
- Rules:
COND_LLDP_CAP_PHONE(+40) ORCOND_CDP_Device_CiscoPhone(+70) - MCF: 60 → Endpoint Profile:
Cisco-IP-Phone-88xx→ Identity Group: IP_Phones
- Rules:
- Axis Camera
- Rules: DHCP Opt60 contains “axis” (+40) AND SNMP sysDescr contains “AXIS” (+60)
- MCF: 80 → Endpoint Profile:
Axis-Camera→ Identity Group: Cameras
- Windows 11 Workstation
- Rules:
COND_HTTP_UA_Windows11(+40) AND/OR RADIUS Calling-Station OUI in Microsoft list (+60) - MCF: 80 → Endpoint Profile:
Windows-11→ **Identity Group: Corporate-PCs`
[Screenshot: ISE Profiling Policy with CF & MCF]
- Rules:
- HP LaserJet Printer
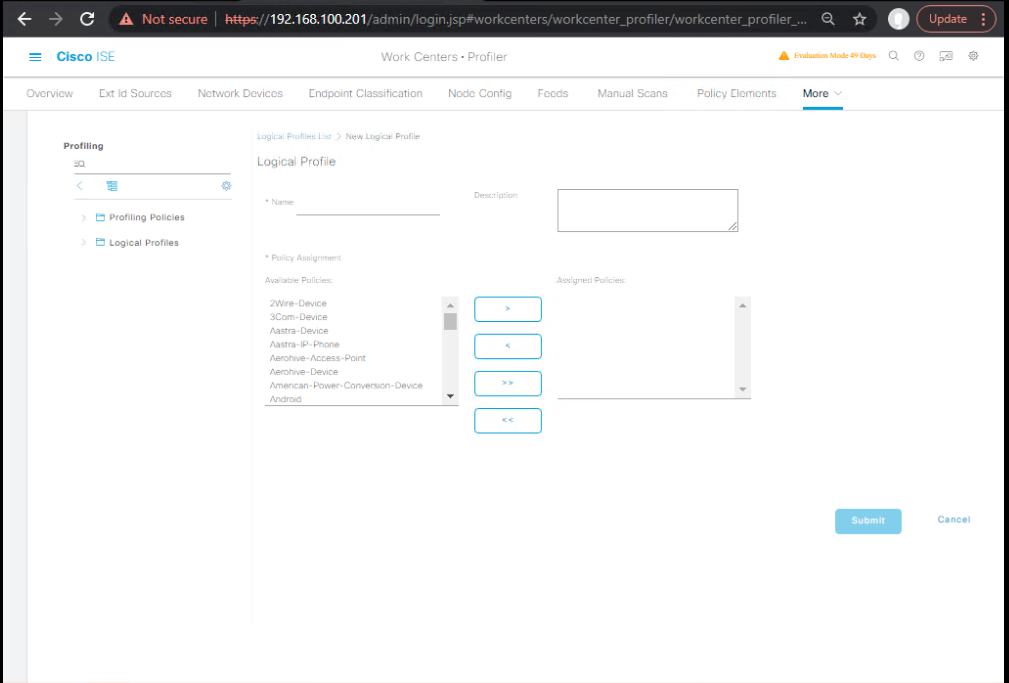
- Logical Profiles (roll-up labels)
Work Centers → Profiler → Logical Profiles → Add →- Printers-All = (HP-LaserJet OR Canon-Printer OR Brother-Printer)
- Cameras-All = (Axis-Camera OR Hikvision-Camera …)
Use in Authorization to keep rules readable.
[Screenshot: ISE Logical Profile Create]
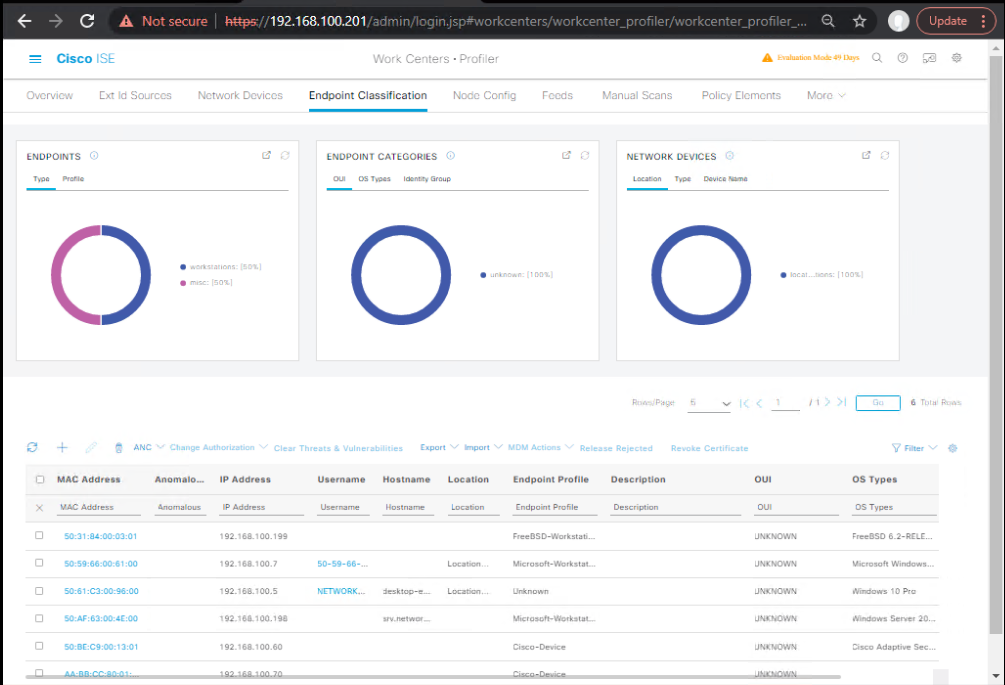
Validation:
- Context Visibility → Endpoints → <MAC/IP> → Endpoint Profile, Attributes, Matched Policies, CF.
- Operations → Reports → Profiler → Endpoint Profiling Summary.
[Screenshots: Endpoint Detail Attributes, Profiler Summary]
D) Make Authorization React to Profiles (SGT/Access)
- Authorization Profiles (results)
Policy → Policy Elements → Results → Authorization → Authorization Profiles → AddAP_SGT_PRINTERS→ Security Group Tag = Printers(15)AP_SGT_IPPHONES→ SGT = Voice-Phones(25)AP_SGT_CAMERAS→ SGT = Cameras(35)AP_SGT_CORPPC→ SGT = Employees(2)
[Screenshot: AuthZ Profile with SGT]

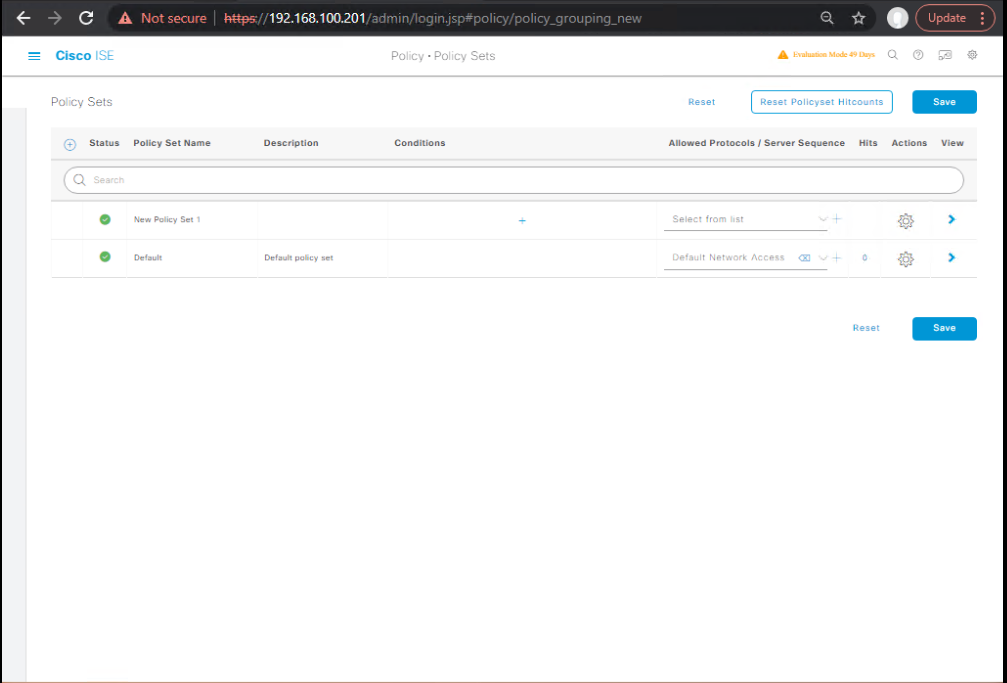
- Authorization Policy (top-down)
Policy → Policy Sets → <Wired/Wireless> → Authorization- IF Endpoint Profile =
Cisco-IP-Phone-88xx→AP_SGT_IPPHONES - IF Logical Profile =
Printers-All→AP_SGT_PRINTERS - IF Logical Profile =
Cameras-All→AP_SGT_CAMERAS - IF Endpoint Profile =
Windows-11AND AD-Group = Domain Users →AP_SGT_CORPPC
[Screenshot: ISE Authorization Policy referencing Profiles/Logical Profiles]
- IF Endpoint Profile =
Validation:
- Operations → RADIUS Live Logs → open a record → Security Group, AuthZ Profile, Endpoint Profile present.
- Confirm CoA sent after profile change (CoA Result = Success).
[Screenshot: Live Log Detail with Endpoint Profile & SGT]
E) Force (Re)Profiling & Lifecycle
- Trigger collection
- Bounce the port or CoA Reauth from ISE Live Sessions.
- On switch:
clear authentication sessions interface Gi1/0/11
- Schedule SNMP discovery for known subnets:
Work Centers → Profiler → Probes → SNMP Query → Subnet List (scan windows/priorities). - Re-profiling on attribute change: ensure CoA on profile change is ON (Step A.3).
- Static overrides (exceptions):
Context Visibility → Endpoints → → Edit → Static Profile or Static Group (use sparingly).
Validation:
- Endpoint Timeline shows Re-Profiled events and CF progression.
[Screenshot: Endpoint Timeline Re-Profile Events]
F) Device-Side CLI Validation (Catalyst & WLC)
Catalyst 9300 (Access):
show authentication sessions interface Gi1/0/11 details
! Look for: Method (MAB/802.1X), ISE Policy, SGT, Session-Timeout, Status Authorized

show device-sensor cache interface Gi1/0/11
! See learned DHCP/CDP/LLDP attributes sent to ISE

show ip device tracking all
! MAC/IP/VLAN bindings for endpoints

! If TrustSec in use, confirm SGTs applied from profiling-triggered AuthZ:
show cts role-based sgt-map ip 10.20.20.55
WLC 9800 (if wireless in your lab):
show wireless client mac <client-mac> detail | i Username|Policy|Security Group Tag
ISE GUI cross-check:
- Context Visibility → Endpoints filter by Profile = HP-LaserJet / Cisco IP Phone / Axis Camera / Windows-11.
G) Troubleshooting Breakpoints (quick)
- No attributes in ISE? Check DHCP helper or SPAN reaching ISE; use a SPAN capture on ISE NIC or Operations → Live Logs → DHCP entries.
- No SNMP data? Confirm SNMP RO works from ISE to target; try Profiler → Tools → SNMP Query. ACLs? VRFs?
- Wrong profile chosen? Open endpoint → Matched Rules: adjust CF weights/MCF or rule order; prefer AND with high-fidelity signals (SNMP sysObjectID) to avoid false positives.
- Frequent flapping profiles? Disable noisy probes, stabilize with attribute aging and tighten conditions; keep CoA on profile change but avoid hair-trigger rules.
Quick Validation Snippets
# Catalyst
show authentication sessions interface Gi1/0/11 details
show device-sensor cache interface Gi1/0/11
show ip device tracking all

# ISE GUI
Operations → RADIUS Live Logs (SGT/Profile)
Context Visibility → Endpoints (Attributes, Matched Policies, CF timeline)
Work Centers → Profiler → Reports (Endpoint Profiling Summary)

# WLC (optional)
show wireless client mac <client-mac> detail | i Security Group Tag|Policy
FAQs – Advanced Profiling Configuration in Cisco ISE
1. How do I confirm which profiling method (DHCP, SNMP, RADIUS, HTTP, etc.) classified my endpoint?
- GUI Validation:
- Go to Context Visibility → Endpoints → [Select Endpoint] → Attributes tab.
- You will see attributes grouped under “Collected From” (DHCP, RADIUS, SNMP, etc.).
- CLI Validation on PSN:
show logging application profiler.logLook for logs showing which probe contributed to classification.
2. My endpoint shows “Unknown” instead of a profile. How do I fix it?
- Ensure probes are enabled under Administration → System → Deployment → [PSN] → Profiling Configuration.
- Validate that network devices are configured to send telemetry:
- Switch/WLC must have RADIUS Accounting and ip device tracking enabled.
- DHCP relay should point to ISE if using DHCP probe.
- Run:
show authentication sessions interface <int> detailsCheck if attributes (like DHCP fingerprint) are seen.
3. Can I use multiple conditions to classify a device (e.g., OUI + DHCP option)?
- Yes.
- Create a Custom Profiling Policy under Policy → Profiling → Policies.
- Add multiple conditions with AND/OR logic (e.g.,
OUI = AppleANDDHCP Option 55 contains 1,3,6). - Assign higher priority so it takes precedence.
4. How do I override ISE’s automatic profile and manually assign one?
- Navigate to Context Visibility → Endpoints → [Endpoint] → Edit Attributes → Static Assignment.
- Tick Static Profile Assignment and choose a profile.
- CLI Validation:
show profiling endpoint mac <mac-address>Confirms static profile binding.
5. How do I profile wireless devices when DHCP is offloaded to an external server?
- Use RADIUS probe (NAS-Port-Type = Wireless) and HTTP probe (for web logins).
- Optionally enable SNMP probe on WLC to learn device details.
- If DHCP probe is critical, configure DHCP SPAN session to ISE.
6. How do I differentiate between similar devices (e.g., iPhone vs. iPad)?
- Enable HTTP probe (captures User-Agent strings).
- Fine-tune profiling policies using:
- DHCP fingerprints (option 55 lists).
- HTTP User-Agent (contains model info).
- OUI (first 3 bytes of MAC).
- Use compound conditions:
DHCP Fingerprint = Apple iOS+User-Agent contains iPad.
7. What happens if a device matches multiple profiles?
- ISE uses Profiling Policy priority to decide.
- Higher priority policies (top of list) override lower ones.
- If equal priority → ISE applies the more specific profile.
- Validation: Check Profiler logs:
show logging application profiler.log
8. How do I validate profiling results in real-time?
- ISE GUI: Context Visibility → Endpoints → Filter by MAC/IP.
- ISE CLI:
show profiling endpoint mac <mac-address>Shows learned attributes, probes used, and current profile. - Switch CLI:
show authentication sessions mac <mac> detailsConfirms endpoint details and SGT assignment (if mapped).
9. Can profiling be used to assign different authorization policies?
- Yes.
- Example:
- Profile = Printer → Authorization Rule → VLAN 20, limited access.
- Profile = iPhone → Authorization Rule → Internet-only access.
- Configure under Policy → Policy Sets → Authorization Policy.
- Verify in Live Logs → Authorization Result.
10. How do I export profiling data for external analysis?
- Use pxGrid to export profiling and context data to tools like Splunk/Stealthwatch.
- Alternatively:
- Go to Context Visibility → Endpoints → Export CSV.
- CLI method:
application configure iseEnable profiler data export through syslog or pxGrid.
YouTube Link
For more in-depth Cisco ISE Mastery Training, subscribe to my YouTube channel Network Journey and join my instructor-led classes for hands-on, real-world ISE experience
Closing Notes
Advanced Profiling = the foundation for clean Authorization and TrustSec. Start with reliable probes (RADIUS/DHCP/Device Sensor), model precise rules with CF/MCF, and wire AuthZ/SGT to react instantly. Validate relentlessly: Endpoint Details, Live Logs, switch/WLC CLI, and Profiler reports.
Upgrade Your Skills – Start Today
For more in-depth Cisco ISE Mastery Training, subscribe to my YouTube channel Network Journey and join my instructor-led classes for live labs, design reviews, and troubleshooting drills.
Fast-Track to Cisco ISE Mastery Pro
I run a focused 4-month, instructor-led CCIE Security-oriented program covering:
- End-to-end ISE: 802.1X/MAB, Advanced Profiling, Posture, BYOD
- TrustSec (SGT/SXP/Matrix) with wired/wireless enforcement
- Brownfield migrations, break/fix playbooks, and design case studies
- Weekly live sessions + recordings, graded workbooks, interview prep
Course outline & cohorts: https://course.networkjourney.com/ccie-security/
Enroll Now & Future‑Proof Your Career
Email: info@networkjourney.com
WhatsApp / Call: +91 97395 21088

![CAPWAP Overview – Bridging Access Points and Controllers [CCNP Enterprise] _networkjourney](https://networkjourney.com/wp-content/uploads/2025/07/CAPWAP-Overview-–-Bridging-Access-Points-and-Controllers-CCNP-Enterprise.png)
![[Day 38] – Cisco ISE Mastery Training: Wired Supplicant Configuration for Windows](https://networkjourney.com/wp-content/uploads/2025/08/Day-38-–-Cisco-ISE-Mastery-Training-Wired-Supplicant-Configuration-for-Windows.png)