
Trainer Sagar Dhawan
- Posted on
[Day 10] Cisco ISE Mastery Training: Adding Network Devices (Switches, WLCs) to ISE
Table of Contents
Introduction
Network devices (switches, wireless controllers, routers, firewalls) are the RADIUS clients that ask Cisco ISE who can access the network. Adding them to ISE properly — with the right IPs, shared secrets, device groups and attributes — is essential for accurate policy enforcement, logging, and troubleshooting.
This lesson shows you the practical lab steps to register NADs in ISE, configure those devices to point at ISE, and validate authentication and accounting traffic so students and engineers can move from “device added” to “policies enforced” with confidence.
Problem Statement
Typical failures when integrating NADs with ISE:
- RADIUS requests rejected because the NAD IP or shared secret doesn’t match ISE entry.
- Device appears in ISE but no accounting / no Live Logs (ports/ACLs/firewall issues).
- Multiple devices with inconsistent naming and secrets — hard to manage at scale.
- WLCs misconfigured for WebAuth/EAP resulting in guest or 802.1X failures.
You’ll learn how to avoid those mistakes with a reproducible lab workflow and validation checklist.
Solution Overview
Step-by-step process covered here:
- Design naming & grouping convention for NADs.
- Add NADs in ISE (Administration → Network Resources → Network Devices).
- Configure shared secrets, RADIUS ports and device profiles.
- Configure switches/WLCs to use ISE for authentication/accounting.
- Validate using ISE Live Logs, device CLI (show authentication sessions, test aaa), and simple packet/trace techniques.
We’ll provide exact GUI paths, CLI examples for Cisco IOS switches and common WLCs, and the validation commands you must run.
Sample Lab Topology
Lab platform: VMware ESXi or EVE-NG
Components & example IPs
- ISE (PAN+PSN):
10.10.10.5 - Windows AD (optional):
10.10.10.10 - Catalyst switch (IOSv-L2):
10.10.10.2 - WLC (9800 or AireOS/virtual):
10.10.10.20 - Windows 10 client (wired) & Wi-Fi laptop
Topology Layout:
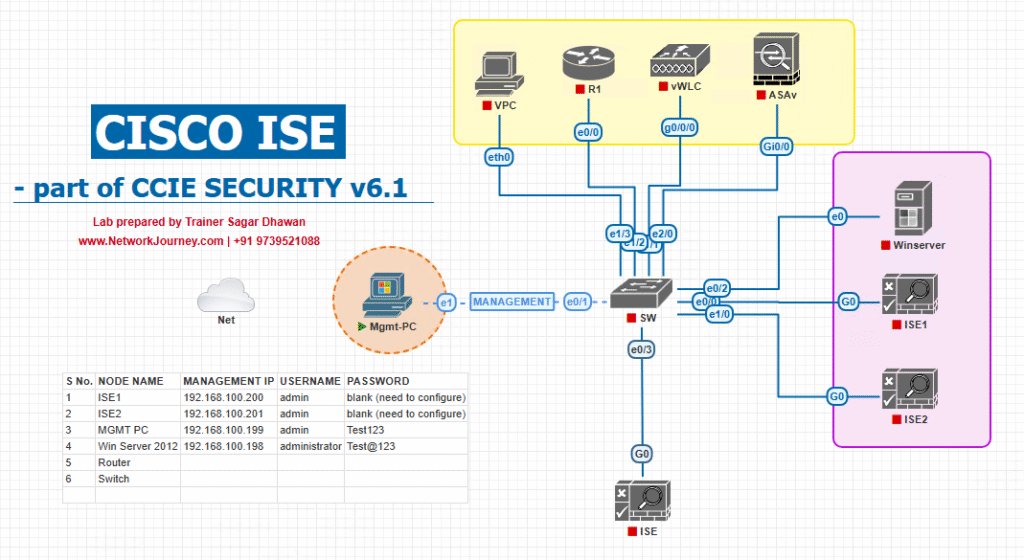
Notes: Put ISE and NADs on a management network or ensure routing/DNS/NTP is in place prior to testing.
Step-by-Step GUI Configuration Guide (with CLI snippets & validation)
Pre-checks (do these on ISE console first)
ise/admin# ping 10.10.10.2          # ping the switch
ise/admin# ping 10.10.10.20         # ping the WLC
ise/admin# nslookup switch.lab 10.10.10.10   # verify DNS if used
ise/admin# show application status ise
All pings should succeed and ISE services should be Running.
A — Best practices before adding devices
- Naming convention (example):
NAD-SW-<site>-<id>andNAD-WLC-<site>-<id>. - Shared secret policy: 20+ characters, mixed chars; record secrets in a vault.
- Device groups: Create groups in ISE for easier policy targeting (e.g.,
Switches-Edge,WLC-Core). - Ports: RADIUS auth = UDP 1812 (or 1645), accounting = UDP 1813 (or 1646). Use standard 1812/1813 unless legacy NAD requires otherwise.
B — Add a Catalyst Switch to ISE (GUI steps)
- Navigate:
Administration → Network Resources → Network Devices→ Add.
[Screenshot: ISE Add Network Device Screen]
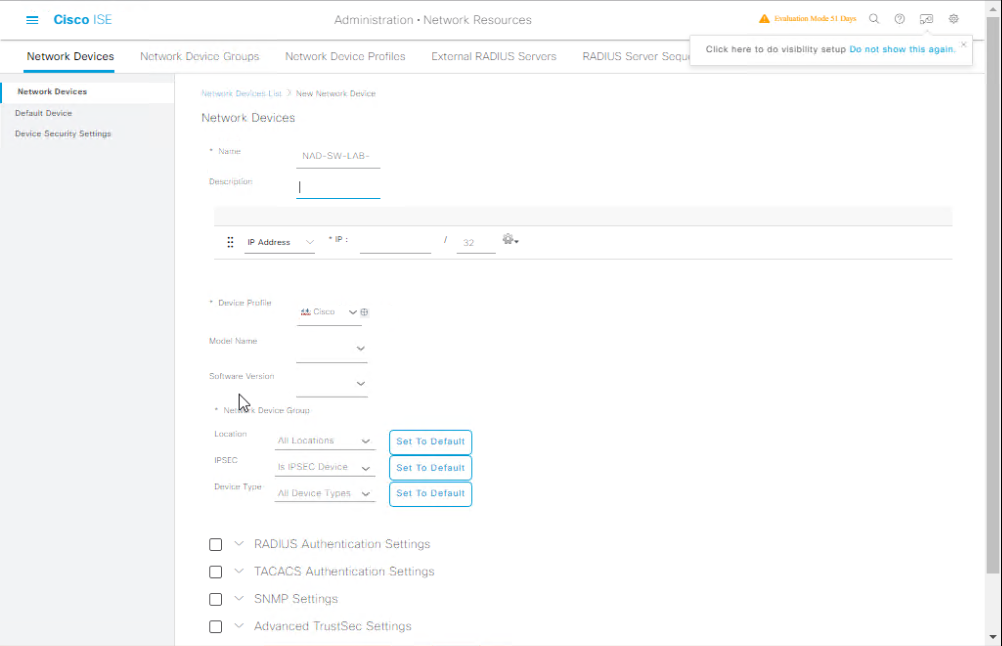
- Fill the form (example values):
- Name:
NAD-SW-Lab-01 - IP Address / Range:
10.10.10.2(or prefix/mask) - Device Type:
Switch(select vendor if available) - Location / Description:
Lab core switch - Shared Secret:
!My$ecureSecret2025!(enter & note) - Enabled Authentication Protocols: RADIUS (check)
- Radius Port: 1812 (default)
- Save.
[Screenshot: Fill Network Device Form — Shared Secret Field]
- Name:
- (Optional) Add SNMP credentials: SNMPv2/v3 under the device entry for profiling/monitoring.
ISE: Device Groups
- On the same page, add the device to a Device Group (
Switches-Lab) for policy scoping.
Validation in ISE (GUI)
- After Save, the device should appear in the list.
- Click the device to view details and confirm the shared secret is stored (ISE will not display the secret in cleartext after save — ensure you recorded it).
C — Configure the Switch (IOS) to use ISE (CLI)
Sample IOS configuration
conf t
! Define RADIUS server (IOSv / Catalyst)
radius server ISE
 address ipv4 10.10.10.5 auth-port 1812 acct-port 1813
 key !My$ecureSecret2025!

aaa new-model
aaa group server radius ISE-GROUP
 server name ISE
aaa authentication dot1x default group ISE-GROUP
aaa authorization network default group ISE-GROUP

dot1x system-auth-control

interface GigabitEthernet1/0/10
 switchport mode access
 switchport access vlan 10
 authentication port-control auto
 dot1x pae authenticator
 mab
 spanning-tree portfast
exit
Validation on switch (CLI):
show running-config | section radius
show aaa servers
show authentication sessions interface Gi1/0/10
show running-config | section radiusshould show theradius server ISEstanza.show authentication sessions ...should reflect session state after client connection (Auth/Unauth).
Trigger a test RADIUS request (if supported):
test aaa group radius ISE-GROUP username student01 password Cisc0@123 new-code
- Watch ISE Live Logs to confirm Access-Request / Access-Accept.
D — Add a WLC to ISE (GUI steps)
On ISE:
Administration → Network Resources → Network Devices → Add.- Name:
NAD-WLC-Lab-01 - IP:
10.10.10.20 - Device Type:
Wireless-LAN-Controlleror vendorCisco WLC - Shared Secret: same pattern as switches.
- Save.
[Screenshot: Add WLC in ISE]
- Name:

- Place WLC in device group
WLC-Lab.
Validation in ISE (GUI): device appears under Network Devices list.
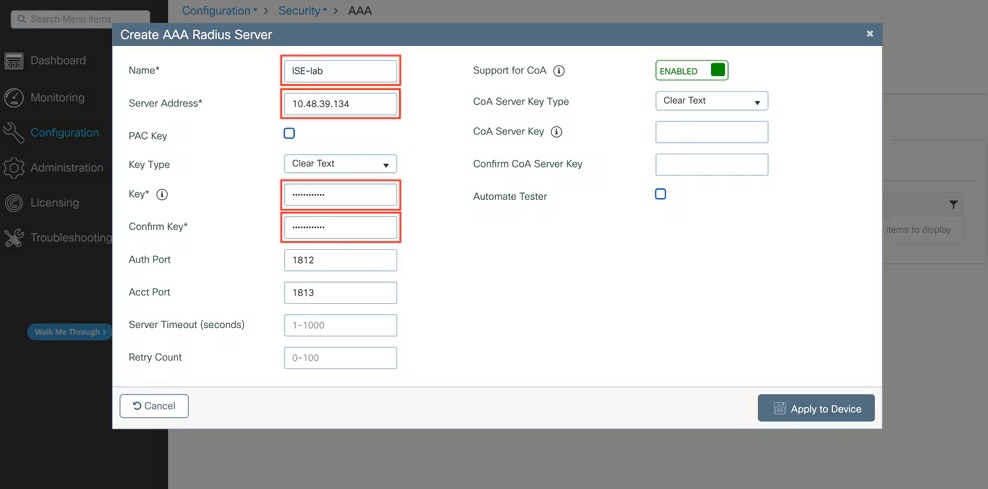
E — Configure WLC (GUI and CLI examples)
AireOS (5508 / 8.x) — GUI steps (recommended):
- WLC GUI → Security → AAA → RADIUS → Authentication → Add new server:
- IP:
10.10.10.5 - Key:
!My$ecureSecret2025! - Port: 1812
- IP:
- Also add Accounting same IP/secret under Accounting.
- On the WLAN profile, under Security > Layer 2, select WPA2/Enterprise, and set the Authentication Server to the RADIUS you added.
[Screenshot: WLC GUI RADIUS Add]
AireOS CLI example (sample)
config radius auth add 10.10.10.5 1812 !My$ecureSecret2025!
config radius acct add 10.10.10.5 1813 !My$ecureSecret2025!
config wlan security wpa akm 1 0 0  # example – set to 802.1X on GUI normally
(AireOS CLI syntax varies by code; prefer GUI for WLCs unless comfortable.)
Cisco 9800 (IOS-XE) sample CLI
config t
radius server ISE
 address ipv4 10.10.10.5 auth-port 1812 acct-port 1813
 key !My$ecureSecret2025!
aaa group server radius ISE-GROUP
 server name ISE
!
wlan lab-wlan
  auth open
  authentication server-group ISE-GROUP
  encryption gce aes
Validation on WLC:
- For AireOS:
show radius summary/show radius statswill show reachability. - For 9800:
show radius servers/show wlan summaryetc.
Trigger test: Connect a wireless client to the SSID and watch ISE Live Logs for authentication attempts.
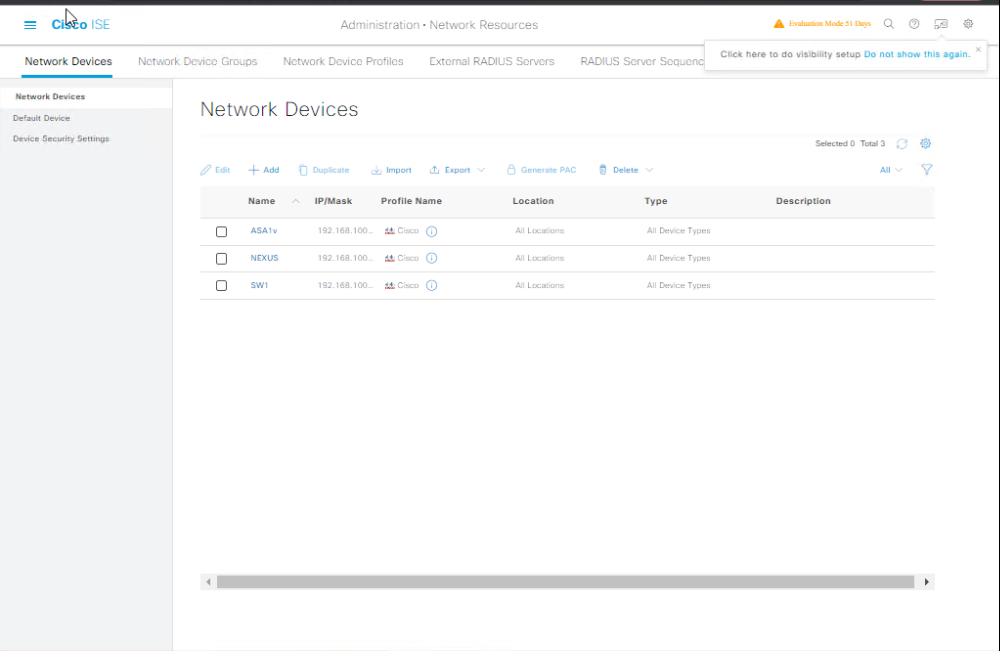
F — Validation Steps (ISE GUI + CLI + device)
- Immediate ISE GUI check:
Administration → Network Resources → Network Devices→ Ensure NAD is listed with correct IP and device group.- [Screenshot: Network Devices List with newly added NAD]
- Test basic connectivity: from ISE console:
ise/admin# ping 10.10.10.2    # switch
ise/admin# ping 10.10.10.20   # WLC
- Trigger an authentication on the NAD (connect a client or run
test aaaon switch). Then on ISE GUI:Operations → RADIUS → Live Logs— filter by NAD IP or username. You should see Access-Request → Access-Accept/Reject.
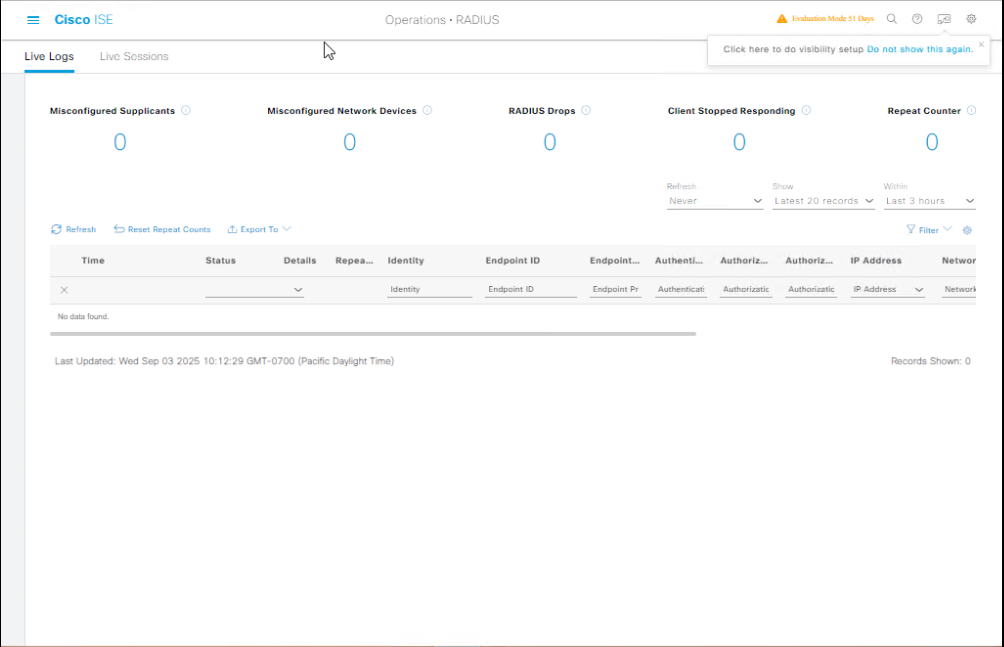
- [Screenshot: ISE Live Logs showing an Access-Request from NAD-SW-Lab-01]
- Check switch session:
show authentication sessions interface Gi1/0/10
Expect AUTHZ/AUTHORIZED and assigned VLAN or dACL.
- If Accounting enabled, verify in ISE:
Operations → RADIUS → Live Logs– accounting records should appear. - If issues, capture a packet trace on NAD management interface or use
tcpdumpon ISE (lab only):
# On ISE (if allowed in your lab)
ise/admin# tcpdump -i eth0 port 1812 or port 1813 -w /tmp/radius.pcap
Open pcap in Wireshark, filter udp.port==1812.
Important: avoid tcpdump in production unless authorized.
FAQs
Q1: What is the minimum information required to add a network device in Cisco ISE?
A: At a minimum, you need:
- Name (descriptive label for the device)
- IP Address (or subnet range for multiple devices)
- Device Type (optional but useful for categorization)
- RADIUS Shared Secret (must match on the network device)
- SNMP settings (optional, for profiling and CoA)
Validation: After adding, use CLI on the device to test RADIUS connectivity withtest aaa group radius.
Q2: What happens if the shared secret between ISE and the switch/WLC does not match?
A: Authentication will fail, and logs in Operations > RADIUS Live Logs will show Invalid shared secret.
CLI validation: On the network device, run debug radius authentication to confirm mismatches.
Q3: How do I handle a network with multiple IP addresses for a device?
A: You can add multiple IP addresses by:
- Using a subnet definition in ISE (e.g.,
192.168.10.0/24) - Or creating separate device entries for each IP if different secrets are used.
Tip: Keep shared secrets consistent for ease of management.
Q4: Can I bulk-import network devices into Cisco ISE?
A: Yes.
- Navigate to Administration > Network Resources > Network Devices
- Use Export, fill in the CSV with required columns, then Import.
Validation: After import, pick a random device and run a RADIUS test.
Q5: What device types should I define for better policy control?
A: Common types include:
- Switch (Access Switch, Distribution Switch)
- WLC (Wireless LAN Controller)
- VPN Gateway (ASA, Firepower)
These allow you to create condition-based policy rules targeting specific device types.
Q6: How do I verify that a newly added network device is communicating with ISE?
A:
- Attempt an 802.1X or MAB authentication from a client connected to the device.
- Check Operations > RADIUS Live Logs for authentication entries from the device’s IP.
CLI validation: On the device, useshow radiusorshow authentication sessions.
Q7: Is SNMP mandatory when adding a network device to ISE?
A: No, SNMP is optional, but it’s highly recommended for profiling and device discovery. Without SNMP, profiling will rely on other methods like DHCP or HTTP probes.
Q8: How should I set up network device groups (NDGs)?
A: Organize NDGs based on:
- Location (e.g., HQ, Branch1, Branch2)
- Device Type (Switch, WLC, VPN)
- Function (Access, Core, Edge)
Validation: When creating policies, use NDGs as conditions to avoid manual device selection.
Q9: What is the recommended RADIUS timeout for network devices connecting to ISE?
A: Typically 5 seconds with 3 retries.
For wireless deployments, a lower timeout (e.g., 2 seconds) can help speed up reauthentication, but avoid too low to prevent false failures.
Q10: How can I troubleshoot if a device fails to authenticate with ISE after being added?
A:
- Confirm IP and shared secret match
- Check the device’s RADIUS configuration (
show run | i radius) - Ensure the device’s IP is not behind NAT
- Review ISE Live Logs for error messages
CLI check on switch/WLC:
test aaa group radius <username> <password> new-code
debug radius authentication
YouTube Link
For more in-depth Cisco ISE Mastery Training, subscribe to my YouTube channel Network Journey and join my instructor-led classes for hands-on, real-world ISE experience
Closing Notes (Key takeaways)
- Add NADs in ISE using the NAD’s RADIUS source IP and a strong shared secret.
- Keep a consistent naming and grouping scheme to simplify policy targeting.
- Validate immediately with Switch/WLC CLI tests and ISE Live Logs — the GUI Live Logs are the fastest indicator that RADIUS traffic arrived and how ISE evaluated it.
- For scale, automate NAD provisioning via ISE APIs — manual entry does not scale.
- Always record secrets and plan for rotation; never embed secrets in public training material.
Fast-Track to Cisco ISE Mastery Pro
For more in-depth Cisco ISE Mastery Training, subscribe to my YouTube channel Network Journey and join my instructor-led classes.
Want to go from lab practice to CCIE-level mastery? I run a focused 4-month instructor-led CCIE Security & ISE Mastery program: live weekly labs in VMware ESXi / EVE-NG, graded homework, 1:1 doubt sessions, and a full CCIE Security syllabus (ISE deep dives, Firepower, VPN, advanced troubleshooting). Seats are limited to keep batches hands-on.
Join the training here and take your first step towards becoming a CCIE Security expert.
https://course.networkjourney.com/ccie-security/
Enroll Now & Future‑Proof Your Career
Email: info@networkjourney.com
WhatsApp / Call: +91 97395 21088
![[Day 43] Cisco ISE Mastery Training: Wireless MAB Authentication](https://networkjourney.com/wp-content/uploads/2025/08/Day-43-Cisco-ISE-Mastery-Training-Wireless-MAB-Authentication.png)
![[Day 6] Cisco ISE Mastery Training: Initial Setup Wizard & GUI Tour](https://networkjourney.com/wp-content/uploads/2025/08/Day-6-Cisco-ISE-Mastery-Training-Initial-Setup-Wizard-GUI-Tour.png)
![[Day 15] Cisco ISE Mastery Training: Validating RADIUS & TACACS+ Connectivity](https://networkjourney.com/wp-content/uploads/2025/08/Day-15-Cisco-ISE-Mastery-Training-Validating-RADIUS-TACACS-Connectivity.png)