Trainer Sagar Dhawan
- Posted on
[Day 102] Cisco ISE Mastery Training: Load Balancing with F5 / Citrix ADC
Table of Contents
Introduction
Load balancing in Cisco ISE is not just about distributing authentication requests—it’s about ensuring scalability, fault-tolerance, and seamless user experience across a complex enterprise network. As deployments scale from a few thousand endpoints to hundreds of thousands of daily authentications, the traditional direct-to-node access method becomes a bottleneck. This is where enterprise-grade load balancers like F5 BIG-IP and Citrix ADC (formerly NetScaler) enter the picture.
In large-scale or mission-critical environments, ISE must handle:
- Millions of RADIUS transactions per day without packet drops.
- High-availability (HA) across PSNs so that endpoint authentications never fail during upgrades or outages.
- Session stickiness (persistence) to preserve RADIUS stateful transactions.
- TLS offloading for HTTPS Admin/Guest portals for performance optimization.
By integrating Cisco ISE with F5 or Citrix ADC, engineers can design a resilient distributed ISE fabric that ensures:
- 24×7 availability of authentication services (WLC, switches, VPNs).
- Predictable performance across all nodes in the cluster.
- Scalable guest portals, BYOD onboarding, and pxGrid services without impacting end-user experience.
This training will walk you step-by-step through configuring, validating, and troubleshooting ISE load balancing—both on the GUI and CLI. By the end of this masterclass workbook, you’ll be able to design and deploy an enterprise-ready ISE + F5/Citrix load-balancing architecture that meets real-world production requirements.p.
Problem Statement (What Breaks Without Proper LB)
Typical symptoms without a correct LB design:
- EAP drops during re-auth/roaming (persistence missing/wrong).
- Guest/BYOD portals loop after redirect (no cross-service stickiness between RADIUS & HTTP).
- Hot PSN while others idle (mis-weighted pools).
- CoA/accounting inconsistencies (auth and accounting land on different PSNs).
- False “ISE down” alarms (UDP health checks not actually proving RADIUS is alive).
Your goal: RADIUS-aware, PSN-aware LB with proper persistence + monitors + drain/maintenance patterns.
Solution Overview (How We Fix It)
- Separate VIPs per service class:
- RADIUS Auth (UDP/1812)
- RADIUS Accounting (UDP/1813)
- Web Portals (TCP/443 and/or 8443 for Guest/BYOD/Sponsor/MyDevices)
- (Optional) TACACS+ (TCP/49) if using ISE Device Admin
- Persistence:
- RADIUS: Calling-Station-ID (or Framed-IP-Address); match across services to portals.
- Portals (HTTPS): Source IP or Cookie (keep-alive on same PSN).
- Monitors:
- Real RADIUS monitor (Access-Request probe with shared secret) – not just UDP ping.
- HTTPS: L7 GET to known portal path.
- Operational controls: graceful drain, weighting, and maintenance windows.
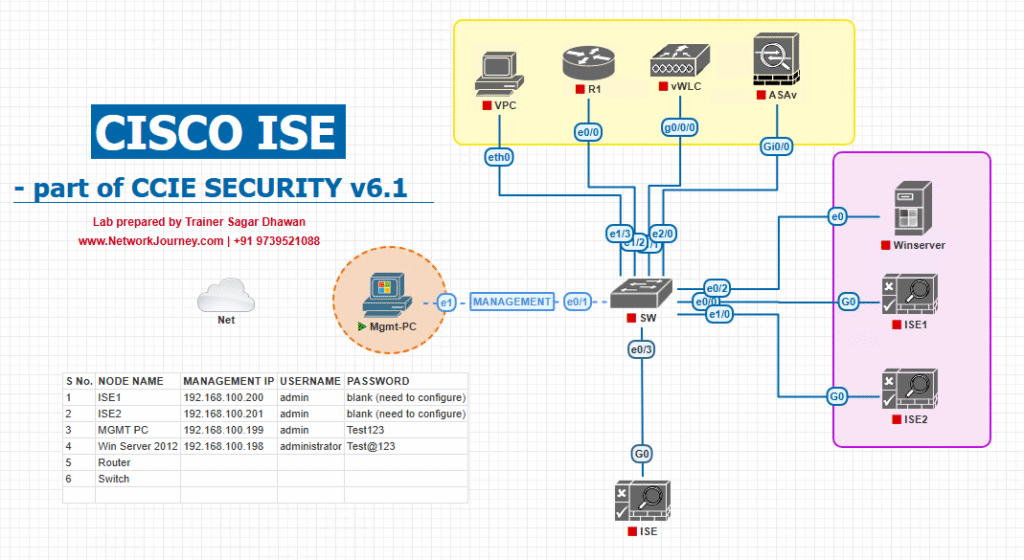
Sample Lab Topology (VMware/EVE-NG)
Compute / Services
- ISE: PSN1/PSN2/PSN3/PSN4, PAN, MnT
- F5 BIG-IP (vCMP or VE) and/or Citrix ADC
- Catalyst 9300 (wired), WLC 9800 (wireless)
- AD/PKI, DHCP/DNS, NGFW (pxGrid consumer)
- Endpoints: Win11 (dot1x EAP-TLS), iOS/Android (CWA/BYOD), IoT (MAB)
Topology diagram:]
Key note: Configure NADs (Switch/WLC/VPN) to use the RADIUS VIP(s); ISE Network Devices must align with LB design (see Step 0).
Step-by-Step GUI Configuration Guide
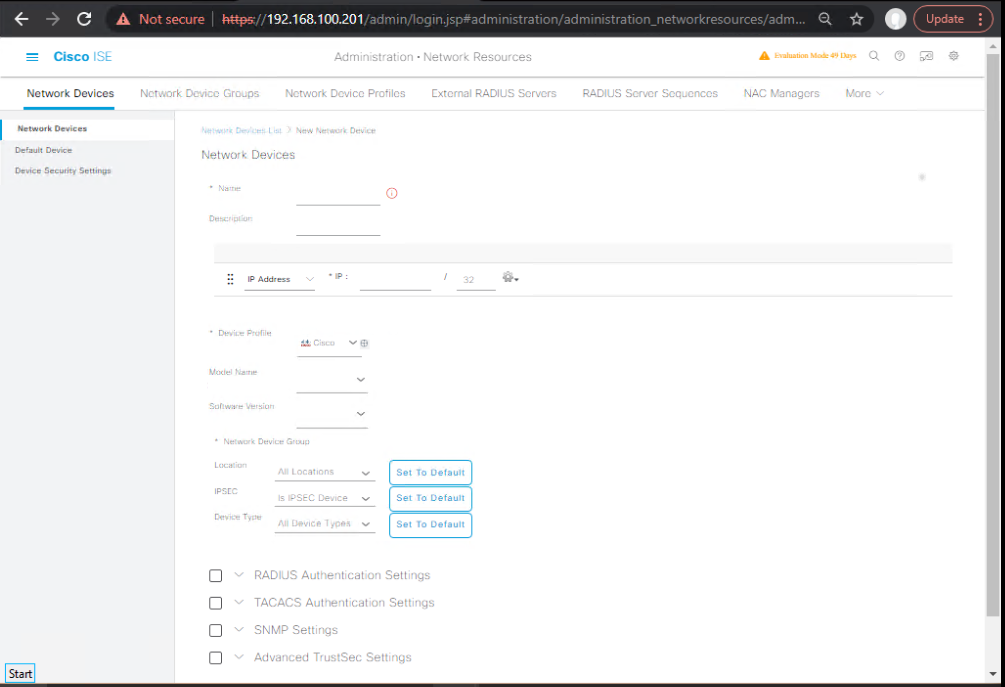
Step 0 — ISE & NAD Pre-Checks (Must-Do Before LB)
ISE GUI
- Administration → Network Resources → Network Devices
- Create each NAD with its IP, SNMP (optional), and RADIUS shared secret.
- If your LB will SNAT (source NAT) RADIUS to PSNs, either:
- create a Network Device entry for the VIP IP with the shared secret, and configure NADs to set
NAS-IP-Addressto their real IP; or - avoid SNAT so PSNs see the real NAD IP (recommended).
- create a Network Device entry for the VIP IP with the shared secret, and configure NADs to set
NAD CLI (Catalyst/WLC)
# Catalyst (example)
show run | sec aaa|radius
show radius statistics
# WLC 9800
show radius summary
Pass: NADs point to VIP, secrets match; RADIUS counters increment.
Fail: “Invalid client” in ISE radius logs → fix Network Device entries / SNAT plan.
F5 BIG-IP — RADIUS (1812/1813) VIPs
Step F5-1: Create PSN Pool(s)
GUI: Local Traffic → Pools → Create
- Name:
pool_ise_radius_auth| Members:psn1:1812,psn2:1812, … - Name:
pool_ise_radius_acct| Members:psn1:1813,psn2:1813, … - Load Balancing: Least Connections (Member) or Round Robin (start simple)
Validation (F5 CLI):
tmsh list ltm pool pool_ise_radius_auth members
tmsh show ltm pool pool_ise_radius_auth
Step F5-2: Build RADIUS Monitor (real Access-Request)
GUI: Local Traffic → Monitors → Create
- Type: RADIUS
- Shared Secret: (monitor secret; must exist as NAD on ISE if probe’s source is F5 self IP)
- Username:
monitor(dummy) - Response: expect
Access-Reject(works as “up signal”) - Assign to both pools.
Validation: Pool members go green only when RADIUS actually replies.
Step F5-3: Create Virtual Servers (VIPs)
GUI: Local Traffic → Virtual Servers → Create
vs_ise_radius_auth- Destination:
VIP_AUTH_IP:1812 - Protocol: UDP
- Source Address Translation: None (preferred) or Auto Map (SNAT)
- Default Pool:
pool_ise_radius_auth - Persistence:
- Create Universal Persistence profile keyed on Calling-Station-ID (RADIUS AVP 31) or Framed-IP-Address (AVP 8).
- Enable Match Across Services (so accounting & web portal stick to same PSN).
- Destination:
vs_ise_radius_acctVIP_ACCT_IP:1813, same profiles, Default Poolpool_ise_radius_acct.
F5 iRule (optional) — persist on Calling-Station-ID
when CLIENT_ACCEPTED {
    # RADIUS is UDP; we inspect first packet
}
when LB_SELECTED {
    # Use persistence across services by table key "csid"
}
(In practice you can use F5’s RADIUS persistence profile or Universal iRule that extracts AVP 31.)
Validation (NAD + ISE):
- NAD CLI:
show radius statisticsincreases on attempts. - ISE GUI: Operations → RADIUS → Live Logs → Matched PSN = one of pool members.
- F5 CLI:
tmsh show ltm virtual vs_ise_radius_auth→ connection stats.
F5 BIG-IP — HTTPS Portal VIP (443/8443)
Step F5-4: PSN Web Pool & Monitor
Pool: pool_ise_https → Members: psn1:443, psn2:443
Monitor: HTTPS with send string GET /portal/ or /guestportal/ and expect 200/302.
Step F5-5: HTTPS VIP with Cross-Service Stickiness
Virtual: vs_ise_https_portal → VIP_WEB_IP:443
- Client SSL Profile: LB does not terminate TLS for EAP; for portals, you may pass-through or terminate (commonly pass-through so PSN cert is seen by clients).
- Persistence: Source Address and enable Match Across Services so web flows follow the same PSN as RADIUS.
Validation:
- Connect a client to Guest/BYOD redirect; ensure the same PSN handles both the RADIUS auth and the web portal (Live Logs + PSN access logs).
- ISE Live Logs → Authorization Result shows CWA redirect; after login, same PSN completes authz.
F5 BIG-IP — Drain Mode & Maintenance
Step F5-6: Drain a PSN Gracefully
GUI: Pool → Member → Disable (Drain)
- Existing sessions continue; new ones avoid this member.
Validation:
tmsh show ltm pool pool_ise_radius_auth members→ Disabled (Forced Offline/Disabled) state noted.- ISE Live Logs continue on other PSNs; no spikes in failure.
Citrix ADC (NetScaler) — RADIUS (1812/1813) VIPs
Step NS-1: Add Servers & Services
GUI: Traffic Management → Servers → Add psn1, psn2, …
Services: Add service per PSN/port
svc_psn1_rad_auth(UDP/1812),svc_psn1_rad_acct(UDP/1813), etc.
CLI:
add server psn1 10.10.10.11
add service svc_psn1_rad_auth psn1 UDP 1812
add service svc_psn1_rad_acct psn1 UDP 1813
Step NS-2: Monitors (RADIUS Real Probe)
GUI: System → Monitors → Add → Type: RADIUS
- Key: Shared secret; Username:
monitor - Bind to RADIUS services.
CLI:
add lb monitor mon_rad RADIUS -RadKey <secret> -username monitor
bind service svc_psn1_rad_auth -monitorName mon_rad
Step NS-3: Load-Balancing vServers (VIPs)
GUI: Traffic Management → LB Virtual Servers → Add
lbvserver vsvr_ise_rad_auth(Protocol: UDP, Port 1812)- Bind RADIUS Auth services.
- Persistence: SRCIP (or CallId RADIUS persistence if licensed/available).
- Service Group weights = even or tailored.
- Repeat for
vsvr_ise_rad_acct(1813).
CLI:
add lb vserver vsvr_ise_rad_auth UDP <VIP_AUTH_IP> 1812
bind lb vserver vsvr_ise_rad_auth svc_psn1_rad_auth
set lb vserver vsvr_ise_rad_auth -persistenceType SOURCEIP -timeout 30
Step NS-4: HTTPS Portal VIP
Services: svc_psn1_https (TCP/443) with HTTP-ECV/HTTPS-ECV monitor to /portal/
vServer: vsvr_ise_https (TCP/443), persistence SOURCEIP
- Link Persistence Across Services: Use Persistence Groups so RADIUS + HTTPS stay on same PSN.
CLI (example):
add service svc_psn1_https psn1 TCP 443
add lb vserver vsvr_ise_https SSL <VIP_WEB_IP> 443
bind lb vserver vsvr_ise_https svc_psn1_https
set lb vserver vsvr_ise_https -persistenceType SOURCEIP -timeout 30
Step NS-5: Drain / Disable for Maintenance
GUI: Services → Select member → Disable (Graceful).
CLI:
disable service svc_psn1_rad_auth
Validation: Active sessions finish; new ones avoid disabled member.
ISE & NAD — Post-LB Validation Matrix
A) Wired 802.1X (EAP-TLS)
- GUI: ISE → Operations → RADIUS Live Logs → Matched Rule, Selected PSN, Elapsed Time
- Switch CLI:
show authentication sessions interface Gi1/0/10 details
show radius statistics
Pass: Auth success; same PSN serves reauths; latency stable.
B) Wireless CWA (Guest/BYOD)
- WLC:
show wlan <id>
show client detail <mac>
- ISE Live Logs: CWA redirect then final permit; Web VIP shows hits on same PSN.
Pass: No redirect loops; portal page loads quickly.
C) Accounting Stickiness
- ISE Live Logs → Accounting tab → same PSN as Auth.
- LB stats show Match Across Services working.
D) PSN Failure Test
- Drain one PSN → simulate failure → ensure zero auth drops, even distribution across survivors.
E) RADIUS Monitor Proof
- Temporarily block RADIUS on PSN → LB marks DOWN within monitor interval, routes away.
Step-by-Step Configuration & Validation
Step 1 – Prepare Cisco ISE Nodes for Load Balancer Integration
- Ensure you have multiple Policy Service Nodes (PSNs) already installed and joined to the ISE cluster.
- Each PSN should be licensed and assigned the Policy Service role.
CLI Validation on PSN
ise/admin# show application status ise
ise/admin# show run
ise/admin# show ip interface brief
Confirm that RADIUS (UDP/1812,1813) and HTTPS (TCP/443) services are active.
Step 2 – Configure F5 BIG-IP for RADIUS (PSN VIP Setup)
On F5 GUI
- Create a Node Pool for ISE PSNs
- Navigate: Local Traffic > Pools > Pool List > CreatePool Name:
ISE_PSN_RADIUSHealth Monitor:RADIUS(or custom with UDP 1812 check).Add members (ISE PSN1, PSN2 IPs).
- Navigate: Local Traffic > Pools > Pool List > CreatePool Name:
- Create Virtual Server (VIP)
- Navigate: Local Traffic > Virtual Servers > CreateName:
ISE_RADIUS_VIPDestination IP:10.10.10.100(VIP to be used by switches/WLCs).Service Port:1812.Default Pool:ISE_PSN_RADIUS.Persistence Profile: Source IP Persistence (important for RADIUS stickiness).
- Navigate: Local Traffic > Virtual Servers > CreateName:
- Repeat for Accounting (UDP/1813) if required.
CLI Validation on F5
tmsh show ltm pool ISE_PSN_RADIUS members
tmsh show ltm virtual ISE_RADIUS_VIP
Confirm pool members are up.
Step 3 – Configure Cisco Switch/WLC to Point to VIP
CLI on Cisco Switch
radius-server host 10.10.10.100 auth-port 1812 acct-port 1813 key MySecret
aaa new-model
aaa authentication dot1x default group radius
aaa accounting update periodic 5
aaa accounting exec default start-stop group radius
Validation on Switch CLI
show aaa servers
test aaa group radius USERNAME PASSWORD legacy
Ensure the VIP responds, and the test succeeds.
Step 4 – Configure HTTPS Load Balancing (Guest Portal)
On F5 GUI
- Create Pool for HTTPS PSNs
- Pool Name:
ISE_HTTPS_POOL. - Health Monitor: HTTPS.
- Add PSN1, PSN2 IPs.
- Pool Name:
- Create HTTPS VIP
- VIP IP:
10.10.20.100. - Port:
443. - Persistence: Cookie Persistence.
- VIP IP:
- SSL Offload (Optional)
- Import certificates (same as ISE).
- Enable client SSL profile if offloading.
Validation
tmsh show ltm pool ISE_HTTPS_POOL
tmsh show ltm virtual ISE_HTTPS_VIP
From client browser → access: https://10.10.20.100/guestportal → confirm redirect to correct ISE portal.
Step 5 – Configure Citrix ADC (NetScaler) for RADIUS
On Citrix GUI
- Create Server Objects
- Add ISE PSN1 & PSN2 as servers.
- Create Load Balancing Service Group
- Service Type:
RADIUS. - Add PSNs as members.
- Service Type:
- Create Virtual Server (VIP)
- VIP IP:
10.10.30.100. - Bind Service Group.
- Persistence: Source IP.
- VIP IP:
CLI Validation on Citrix
> show serviceGroup ISE_RADIUS_SG
> show lb vserver ISE_RADIUS_VIP
Step 6 – GUI Validation in ISE
- Navigate: Administration > System > Deployment
- Verify that both PSNs show Active.
- Navigate: Operations > RADIUS > Live Logs
- Authenticate a test user.
- Verify traffic is balanced across PSNs.
Step 7 – CLI Validation on ISE
Run on each PSN:
ise/admin# show logging application radius.log tail
ise/admin# show logging application ise-psc.log tail
Check that authentications are processed by both PSNs.
Final Checklist
- RADIUS VIP reachable from network devices.
- HTTPS VIP reachable from clients.
- Persistence correctly configured (Source-IP for RADIUS, Cookie for HTTPS).
- Health Monitors correctly reflect PSN availability.
- Logs show balanced authentication across nodes.
CLI Pack:
ISE (any node):
show application status ise
show logging application ise-radius.log tail
show logging application | inc (radius|error|ad)
show cpu ; show memory ; show disk
Catalyst (wired)
show authentication sessions interface Gi1/0/10 details
show run | sec aaa|radius
show radius statistics
WLC 9800 (wireless)
show radius summary
show client detail <mac>
show wlan <id>
F5 BIG-IP
tmsh show ltm virtual
tmsh show ltm pool pool_ise_radius_auth
tmsh list ltm monitor radius
tmsh modify ltm pool pool_ise_radius_auth members modify { 10.10.10.11:1812 { session user-disabled } }  ;# drain example
Citrix ADC
show lb vserver vsvr_ise_rad_auth
show servicegrp
disable service svc_psn1_rad_auth
show ns runningconfig | grep -i persist
Expert-Level Use Cases
- Cross-Service Stickiness Map (RADIUS→HTTPS)
- On F5, enable Match Across Services; on ADC, use Persistence Groups.
- Ensures a device that authenticated via RADIUS hits the same PSN for CWA/BYOD portal, eliminating loops.
- Blue-Green PSN Upgrades
- Split pool into Blue (PSN1/2) & Green (PSN3/4).
- Drain/upgrade Green; swing VIP weights → Green primary; drain/upgrade Blue. Zero downtime.
- Weighted Distribution for Burst Sites
- Campuses with heavy shift changes get higher member weight.
- Validate: LB per-member stats + ISE Live Logs latency.
- RADIUS-Aware Health with Synthetic Users
- Create dedicated monitor user and NAD entry for LB monitors.
- Monitor expects Reject (healthy path). Reduces false positives.
- Dual-Site GSLB for PSN VIPs
- Site A/B VIPs, GSLB proximity policy.
- WAN cut? Clients stick to local site. Validate failover by simulated DC outage.
- Accounting Correlation Integrity
- Same persistence key across Auth & Accounting VIPs + Match Across Services.
- SIEM gets clean Start/Stop pairs from same PSN.
- IoT/MAB Affinity Windows
- Increase persistence timeout for MAB-only devices to minimize churn.
- Long-lived sessions reduce CoA storms.
- Portal TLS Offload with PSN Re-encrypt (Advanced)
- If organizational policy demands LB TLS inspection, use client SSL terminate + server SSL re-encrypt with careful cookie persistence.
- Validate cert chain and HSTS behavior with posture agents.
- Selective SNAT for NATed Branches
- If branch NADs are NATed and cause device-lookup issues, enable SNAT on LB but configure ISE to use NAS-IP-Address attribute for lookup.
- Confirm by checking ISE Network Device match in Live Logs.
- Drain-Safe Time Windows (Roaming WLAN)
- Schedule drains outside roaming peaks; set connection-mirror/graceful disable.
- Monitor EAP failure rate and Elapsed Time histogram during action.
- TACACS+ Segregated VIP
- Dedicated TCP/49 VIP for device admin; separate persistence and monitors.
- Prevents infrastructure logins from competing with user AAA.
- Adaptive Health Escalation
- Tiered monitor: RADIUS monitor + fallback UDP + node CPU via SNMP.
- Member auto-disabled if RADIUS passes but CPU > 90% sustained.
FAQs – Cisco ISE Load Balancing with F5 / Citrix ADC
- Answer:
- Cisco ISE PSNs do not natively load balance RADIUS/HTTPS traffic.
- Without a load balancer, each NAD (switch, WLC, ASA, VPN) must be manually configured with multiple PSNs.
- A load balancer simplifies deployments → one VIP per service (RADIUS or HTTPS), ensuring high availability and distribution.
- Validation:
- On F5 CLI:
tmsh show ltm virtual ISE_RADIUS_VIP - On ISE: Operations > RADIUS > Live Logs → verify authentications are coming via the VIP.
- On F5 CLI:
FAQ 2. Which persistence (stickiness) method should I use — Source IP or Cookie?
- Answer:
- RADIUS: Use Source IP Persistence, because NADs (switches, WLCs) always use the same source IP for authentication.
- HTTPS Portals: Use Cookie Persistence, since client browsers rely on session stickiness.
- Validation:
- F5 GUI → Virtual Server → Persistence Profile tab.
- Perform test authentication and ensure sessions always return to the same PSN.
FAQ 3. What ports must be load-balanced for ISE services?
- Answer:
- RADIUS: UDP 1812 (Authentication), 1813 (Accounting).
- TACACS+ (if used): TCP 49.
- HTTPS: TCP 443 (Guest/BYOD/Sponsor portals).
- Validation:
- On F5 CLI:
tmsh list ltm virtual ISE_RADIUS_VIP tmsh list ltm virtual ISE_HTTPS_VIP
- On F5 CLI:
FAQ 4. How do I configure health checks for PSNs in F5/Citrix?
- Answer:
- F5: Use RADIUS health monitor for UDP/1812 and HTTPS monitor for TCP/443.
- Citrix: Use RADIUS health check with authentication request OR simple UDP probe.
- Validation:
- F5 CLI:
tmsh show ltm pool ISE_PSN_RADIUS members - Healthy PSN =
up.
- F5 CLI:
FAQ 5. What happens if one PSN fails — will VIP continue working?
- Answer:
- Yes, the Load Balancer marks the failed PSN as down and routes all traffic to available PSNs.
- Validation:
- Shut down RADIUS on PSN:
ise/admin# application stop ise - Check F5 Pool Status → failed node marked
down.
- Shut down RADIUS on PSN:
FAQ 6. Can I use load balancers for ISE PAN/MnT nodes as well?
- Answer:
- No for PAN (Primary Administration Node).
- Yes for MnT (Monitoring & Troubleshooting nodes) → you can use load balancer for syslog ingestion.
- Validation:
- On ISE GUI: Administration > System > Deployment → confirm PAN is not behind VIP.
FAQ 7. What SSL certificates do I need for HTTPS VIP?
- Answer:
- You must install the same wildcard/multi-SAN certificate on both ISE PSNs and F5/Citrix VIP.
- If SSL Offload is enabled → LB terminates SSL and re-encrypts to backend.
- Validation:
- Open Guest Portal via VIP → check browser SSL → CN must match VIP FQDN.
FAQ 8. Can I do GSLB (Global Server Load Balancing) for multi-site ISE?
- Answer:
- Yes, using F5 GTM or Citrix GSLB to distribute traffic across multiple data centers.
- Common use case: large enterprise with ISE PSNs in Americas + EMEA + APAC.
- Validation:
- Use
nslookupordigagainst VIP FQDN → verify DNS response changes per location.
- Use
FAQ 9. How can I test RADIUS VIP functionality without waiting for real clients?
- Answer:
- On NAD (switch/router):
test aaa group radius USERNAME PASSWORD legacy - On Linux:
radtest USERNAME PASSWORD 10.10.10.100 1812 testing123
- On NAD (switch/router):
- Validation:
- Check ISE Live Logs → test authentication should appear via VIP.
FAQ 10. What are common troubleshooting steps if VIP is not working?
- Answer:
- Check that VIP is reachable via ping.
- Verify LB persistence (Source-IP or Cookie).
- Confirm health monitors show PSNs as
up. - Check ISE logs for RADIUS or HTTPS service errors.
- CLI Validation:
- On F5:
tmsh show ltm virtual ISE_RADIUS_VIP - On ISE:
show logging application radius.log tail show logging application ise-psc.log tail
- On F5:
YouTube Link
For more in-depth Cisco ISE Mastery Training, subscribe to my YouTube channel Network Journey and join my instructor-led classes for hands-on, real-world ISE experience
Closing Notes (Key Takeaways)
- Two RADIUS VIPs (1812/1813) + one HTTPS VIP for portals.
- RADIUS persistence (Calling-Station-ID) + Match Across Services to HTTPS.
- Real RADIUS monitors (Access-Request) → true health.
- Drain/patch cycles without user impact.
- Validate per-PSN load, latency, and Live Logs every change window.
Upgrade Your Skills – Start Today
For more in-depth Cisco ISE Mastery Training, subscribe to my YouTube channel Network Journey and join my instructor-led classes.
Fast-Track to Cisco ISE Mastery Pro
- I run a focused 4-month instructor-led CCIE Security journey with full-stack ISE labs: multi-site PSN/LB, advanced policy sets, pxGrid/SGT, Guest/BYOD at scale, upgrades/DR, and production runbooks.
- Course outline & enrollment: https://course.networkjourney.com/ccie-security/
- Next step: Book a readiness call, get the Load-Balancer for ISE Checklist, and secure your seat.
Enroll Now & Future‑Proof Your Career
Email: info@networkjourney.com
WhatsApp / Call: +91 97395 21088