Trainer Sagar Dhawan
- Posted on
[Day 119] Cisco ISE Mastery Training: REST API Advanced – Automating Profiling
Table of Contents
Introduction
Profiling is how Cisco ISE fingerprints devices (IoT cameras, printers, IP phones, OT sensors, laptops) using probes (RADIUS, DHCP, CDP/LLDP, HTTP-UA, SNMP, NMAP, NetFlow, etc.). In large environments, manual tuning is too slow. REST/ERS + MNT APIs let you seed, enrich, re-profile, bulk-update, and govern endpoints programmatically, turning profiling from a black box into an automation pipeline tied to your CMDB/SIEM/ITSM.
Today you’ll:
- Enable & tune profiling probes.
- Build custom profiling policies & conditions (GUI).
- Stand up ERS/MNT APIs for endpoint automation.
- Write workflows to bulk-seed devices, override groups, kick reprofiling, and validate results.
- Add event-driven reactions (ANC/SGT/VLAN) when profile state changes.
Problem Statement
- Thousands of unmanaged/IoT devices appear with incomplete attributes.
- Profiling confidence is inconsistent across sites (switches/WLCs not uniformly configured).
- Helpdesk does manual endpoint group edits; drift grows; outages happen.
- Security requires provable, repeatable, audited actions when profiles change.
- Need integration with CMDB/ServiceNow/Splunk to unify “source of truth.”
Solution Overview
- Enable & standardize probes (Device Sensor on Cat9K, WLC telemetry; DHCP/HTTP/LLDP/CDP).
- Codify profiling logic via ISE Profiling Policies/Conditions (GUI).
- Automate with APIs:
- ERS (port 9060) to Create/Update endpoints, groups, ANC, bulk jobs.
- MNT/ERS read to pull profiling/endpoint state (or pxGrid if you use it).
- Trigger loops: When state changes (new MAC, profile change), Reprofile or ANC → enforce.
- Validate: Context Visibility, Live Logs, profiler logs, device CLI (auth sessions, device-sensor).
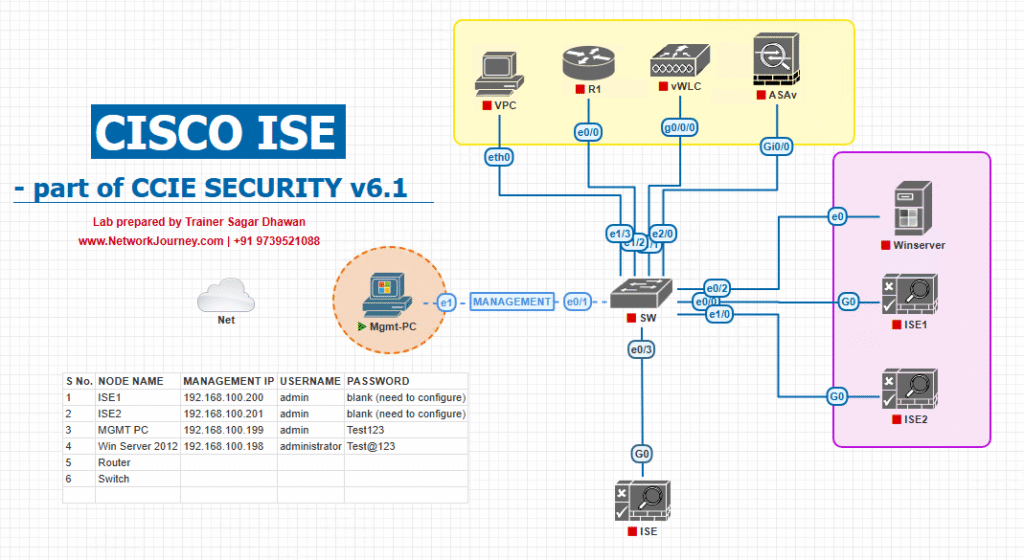
Sample Lab Topology
Platform: VMware (ISE PAN/MnT/PSN), EVE-NG (Cat9K, 9800-CL WLC), Win11 Admin VM.
Addresses:
- ISE PAN/MnT:
10.10.10.10(ERS/MNT/API, GUI) - ISE PSN:
10.10.10.11(RADIUS) - AD/CA/DHCP:
10.10.20.20(for auth + DHCP fingerprints) - Cat9300:
10.10.30.30(access) - 9800-CL WLC:
10.10.30.40(WLAN profiling) - Admin PC:
10.10.40.10(Postman/cURL/Python)
Personas & Groups:
- Endpoint Identity Groups:
IoT-Camera,IP-Phone,Printer,Medical-Device,BYOD-Unknown,Quarantine. - ERS API Admin user:
ers_admin(ERS enabled, strong creds). - AD groups (optional) for admin RBAC.
Step-by-Step GUI Configuration Guide (with CLI/API)
A) Enable Profiler Service & Probes in ISE
- Turn on Profiler
- GUI: Administration > System > Deployment > <PAN/PSN> > Edit
- ✔ Profiler Service Enable
- Save/Sync
- [ISE Node Edit – Profiler Service Enabled]
- GUI: Administration > System > Deployment > <PAN/PSN> > Edit
- Enable Probes
- GUI: Administration > System > Settings > Profiler > Probes
- ✔ RADIUS, DHCP, DHCP SPAN (if used), HTTP, SNMP Query/Trap (if used), DNS (optional), NMAP (optional)
- Save
- [Profiler Probes]
- GUI: Administration > System > Settings > Profiler > Probes
Validation (ISE CLI):
ise/admin# show application status ise   <-- ensure profiler processes are running
ise/admin# show logging application profiler.log tail
B) Configure Network Devices for Profiling (Switch & WLC)
On Catalyst 9300 (Device Sensor + MAB + Accounting):
conf t
aaa new-model
aaa authentication dot1x default group radius
aaa authorization network default group radius
aaa accounting update periodic 5
aaa accounting network default start-stop group radius

radius server ISE1
 address ipv4 10.10.10.11 auth-port 1812 acct-port 1813
 key <SharedKey>

ip device tracking               ! (if needed for IP-to-MAC visibility)
device-sensor accounting
device-sensor filter-list cdp list  all
device-sensor filter-list lldp list all
device-sensor filter-list dhcp list all
device-sensor notify all-changes

interface Gi1/0/10
 switchport mode access
 authentication port-control auto
 mab
 dot1x pae authenticator
 spanning-tree portfast
Validation (Switch CLI):
show authentication sessions interface gi1/0/10 details
show device-sensor cache interface gi1/0/10
show cdp neighbors detail
show lldp neighbors detail
Look for collected attributes (DHCP options, LLDP sysName, CDP Platform, etc.) and RADIUS Accounting updates.
On 9800-CL WLC (high-level):
- Ensure AAA to ISE and Client Profiling/Device Classification is on.
- Validation:
show wireless client mac <mac>→ check Device Type/OS/OUI and RADIUS accounting.
C) Create Endpoint Identity Groups (for automation targets)
- GUI: Administration > Identity Management > Groups > Endpoint Identity Groups > Add
IoT-Camera,IP-Phone,Printer,Medical-Device,BYOD-Unknown,Quarantine
- [Endpoint Identity Groups List]

Validation: Ensure Group names are visible (we’ll need UUIDs for ERS payloads).
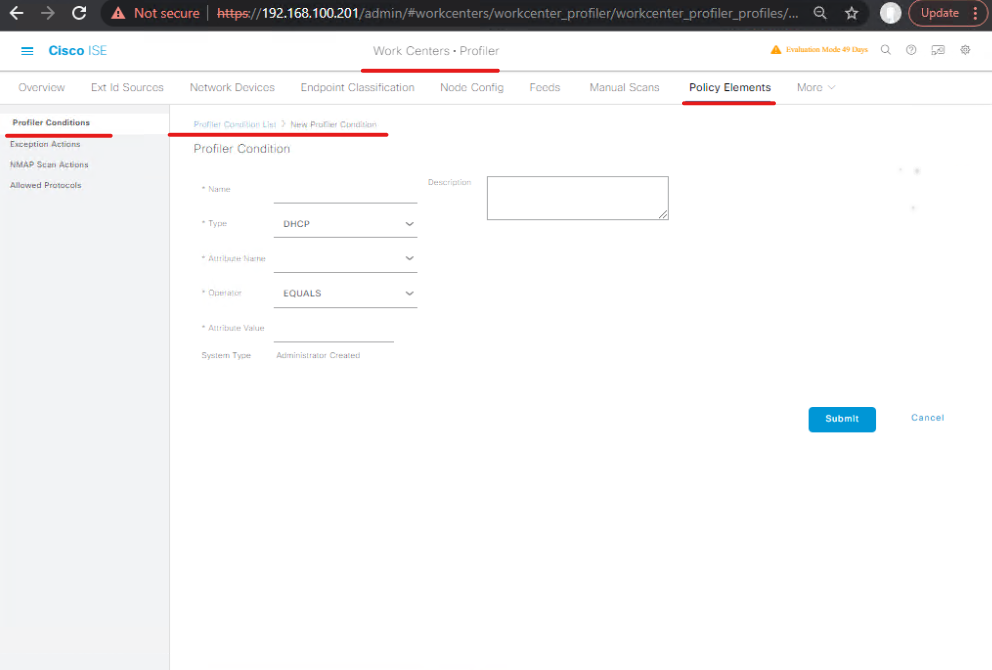
D) Build Custom Profiling Conditions & Policies (GUI)
- Custom Dictionary or Attribute Matches
- GUI: Work Centers > Profiler > Policy Elements > Conditions > Add
- Example Condition: HTTP User-Agent contains “Brother” OR LLDP System Description contains “Axis” OR DHCP Option 60 contains “IP-Phone”
- [Create Profiling Condition]
- GUI: Work Centers > Profiler > Policy Elements > Conditions > Add
- Profiling Policy
- GUI: Work Centers > Profiler > Policies > Add
- Name:
IoT-Camera-Axis - Rule:
LLDP:System Description CONTAINS "Axis"ORCDP:Platform CONTAINS "Axis" - Result: Profile =
Cisco-IP-Camera(or your custom profile)
- Name:
- Order appropriately (Top-down).
- [Profiling Policy Rule]
- GUI: Work Centers > Profiler > Policies > Add
Validation:
- Drop a test device on Gi1/0/10 (Axis camera or simulate attributes); reauth (see Section G).
- GUI: Context Visibility > Endpoints → Columns: Profile, Certainty Factor, Matched Conditions.
- [Endpoint Detail – Profiling Tab]
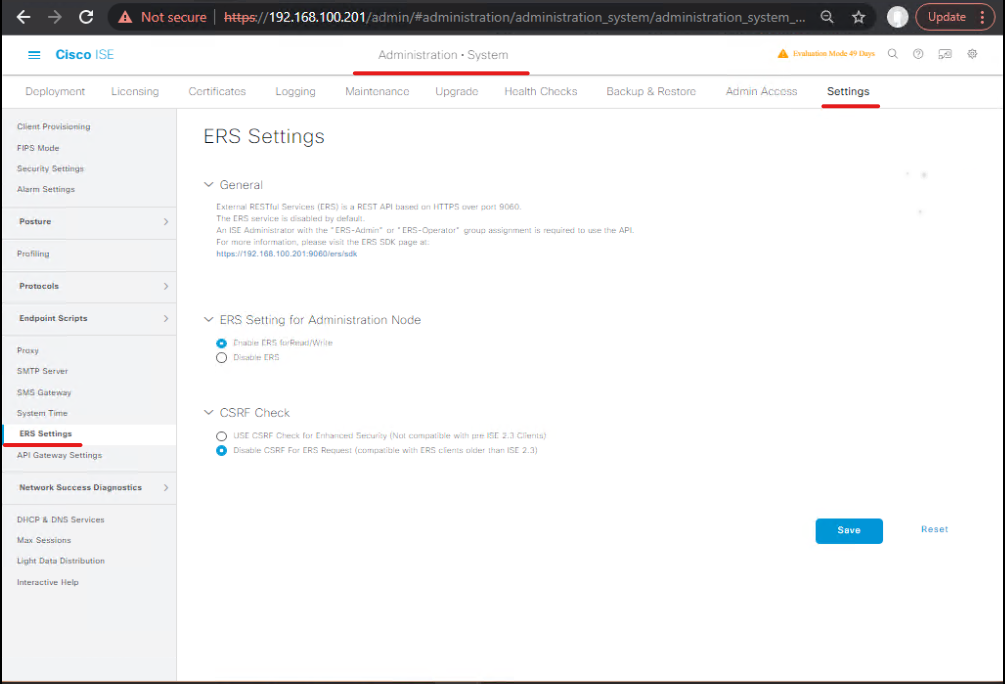
E) Prepare ERS/MNT APIs (Security + Access)
- Enable ERS
- GUI: Administration > System > Settings > ERS Settings → ✔ Enable ERS
- [ERS Enabled]
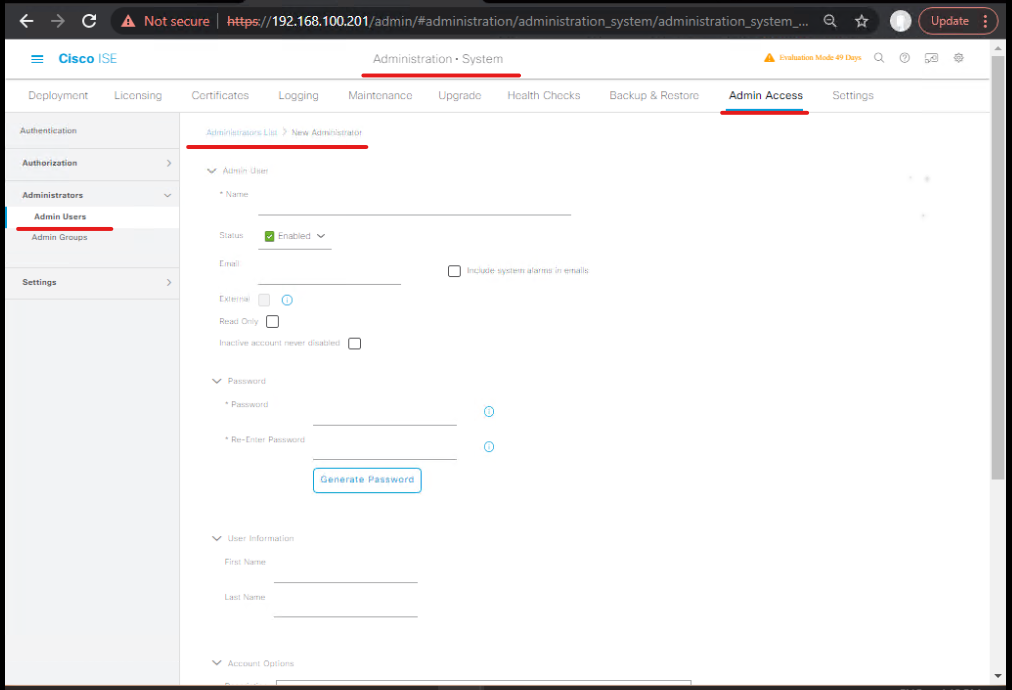
- Create ERS Admin
- GUI: Administration > System > Admin Access > Administrators > Admin Users > Add
- User:
ers_admin→ Role: ERS Admin (or custom minimal role with ERS access)
- User:
- [ERS Admin User]
- GUI: Administration > System > Admin Access > Administrators > Admin Users > Add
- (Optional) ERS CSRF Token disabled/enabled — align with your security posture.
Validation (Admin PC):
# List endpoint groups (expect 200 OK with JSON)
curl -k -u ers_admin:ERSpass -H "Accept: application/json" \
 https://10.10.10.10:9060/ers/config/endpointgroup
F) API Workflows: Seed, Enrich, Group, Reprofile, Enforce
Notes: ERS object names & fields can vary slightly by ISE version. Where noted, validate with a GET first to see the exact JSON structure in your lab.
F1) Lookup an Endpoint by MAC (GET)
MAC=00:11:22:33:44:55
curl -k -u ers_admin:ERSpass -H "Accept: application/json" \
"https://10.10.10.10:9060/ers/config/endpoint?filter=mac.EQ.${MAC}"
- If found, you’ll get
id(UUID),groupId,description, possiblyprofiledata (read-only). - Validation: Compare with Context Visibility > Endpoints.
F2) Create Endpoint & Seed Group + Metadata (POST)
- Find Group UUID for
IoT-Camera:
curl -k -u ers_admin:ERSpass -H "Accept: application/json" \
 https://10.10.10.10:9060/ers/config/endpointgroup
# Parse for "IoT-Camera" and copy its "id"
- Create Endpoint (seed record for profiling):
cat > /tmp/new_endpoint.json <<'EOF'
{
  "EndPoint": {
    "name": "AxisCam-Lobby-01",
    "mac": "00:11:22:33:44:55",
    "description": "Seeded via ERS; Site=BLR-01; Floor=3; Port=Gi1/0/10",
    "groupId": "PUT-UUID-OF-IoT-Camera",
    "staticGroupAssignment": false
  }
}
EOF

curl -k -u ers_admin:ERSpass \
 -H "Content-Type: application/json" -H "Accept: application/json" \
 -d @/tmp/new_endpoint.json \
 https://10.10.10.10:9060/ers/config/endpoint
- staticGroupAssignment=false allows dynamic profiling to move it later.
- Validation: GET endpoint; check appears in GUI → Context Visibility > Endpoints.
F3) Update Endpoint (Add Attributes / Lock Group) (PUT)
Use only if you truly want to override dynamic behavior.
# First, GET endpoint by MAC and copy its "id"
EPID="PUT-UUID-HERE"

cat > /tmp/update_endpoint.json <<'EOF'
{
  "EndPoint": {
    "id": "PUT-UUID-HERE",
    "description": "Updated via ERS; Owner=OT; Serial=AXIS-12345",
    "staticGroupAssignment": true,
    "groupId": "PUT-UUID-OF-IoT-Camera"
  }
}
EOF

curl -k -u ers_admin:ERSpass -X PUT \
 -H "Content-Type: application/json" -H "Accept: application/json" \
 -d @/tmp/update_endpoint.json \
 https://10.10.10.10:9060/ers/config/endpoint/{$EPID}
- Validation: GUI shows Locked group (static). Profiling won’t move it unless you unset static.
F4) Trigger Reprofile / Reauth
- If your ISE version exposes a Reprofile action (check with OPTIONS/GET on endpoint):
curl -k -u ers_admin:ERSpass -X PUT \ https://10.10.10.10:9060/ers/config/endpoint/{id}/reprofile - If not available, force reauth on NAD to refresh attributes:
# Catalyst
clear authentication session interface gi1/0/10
# Or bounce the port if lab-only:
shutdown / no shutdown
- Validation: Watch profiler.log and Context Visibility for updated Profile/Certainty Factor.
F5) Bulk Import (ERS Bulk)
- Prepare CSV:
mac,name,description,groupName,staticGroupAssignment - GUI: Administration > System > Settings > Bulk Operations or ERS bulk API.
- Validation: Bulk status → Success; endpoints appear in Context Visibility.
F6) Enforce on Profile Change (ANC quarantine)
- Create ANC Policy (GUI): Work Centers > Profiler (or Policy) > ANC Policies →
Quarantine(dACL/VLAN). - Apply via ERS:
cat > /tmp/anc_apply.json <<'EOF'
{
  "OperationAdditionalData": {
    "additionalData": [
      {"name": "macAddress", "value": "00:11:22:33:44:55"},
      {"name": "policyName", "value": "Quarantine"}
    ]
  }
}
EOF

curl -k -u ers_admin:ERSpass -H "Content-Type: application/json" \
 -d @/tmp/anc_apply.json \
 https://10.10.10.10:9060/ers/config/ancendpoint/apply
- Validation: Context Visibility → Endpoint ANC Status, and CoA on switch:
show authentication sessions interface gi1/0/10 details | i ACL|Quarantine|Server policies
G) Re-Auth / Data Refresh Playbook
- Wired:
clear authentication session interface gi1/0/10 - Wireless (9800): Deauthenticate client → client re-associates and reauths.
- Validate:
- GUI: Context Visibility > Endpoints → Profile updated, Conditions matched, Certainty rises.
- ISE CLI:
show logging application profiler.log tailto see attribute merges. - Switch CLI:
show device-sensor cacheshows new attributes sent.
H) Reports & Audit
- GUI: Operations > Reports > Endpoints and Users > Endpoint Profile Changes
- Filter by MAC/time; export PDF/CSV.
- GUI: Operations > RADIUS > Live Logs to see auths/CoA.
- Validation: Check that your API-driven changes correlate with profiler events and auth records.
Quick Validation:
ISE GUI:
- Profiler Probes enabled, Profiling Conditions/Policies hit, Endpoint → Profiling tab (Matched Conditions, Certainty).
ISE CLI:
show application status ise
show logging application profiler.log tail
Switch CLI:
show authentication sessions interface gi1/0/10 details
show device-sensor cache interface gi1/0/10
show cdp neighbors detail
show lldp neighbors detail
API Smoke Tests:
# Endpoint groups
curl -k -u ers_admin:ERSpass -H "Accept: application/json" https://10.10.10.10:9060/ers/config/endpointgroup
# Endpoint by MAC
curl -k -u ers_admin:ERSpass -H "Accept: application/json" "https://10.10.10.10:9060/ers/config/endpoint?filter=mac.EQ.00:11:22:33:44:55"
Expert Level Use Cases
- CMDB-Driven Seeding
- Nightly job: Pull IP/MAC/Type from ServiceNow → ERS bulk import → groups
IP-Phone/Printer/IoT. - Validate with a delta report against Context Visibility.
- Nightly job: Pull IP/MAC/Type from ServiceNow → ERS bulk import → groups
- Adaptive Quarantine
- If device flaps profile (e.g., Camera→Unknown), POST ANC “Quarantine” and send a ServiceNow ticket with MAC/Port/Location.
- Auto-release after 24h if profile stabilizes.
- On-Change Reprofiling
- Watch for switch traps (SNMP LinkUp/Down) → trigger clear auth session and GET endpoint. If Certainty < threshold, email SecOps.
- Watch for switch traps (SNMP LinkUp/Down) → trigger clear auth session and GET endpoint. If Certainty < threshold, email SecOps.
- IoT Vendor Rollout
- Before new printers arrive, pre-create endpoints with manufacturer OUIs and descriptions; when devices connect, profiling instantly reaches 100% certainty and correct SGT/VLAN is applied.
- Before new printers arrive, pre-create endpoints with manufacturer OUIs and descriptions; when devices connect, profiling instantly reaches 100% certainty and correct SGT/VLAN is applied.
- Multi-site Profiling Consistency
- Script audits across all access switches: check device-sensor status. If disabled, auto-push a template. Generate compliance dashboard.
- Script audits across all access switches: check device-sensor status. If disabled, auto-push a template. Generate compliance dashboard.
- Profile-to-Policy Orchestration
- For
Medical-Deviceprofile: Assign dACL and SGT. If the device changes profile unexpectedly, ANC + Slack alert.
- For
- Guest/BYOD Auto-Normalization
- If endpoints land in
BYOD-Unknownfor >4 hours, trigger Guest sponsor flow email and move to a “Remediation” VLAN via API+CoA.
- If endpoints land in
- Splunk-Assisted Profiling
- Splunk detects DHCP fingerprint anomalies → call ISE ERS to set a temporary Endpoint Attribute (e.g., Tag=Suspect) → Authorization rules dACL the device.
- Splunk detects DHCP fingerprint anomalies → call ISE ERS to set a temporary Endpoint Attribute (e.g., Tag=Suspect) → Authorization rules dACL the device.
- Zero-Touch IP Phone Deployment
- Use LLDP MED attributes to profile phones → ERS updates
descriptionwith site/cubicle → VLAN voice auto-assignment; if non-phone appears on voice port, auto-Quarantine.
- Use LLDP MED attributes to profile phones → ERS updates
- OT Network Change Window
- Before maintenance, ERS sets
staticGroupAssignment=truefor known PLCs to freeze posture/profiling changes; revert after window.
- Before maintenance, ERS sets
FAQs – REST API Advanced: Automating Profiling in Cisco ISE
Q1. What are the most common REST API endpoints in ISE for profiling automation?
Answer:
/ers/config/profilerprofile→ Used to create, update, or delete profiling policies./ers/config/endpoint→ Used to add, update, or delete endpoint records./ers/config/endpointgroup→ For assigning endpoints into profiling groups./ers/config/ancpolicy→ For applying quarantine or other security policies.- Validation:
- GUI: Administration → System → Settings → ERS Settings → Enable ERS API.
- CLI:
curl -k -u admin:password https://<ISE-IP>:9060/ers/config/endpoint
Q2. How do I authenticate my API requests securely to avoid failures?
Answer:
- Cisco ISE ERS APIs support HTTP Basic Auth (username/password of ISE admin) and XSRF-Token (for POST/PUT/DELETE).
- Steps:
- Use admin account with ERS API access (check RBAC permissions).
- For POST/PUT/DELETE requests → First GET a token using:
curl -k -u admin:password -H "Accept: application/json" \ https://<ISE-IP>:9060/ers/config/endpoint -i - Copy
X-CSRF-Tokenfrom headers and include in write requests.
Q3. Can I dynamically trigger profiling updates when new attributes are detected?
Answer:
Yes. Example workflow:
- Syslog or pxGrid receives new DHCP fingerprint or HTTP user-agent.
- External script/API calls:
curl -k -u admin:password -H "Content-Type: application/json" \ -X PUT https://<ISE-IP>:9060/ers/config/endpoint/<id> \ -d '{"ERSEndPoint": {"mac": "AA:BB:CC:DD:EE:FF", "groupId": "Profiler_Group_UUID"}}' - GUI Validation: Check Operations → RADIUS → Live Logs and endpoint Attributes Tab.
Q4. How do I bulk-import endpoints with profiling via API instead of CSV?
Answer:
- Create JSON with multiple endpoint entries:
{ "ERSEndPoint": { "name": "IoT_Camera", "mac": "AA:11:22:33:44:55", "groupId": "IoT_Profiler_UUID" } } - Use scripting (Python example):
import requests, json url = "https://<ISE-IP>:9060/ers/config/endpoint" headers = {"Content-Type": "application/json", "Accept": "application/json"} for mac in mac_list: payload = {"ERSEndPoint":{"mac":mac,"groupId":"IoT_Profiler_UUID"}} requests.post(url, auth=("admin","pass"), headers=headers, json=payload, verify=False) - Validation: GUI → Endpoints → Search by MAC.
Q5. How do I know which profiling policy was matched for a given endpoint?
Answer:
- GUI: Context Visibility → Endpoints → [Endpoint Details] → Profiler Policy Matched.
- API:
curl -k -u admin:password \ https://<ISE-IP>:9060/ers/config/endpoint/<UUID>→ Check"profileId"field.
Q6. What if I want to override an automatically profiled device with a manual assignment?
Answer:
- Use API PUT to set endpoint to static group.
- Example:
curl -k -u admin:password -H "Content-Type: application/json" \ -X PUT https://<ISE-IP>:9060/ers/config/endpoint/<id> \ -d '{"ERSEndPoint": {"staticProfileAssignment": true,"groupId": "CriticalDevices_UUID"}}' - Validation: GUI → Endpoint details → “Static Assignment = True”.
Q7. Can I use pxGrid + API together for advanced profiling automation?
Answer:
Yes:
- pxGrid feeds telemetry (e.g., Splunk, Firepower, DNA Center).
- API applies endpoint group/profile updates in ISE.
- Workflow Example:
- Splunk detects IoT abnormal traffic.
- pxGrid session subscriber extracts MAC.
- Script calls ERS API → Moves endpoint to Quarantine Group.
Q8. How do I troubleshoot API failures in ISE?
Answer:
- Enable ERS Debug logs:
- CLI:
application configure ise > Debug ERS
- CLI:
- Check ISE logs:
- GUI: Operations → Reports → API Access Reports.
- Common Issues:
- Wrong Content-Type (
application/jsonrequired). - CSRF Token missing.
- RBAC role of admin not permitting API.
- Wrong Content-Type (
Q9. How do I automate profiling for IoT devices that don’t provide DHCP/HTTP attributes?
Answer:
- Use custom attributes via API:
curl -k -u admin:password -H "Content-Type: application/json" \ -X PUT https://<ISE-IP>:9060/ers/config/endpoint/<id> \ -d '{"ERSEndPoint": {"customAttributes": {"Asset-Tag":"IoT-Plant1","Device-Type":"Camera"}}}' - GUI Validation: Endpoint Attributes → Custom Attributes Tab.
Q10. What’s the best way to validate profiling automation after applying APIs?
Answer:
- Step 1: Check endpoint in GUI → Context Visibility → Endpoints.
- Step 2: Validate MAC group membership.
- Step 3: Use CLI from switch/WLC to check authorization:
show authentication sessions mac <AA:BB:CC:DD:EE:FF> details - Step 4: Re-run API GET endpoint status to confirm updates.
curl -k -u admin:password https://<ISE-IP>:9060/ers/config/endpoint/<UUID>
YouTube Link
For more in-depth Cisco ISE Mastery Training, subscribe to my YouTube channel Network Journey and join my instructor-led classes for hands-on, real-world ISE experience
Closing Notes
- Start with visibility: enable probes + device-sensor everywhere.
- Codify logic: Conditions and Policies should reflect device reality; keep them small, targeted, and testable.
- Automate carefully: favor dynamic profiling; use static overrides sparingly with clear expiry.
- Always validate end-to-end: device attributes → ISE profile → Authorization result → enforcement on the port/WLAN → logs & reports.
Upgrade Your Skills – Start Today
“For more in-depth Cisco ISE Mastery Training, subscribe to my YouTube channel Network Journey and join my instructor-led classes.”
Fast-Track to Cisco ISE Mastery Pro (4-month instructor-led)
- 90+ production-grade labs (Profiling, TrustSec, pxGrid, APIs, SIEM, TACACS+)
- Automation packs (ERS/MNT/pxGrid + Python/Ansible + Postman)
- Troubleshooting bible (log samples, flows, CLI drills)
Course outline & enrollment: https://course.networkjourney.com/ccie-security/
Enroll Now & Future‑Proof Your Career
Email: info@networkjourney.com
WhatsApp / Call: +91 97395 21088