Trainer Sagar Dhawan
- Posted on
[Day 134] Cisco ISE Mastery Training: Advanced Profiling – Custom Probes
Table of Contents
Introduction
Profiling = the “how do we know what’s on the wire” function of ISE. Out of the box, ISE can identify many clients from DHCP, RADIUS, HTTP headers, SNMP, NetFlow, DNS, and other probes. But real networks contain new IoT devices, industrial gear, and custom appliances that don’t match built-in signatures. That’s where custom probes and custom signatures become priceless — you teach ISE the fingerprint of the device so it can:
- Automatically classify and group devices (IoT cameras, VoIP phones, printers).
- Apply correct authorization (VLAN/ACL) without manual MAC whitelisting.
- Trigger posture/quarantine or inventory and reporting.
In this Article you’ll create multiple real custom probes: DHCP option matching, HTTP user-agent regex, SNMP sysDescr parsing, and a syslog parser (via the Passive Identity Connector template approach). You’ll validate each with GUI checks, packet captures, and debug logs so students learn the pattern and the proof.
Problem Statement
Real network problems that custom probes solve:
- New vendor devices arrive (e.g., “AcmeCam v2”): no built-in ISE signature → default falls back to Guest or Unknown → insecure.
- Built-in signatures cause false positives (e.g., a smartphone using a weird browser UA).
- Security policy needs device-level control (IoT into a segmented VLAN) — manual work is too slow at scale.
Goal: teach ISE to reliably and repeatably identify new or niche endpoints using custom probes and signatures, and to validate identification in production-safe ways.
Solution Overview
ISE Profiling architecture (high level):
- Probes collect raw telemetry (DHCP, HTTP, RADIUS, SNMP, NetFlow, DNS, SNMP, SNMP traps, and others).
- Profiler Service receives probe attributes and evaluates them against Profiling Policies (ordered rules).
- Custom Signatures / Regex allow you to parse probe payloads (user agent, DHCP Option 60, sysDescr, sysObjectID, syslog body) and extract attributes.
- When a match occurs, ISE assigns Endpoint Type / Endpoint Identity Group and triggers profiling events usable in AuthZ policies. (Cisco)
We will work with these building blocks: enable/route probes → craft custom attribute extraction (regex) → create profiling policy rule → validate and tune.
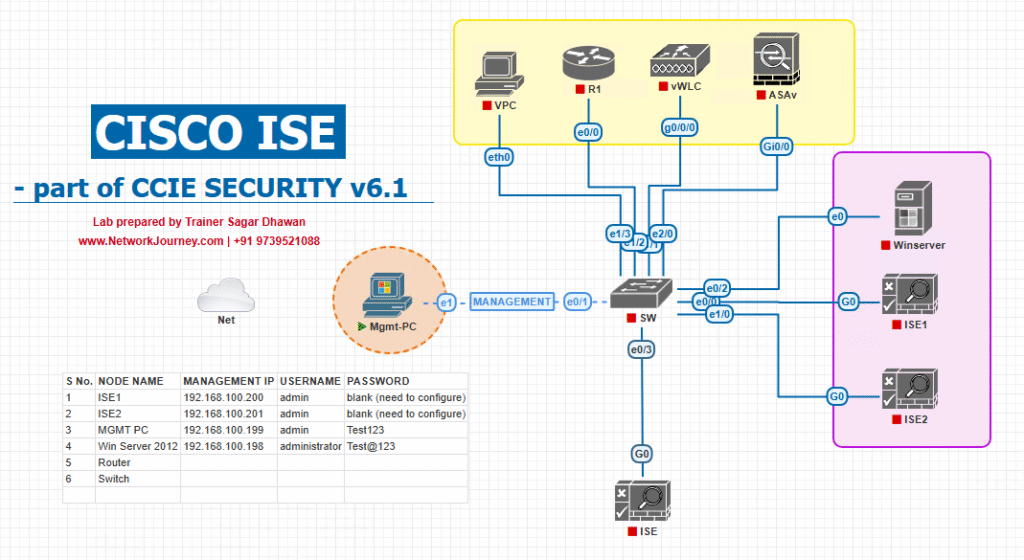
Sample Lab Topology
Platform: VMware (ISE PAN/PSN) or EVE-NG (ISE OVA + network images). Use snapshots to roll back.
Components
- Cisco ISE PAN + PSN (Profiler enabled) — e.g.,
10.10.10.11(PSN). - Windows DHCP Server (for DHCP probe testing) —
10.10.20.10. - HTTP/Web server (to host test web page and simulate HTTP User-Agent hits) —
10.10.30.20. - SNMP device emulator (or real device) for sysDescr (e.g., snmpsim) —
10.10.40.10. - Syslog generator (or a firewall that will send syslog) —
10.10.50.10. - Test client(s): Linux VM + Windows laptop + IoT emulator (curl/wget to send custom headers).
- Optional: Passive Identity Connector (PIC) VM if you want to parse vendor syslog messages centrally. (Cisco)
Topology diagram:
Step-by-Step GUI Configuration Guide
Pre-req checklist:
• ISE PSN installed and reachable.
• ISE Profiler license/component enabled.
• NTP time in sync.
• Devices (DHCP, web server, SNMP, syslog) accessible to ISE (same L2/L3 or reachable).
Phase 1 — Enable Profiler & Probes on PSN(s)
- Login to ISE (PAN).
- Go to Administration > System > Deployment. Click Edit on the PSN node you want to use for profiling. In the node edit dialog verify Profiler service is enabled for that node (Profiling Configuration tab). Save.
- [Screenshot: Administration > System > Deployment > Node Edit > Profiling Configuration].
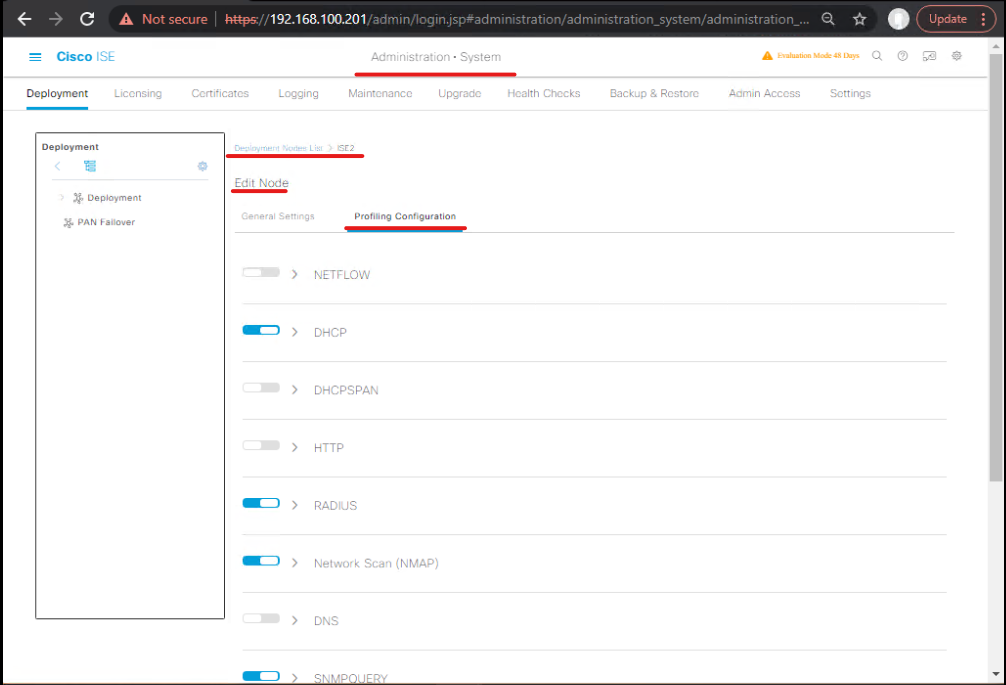
Validation: On PAN: Operations > System > Deployment > Nodes shows profiler service up on PSN.
Phase 2 — Enable/Configure the Probes
- Go to Administration > System > Settings > Profiling (or Work Centers > Profiler > Settings depending on ISE version).
- Open Probes tab. Enable the probes you will use: DHCP, HTTP/HTTP(S) (Portal/Redirect capture), RADIUS, SNMP, DNS, NetFlow. Save.
- [Screenshot: Profiling > Probes tab — Enable DHCP, HTTP, SNMP] .
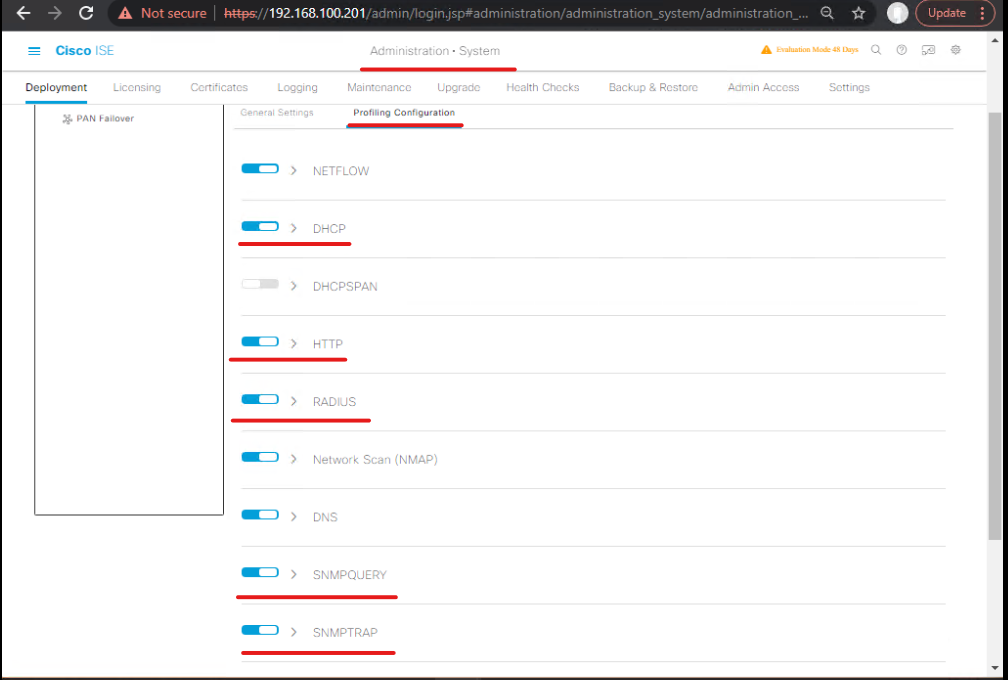
Validation: After enabling, generate test traffic (DHCP request, HTTP GET) and verify that Operations > Profiler > Probe Activity or Operations > Endpoints begins showing attributes flowing in (depends on ISE UI version).
Phase 3 — Create a Custom Extraction Rule (regex) for HTTP User-Agent
Use case: identify “AcmeCamera” devices that send User-Agent: AcmeCam/2.7.1 (Model: X1000; FW: 1.0.4).
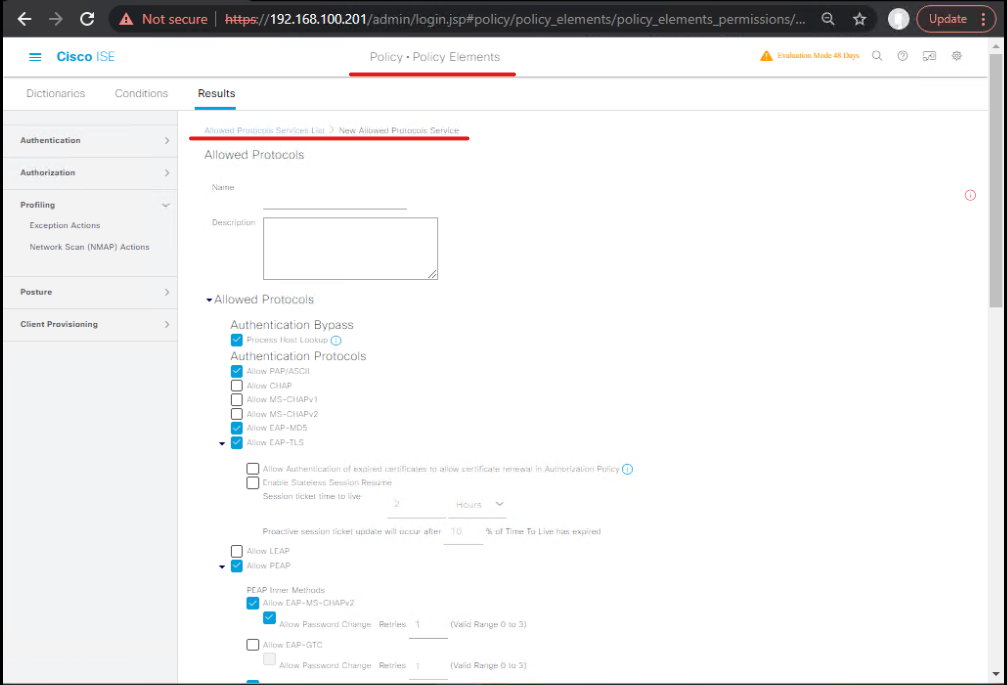
- Go to Policy > Policy Elements > Results > Profiling > Profiling Policies (or Work Centers > Profiler > Profiling Policies). Click Add to create a new profiling policy or edit existing. (Cisco)
- [Screenshot: Policy Elements > Profiling Policies > Add]
- Add a new rule: Name:
Identify_AcmeCam_by_HTTP_UA. - Add condition: If
HTTP Header - User-Agentmatches regex:
^AcmeCam\/(?<version>[0-9\.]+)\s+\(Model:\s*(?<model>[^\;]+);\s*FW:\s*(?<fw>[^\)]+)\)
- Map extraction groups to custom attributes (optional):
version->CustomAttr:Acme_Version,model->CustomAttr:Acme_Model,fw->CustomAttr:Acme_FW. Many ISE UIs allow you to capture regex groups to custom endpoint attributes. If not, at least match the string and set Endpoint Type toAcme Camera. - In the rule outcome, set Endpoint Type to
IP Camera / Acmeand Endpoint Identity Group toIOT/Camera. Save and move this rule high in the policy (profiling rules are evaluated top→down).
Validation (live):
- From test client (simulate device) run:
curl -A 'AcmeCam/2.7.1 (Model: X1000; FW: 1.0.4)' https://<ISE-portal-or-webserver>/
- In ISE GUI: Operations > Profiler > Endpoints (or Context Visibility > Endpoints) → find the client IP/MAC → check derived attributes: Endpoint Type should be
IP Camera / Acme, and custom attributes populated. - If not matched, check Operations > Profiler > Probe Activity to see if HTTP UA was received by ISE (sometimes portal redirect needed to capture UA).
Phase 4 — DHCP Option 60 / Vendor Class Probe (sample)
Use case: detect POS terminals that broadcast DHCP Option 60 = POS-Company-Vendor.
- Ensure DHCP probe is enabled (see Phase 2).
- Create a profiling policy rule: If
DHCP Option 60equalsPOS-Company-Vendor(or matches regex). Set Endpoint Type toPOS Terminaland Identity Group toPOS. Save and position high in policy.
Validation:
- On test client, craft DHCP request (or use real DHCP server with pre-defined Option 60). In Linux you can simulate with
dhclientand vendor class config or a DHCP test tool. Another option: usescapyto build a DHCPDISCOVER with option 60. - After DHCP request, verify in ISE Profiler Endpoint that Endpoint Type changed to
POS Terminal. Also check the DHCP capture on ISE:tcpdumpon PSN (lab only) to confirm Option 60 content.
Example scapy snippet (lab test):
# scapy pseudocode — send DHCPDISCOVER with option 60 (requires root and careful lab setup)
from scapy.all import *
dhcp_discover = Ether(dst='ff:ff:ff:ff:ff:ff')/IP(src='0.0.0.0',dst='255.255.255.255')/UDP(sport=68,dport=67)/BOOTP()/DHCP(options=[('message-type','discover'), ('param_req_list', [1,3,6]), ('vendor_class_id','POS-Company-Vendor'), 'end'])
sendp(dhcp_discover, iface='eth0')
Phase 5 — SNMP / sysDescr custom parsing
Use case: identify industrial PLCs via sysDescr or sysObjectID.
- Enable the SNMP Probe. Ensure ISE can query SNMP on the device (community strings / SNMPv3).
- In Profiling Policy add a rule: If
SNMP sysDescrmatches regex.*PLCModelX.*FW.*orIf SNMP sysObjectID equals .1.3.6.1.4.1.9999.1→ set Endpoint TypePLC-ModelX. - Optionally configure ISE to perform SNMP query (Credential) in the probe config to pull
sysDescr.
Validation:
- Run
snmpwalk -v2c -c public 10.10.40.10 SNMPv2-MIB::sysDescr.0and confirm string. - Generate SNMP query or let ISE probe result in
Operations > EndpointsshowingPLC-ModelX.
Phase 6 — Custom Syslog Templates (PIC / Syslog-based profiling)
When to use: vendor appliances that send identifying info only in syslog messages.
- If you use Cisco PIC or have a syslog-feeding integration, create a custom syslog template to extract fields. PIC templates typically use regular expressions to capture attributes from vendor messages. Refer to Passive Identity Connector Providers and custom template docs. (Cisco)
- Example pattern for an IoT vendor syslog line:
<timestamp> vendor-acme: device <mac=00:11:22:33:44:55> model=X1000 serial=SN12345 fw=1.0.5
Regex to extract MAC and model:
mac=(?P<mac>(?:[0-9A-Fa-f]{2}:){5}[0-9A-Fa-f]{2}).*model=(?P<model>\S+)
- Create PIC template, map capture groups to attributes (MAC → MAC, model → CustomAttr). Configure your firewall/router to forward syslog to PIC/ISE.
Validation:
- Generate a test syslog message from your syslog generator and verify the PIC template extracts attributes into ISE Endpoint record.
Phase 7 — Map Profiling Matches to Authorization
- Once Endpoint Type / Identity Group is assigned, use these in Policy Sets:
Policy > Policy Sets→ in Authorization rules use conditions likeEndpoint : Endpoint Identity Group == "IOT/Camera"→ apply Authorization ProfileIOT_VLANor dACL.- [Screenshot: Policy Sets → Authorization Rule using Endpoint Identity Group].
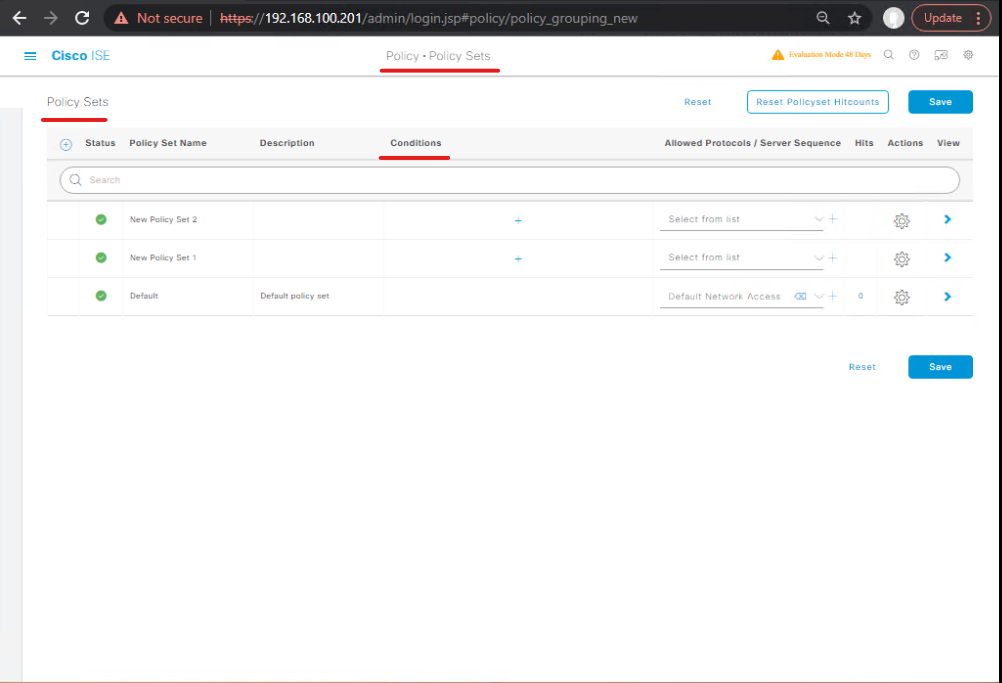
Validation: simulate device connection; after profiling assigns the group, the authorization rule should match and the NAD should place the endpoint into the correct VLAN/ACL — verify on the switch: show authentication sessions interface Gi1/0/X details and in ISE Live Logs.
Troubleshooting & Diagnostics
Always gather the three lenses: Probe Data (raw), Profiler Policy Evaluation (ISE), Network packet trace.
A — Quick triage steps (order matters)
- Did the probe receive the raw data? → Operations > Profiler > Probe Activity (or equivalent) shows inbound attributes. If not, check network and device forwarding.
- Is the profiling rule ordered correctly? Profiling is top-down — place specific custom rules above general ones.
- Check Live Logs: Operations > RADIUS > Live Logs and Operations > Profiler > Endpoints for the session event and matched rule. (Cisco)
B — Packet capture filters (lab)
Capture on PSN or device uplink (lab):
# capture DHCP, SNMP, HTTP user-agent, radius
sudo tcpdump -i eth0 -w profiler_capture.pcap 'port 67 or port 68 or port 161 or tcp port 80 or udp port 1812 or port 53 or port 443'
Open in Wireshark and filter dhcp || snmp || radius || http to find the attribute payloads.
C — Regex not matching — debugging recipe
- Copy the raw probe payload (from tcpdump or Profiler Probe Activity).
- Paste into a regex tester (local dev machine). Use the same regex flavor (Java/PCRE — ISE uses Java regex in many places) — test groups.
- Avoid greedy
.*when extracting. Use named groups where supported. Example: use(?<model>[^;]+)rather than(.+). (Cisco Secure Access)
D — False positives / over-matching
- Add additional guard conditions (e.g., test both HTTP UA and DHCP Option 60) to increase confidence before assigning an Endpoint Type.
- Use confidence thresholds (ISE supports multi-probe confidence accumulation) — require two probes to match before final classification.
E — Profiling cache/ageing
- ISE caches endpoint profile results. If you modify rules and want immediate re-evaluation, use Operations > Profiler > Endpoints → select endpoint → Rescan/Resubmit (or wait for rescan interval). Also, the profilers may test external sources (AD) only periodically. (Cisco Community)
Lab Walkthroughs with Validation
Lab Walkthrough 1 — Detect Acme Cameras via HTTP UA & DHCP Option 60
- Enable HTTP & DHCP probes (Phase 2).
- Add profiling rules for HTTP UA (Phase 3) and DHCP Option 60 (Phase 4). Ensure rules are ordered so the camera rule is above generic phone/tablet rules.
- From test client: (a) Simulate DHCP request with vendor class
POS-Company-Vendoror run a real device that sends Option 60; (b) runcurl -A 'AcmeCam/2.7.1 (Model: X1000; FW: 1.0.4)' https://webserver/. - In ISE: Operations > Profiler > Endpoints → confirm device assigned Endpoint Type
IP Camera / Acme. - In ISE Policy Sets: confirm authz rule for
IOT/Cameraapplied (Access-Accept shows dACL/VLAN). On switch: validate correct VLAN.
Deliverables for student: screenshot of ISE endpoint record, tcpdump with UA string, switch show access-session output.
Lab Walkthrough 2 — Syslog-based Custom Parser (PIC path)
- Configure PIC (or syslog ingestion path) to accept vendor syslog. Create a custom template with regex for
macandmodel. (Cisco) - Send a test syslog message from the generator:
logger -p local0.info "vendor-acme: device mac=00:11:22:33:44:55 model=X1000 fw=1.0.5"to PIC/ISE address. - In ISE: check Endpoint created with MAC and
Acmemodel attribute. - Use authorization policy to move device to
IOTgroup.
Deliverables: syslog sample, PIC template, ISE endpoint record screenshot.
Expert Level Use Cases (step-by-step mapping + validation)
- IoT Auto-Segmentation:
- Create robust signatures for camera + thermostat families (HTTP UA + DHCP Option + SNMP sysObjectID), require at least two probe matches, auto-assign
IOTidentity group → apply quarantine VLAN/dACL. - Validate: test scale (10 devices), confirm all placed in IOT VLAN.
- Create robust signatures for camera + thermostat families (HTTP UA + DHCP Option + SNMP sysObjectID), require at least two probe matches, auto-assign
- Vendor-specific Firmware Tracking:
- Extract
fwfrom UA or syslog intoCustomAttr:firmware; export endpoint inventory weekly for vulnerability management. - Validate: run endpoint report (Endpoints → export CSV) and confirm firmware column.
- Extract
- Operational Alerts via pxGrid:
- When a profile changes from
UnknowntoIP Camera, trigger pxGrid event to SIEM / NAC orchestrator to update firewall rules. - Validate: SIEM alert on event; check automated rule change.
- When a profile changes from
- Adaptive Step-Up Auth:
- If an endpoint profiles as
PersonalLaptopon corporate VLAN, trigger posture check or require reauth. Use CoA to move to remediation VLAN until posture completes. - Validate: ISE Live Logs show profile → posture flow → CoA change.
- If an endpoint profiles as
FAQs
Q1. What is the role of custom probes in Cisco ISE profiling?
A1. Custom probes allow administrators to collect additional attributes beyond default ISE probes (RADIUS, DHCP, SNMP, HTTP, etc.). They extend profiling accuracy by extracting device-specific data (headers, ports, DHCP option fields, HTTP user-agents, etc.) that can’t be detected with default probes.
Q2. How do I create a new custom probe in ISE?
A2.
- Navigate to Administration > System > Settings > Profiler.
- Click Probes > Add.
- Select probe type (e.g., HTTP, DHCP, NMAP, RADIUS attribute).
- Define parsing rules (regex, string match, or attribute extraction).
- Apply to a profiling policy.
- Validate by testing against live traffic.
Q3. Can custom probes be used to profile IoT devices (printers, cameras, IP phones)?
A3. Yes. IoT devices often use unique DHCP Option 60 strings, HTTP headers, or specific SNMP OIDs. Custom probes can extract these identifiers to create granular profiling policies, ensuring proper VLAN or security group assignment.
Q4. What are the performance impacts of enabling custom probes?
A4. If not carefully scoped, custom probes can increase CPU load on PSNs since they must parse additional packet fields. Best practice:
- Apply probes only to necessary subnets.
- Test regex efficiency.
- Avoid enabling across all interfaces without need.
Q5. How do I validate that my custom probe is working?
A5.
- Use Operations > Live Logs to check incoming sessions for custom attribute detection.
- Review Operations > RADIUS > Live Sessions to confirm attribute capture.
- Export endpoint attributes under Context Visibility > Endpoints > Attributes and confirm presence of new probe data.
Q6. Can I use custom probes in combination with Feed Service updates?
A6. Yes. Feed Service provides vendor OUI and profiling updates. Custom probes complement Feed Service by capturing environment-specific signatures (e.g., a regional IoT vendor). Together, they create highly accurate profiling.
Q7. How are custom probes integrated into profiling policies?
A7. After probe creation, map the extracted attribute into a Profiling Policy Condition. Example:
- Condition: If DHCP Option 60 contains “Avaya” → Assign Avaya IP Phone Profile.
- This policy becomes part of your Policy Sets for enforcement.
Q8. What troubleshooting steps should I follow if a custom probe doesn’t fire?
A8.
- Confirm probe is enabled under System > Profiler Settings.
- Use CLI:
show logging application profiler.log show profiler stats - Verify traffic is being mirrored or routed correctly to ISE.
- Check regex/conditions accuracy.
Q9. Can I export and import custom probe definitions across ISE nodes?
A9. Yes. You can export profiling policies (including custom probes) as XML from the Profiler Configuration page and import them into another ISE deployment. Always validate syntax post-import.
Q10. What are advanced use cases of custom probes in enterprise NAC deployments?
A10.
- BYOD onboarding: Detect personal devices via HTTP headers and apply BYOD flow.
- Medical IoT devices: Profile infusion pumps or scanners via DHCP options.
- Printers: Use SNMP OID and MAC OUI together to identify printer models.
- Industrial OT: Use custom TCP probe to identify PLC controllers.
- Zero Trust NAC: Combine custom probe + pxGrid for adaptive policy enforcement.
YouTube Link
For more in-depth Cisco ISE Mastery Training, subscribe to my YouTube channel Network Journey and join my instructor-led classes for hands-on, real-world ISE experience
Closing Notes (Key takeaways)
- Start simple, iterate. Enable a probe, capture raw data, craft regex, then validate. Build confidence with two-probe confirmation to reduce false positives.
- Keep performance in mind. Efficient regex and measured probe enablement limit PSN load. Test scale in lab. (Cisco Live)
- Operationalize: export policies, track custom signatures in version control, automate endpoint inventory exports for vulnerability management.
Upgrade Your Skills — Start Today
For hands-on deep dives, subscribe to Network Journey on YouTube and join my instructor-led Fast-Track to Cisco ISE Mastery Pro — a 4-month, lab-heavy program (EVE-NG/VMware labs, weekly live troubleshooting, CCIE-grade scenarios).
Reserve your seat and download the profiler labpack: https://course.networkjourney.com/ccie-security/
Enroll Now & Future‑Proof Your Career
Email: info@networkjourney.com
WhatsApp / Call: +91 97395 21088