Trainer Sagar Dhawan
- Posted on
[Day 137] Cisco ISE Mastery Training: Zero Trust Network Access (ZTNA)
Table of Contents
Introduction
Zero Trust means never trust, always verify — identity, device posture, and contextual signals (time, location, app) must be evaluated before granting access to resources. Cisco ISE isn’t a full ZTNA gateway by itself, but it’s the policy decision point that tells enforcement points (switches, wireless controllers, VPN gateways, firewalls, cloud ZTNA brokers) whether to allow, restrict, or quarantine a session.
In this Article you’ll learn how to use ISE to implement Zero Trust controls: map users + devices to identity groups, verify posture, require MFA, and return dynamic enforcement attributes (VLAN, dACL, SGT, or SAML claims) to enforcement points — plus how to validate each step with GUI evidence, CLI commands and packet captures. I emphasize safe operations (non-disruptive in production) and reproducible lab tests.
Problem Statement
Real-world ZTNA problems this topic solves:
- Password-only access and lateral movement across flat networks.
- No central way to enforce conditional access by identity, device health, or context.
- Remote or third-party users needing least-privilege, application-level access.
- Difficulty proving compliance and auditability for who/what/when accessed sensitive assets.
You will design flows where access is only granted after identity + device posture + MFA checks, and enforcement is consistent across wired, wireless and remote access.
Solution Overview
How Cisco ISE fits into ZTNA:
- Identity source — ISE integrates with AD/LDAP, SAML IdPs and MFA systems to authenticate users.
- Device trust & posture — ISE uses posture, profiling and endpoint attributes to assess device hygiene.
- Policy decision — ISE Policy Sets combine identity, device trust, endpoint group and contextual attributes to choose Authorization Profiles.
- Dynamic enforcement attributes — ISE returns VLAN, dACL, Filter-ID, SGT or SAML attributes to enforcement points to enforce least privilege.
- Telemetry & automation — ISE shares context via pxGrid and REST for automation with ZTNA brokers, firewalls, and SSE platforms.
This Article uses common enforcement patterns:
- Network enforcement: switch/WLC + ISE (VLAN/dACL/SGT).
- Remote enforcement: VPN gateway (AnyConnect/ASA/FTD) integrated with ISE and MFA.
- Cloud enforcement: SAML assertions + CASB/SSE; ISE contributes identity & posture signals to the cloud broker.
Sample Lab Topology
Platform: VMware (recommended) or EVE-NG. Snapshot frequently.
Components
- Cisco ISE PAN + PSN (ISE 2.x/3.x) —
10.10.10.11 - Active Directory (LDAP) —
10.10.20.10 - Enforcement Switch (Cisco Catalyst / IE) —
10.10.30.10 - Wireless Controller (WLC) —
10.10.30.20(optional) - VPN Gateway (ASA/FTD/AnyConnect lab instance) —
10.10.40.10 - Client VM (Windows) —
172.16.110.101(Corporate) - Unmanaged client (Linux IoT emulator) —
172.16.110.150 - Optional: Duo (MFA) or other MFA service; optional ZTNA broker (cloud) or CASB for SAML testing.
- Lab host for capture & automation —
10.10.99.50
Topology diagram:
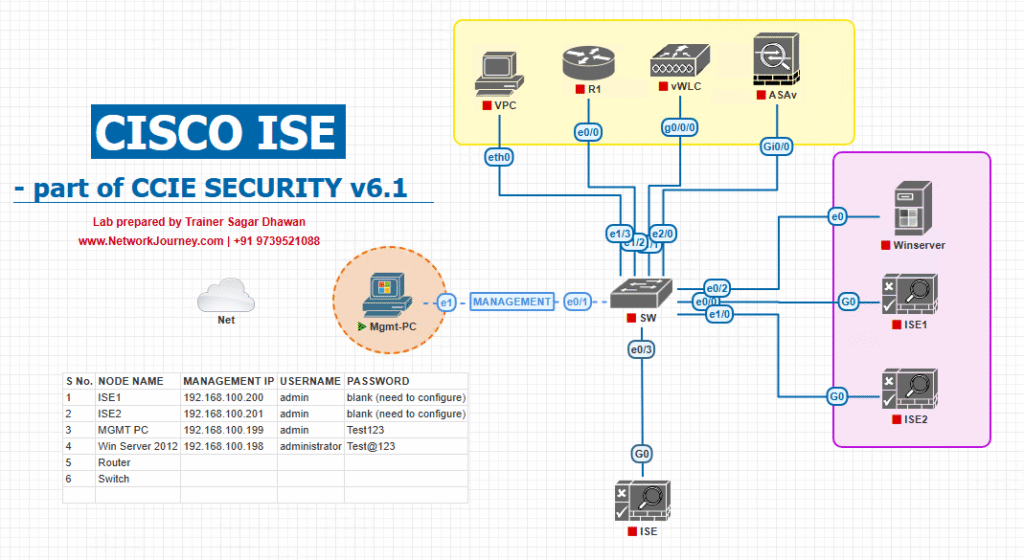
Use test VLANs (Corp, Quarantine, ZTNA-App-Only) to show enforcement changes.
Step-by-Step GUI Configuration Guide
(Each numbered step includes validation & CLI where helpful)
High-level flow to build in the lab:
- Integrate AD & MFA; 2) Add network devices; 3) Configure posture & profiling; 4) Build Authentication & Authorization policies that implement ZTNA semantics; 5) Configure enforcement on switch and VPN; 6) Test and validate.
Step 0 — Pre-req checklist (do this first)
- ISE installed with admin account and PSN reachable.
- AD reachable and test user ready.
- Backup current ISE config (export).
- Lab snapshot or staging environment — do not run risky CoA in production.
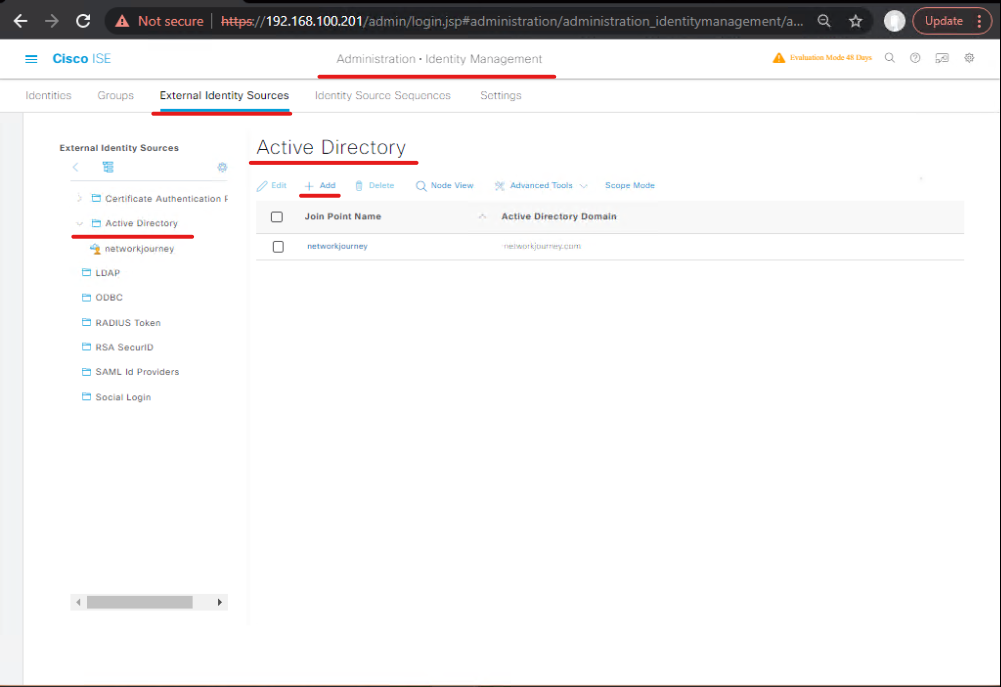
Step 1 — Add AD as Identity Source (GUI)
- ISE GUI → Administration > Identity Management > External Identity Sources > Active Directory → Add.
- Enter domain controllers, bind user (service account) and test join.
- [Screenshot: ISE > AD Add Domain]
Validation: Use Test Connection and verify user lookup works. Try test identity with a lab user.
Step 2 — (Optional) Integrate MFA (e.g., Duo) as External RADIUS or Native
- If using a proxy: Deploy Duo Authentication Proxy and configure it as an External RADIUS token server in ISE: Administration > Identity Management > External Identity Sources > RADIUS Token → Add Duo proxy IP + secret.
- If using native integration on supported ISE version, configure Administration > Identity Management integration for Duo with ikey/skey/host.
- [Screenshot: ISE > External Identity Sources > Duo]

Validation: Test external token server connection (ISE test tool or run sample auth flow).
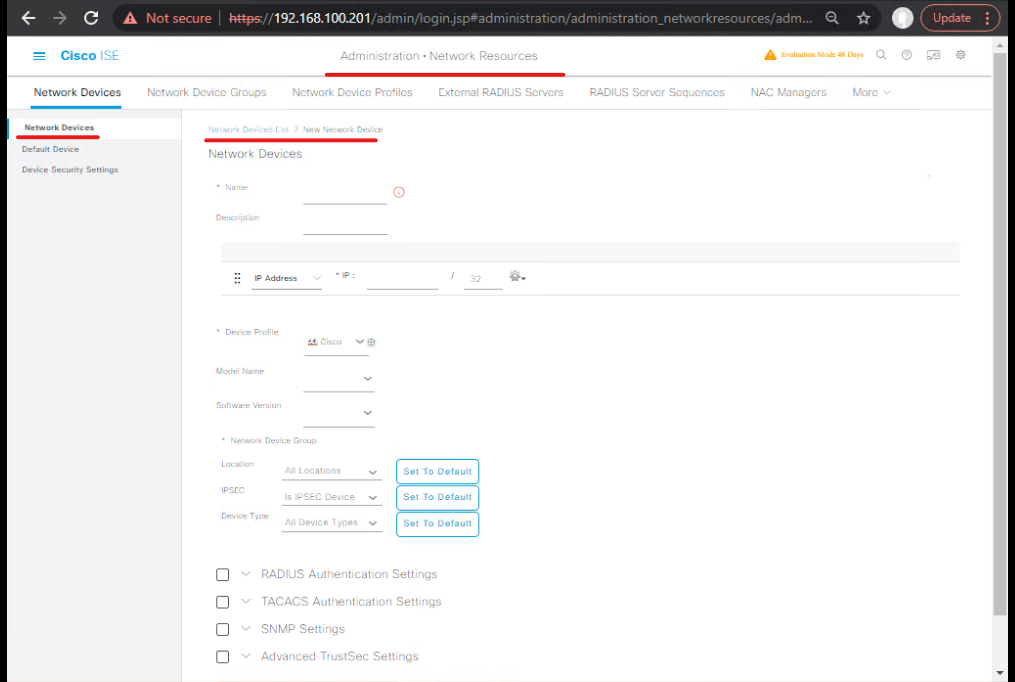
Step 3 — Add Network Devices and Device Groups (GUI)
- Administration > Network Resources > Network Devices > Add: add switch, WLC and VPN (ASA/FTD) with shared secrets, SNMP credentials and enable CoA / Dynamic Authorization.
- Device Profile: choose appropriate vendor/device profile.
- [Screenshot: ISE Add Network Device — Switch]
- Create Network Device Group(s):
EnforcementPointswith childrenSwitches,WLCs,VPNs.
Validation: ISE shows devices; use the Test button where available.
Step 4 — Configure Posture (Host Posture Agent or Endpoint Compliance)
- ISE GUI → Work Centers > Posture > Posture Policies. Create a posture policy that checks for: disk encryption, AV running, latest OS patch OR create a minimal lab posture that checks for a file or registry key to simulate compliance.
- Upload Posture Agent or use Device Posture (if testing AnyConnect).
- [Screenshot: ISE Posture Policy Add — Example Checks]
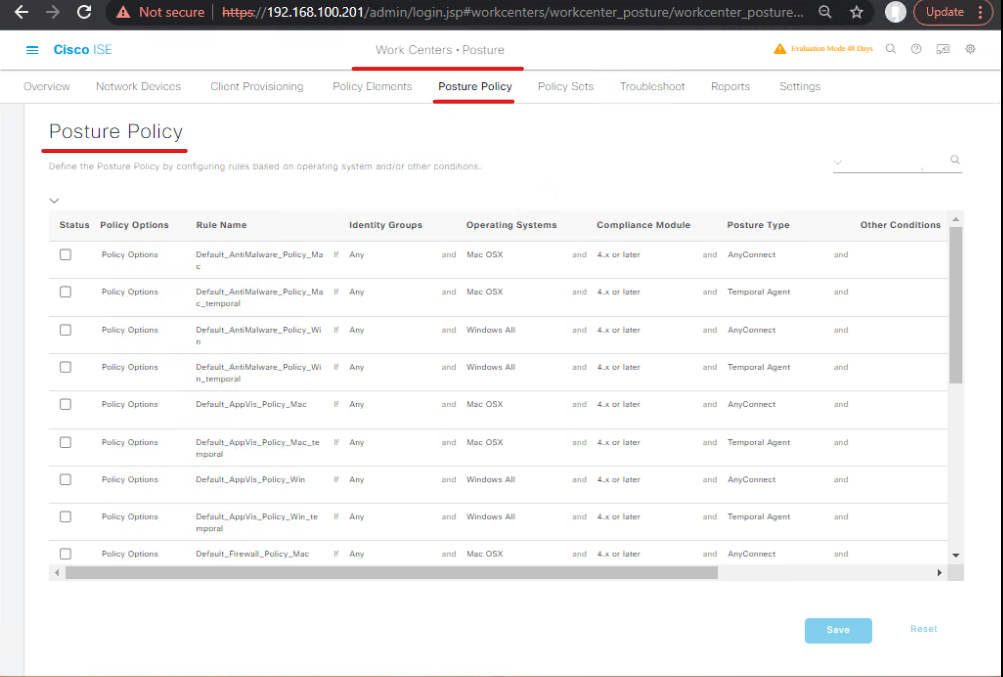
Validation: From test client, run the ISE Posture agent and confirm posture result (Compliant / Non-Compliant) in Work Centers > Posture > Live Sessions.
Step 5 — Enable Profiling (optional but recommended)
- Work Centers → Profiler → Settings: enable DHCP, HTTP, SNMP, NetFlow probes to identify device types.
- Create profiling policies mapping device types to Endpoint Identity Groups (e.g., Corporate-Laptop, BYOD-Phone, Unmanaged).
- [Screenshot: Profiler Settings & Policy]
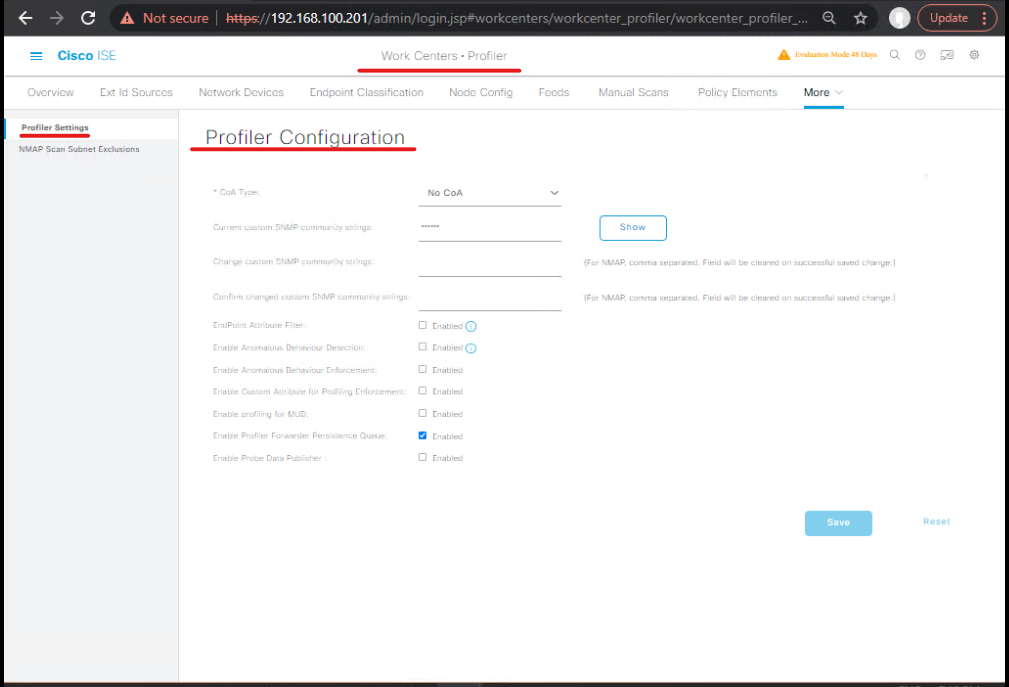
Validation: Connect device and confirm ISE Endpoint shows type in Operations > Endpoints.
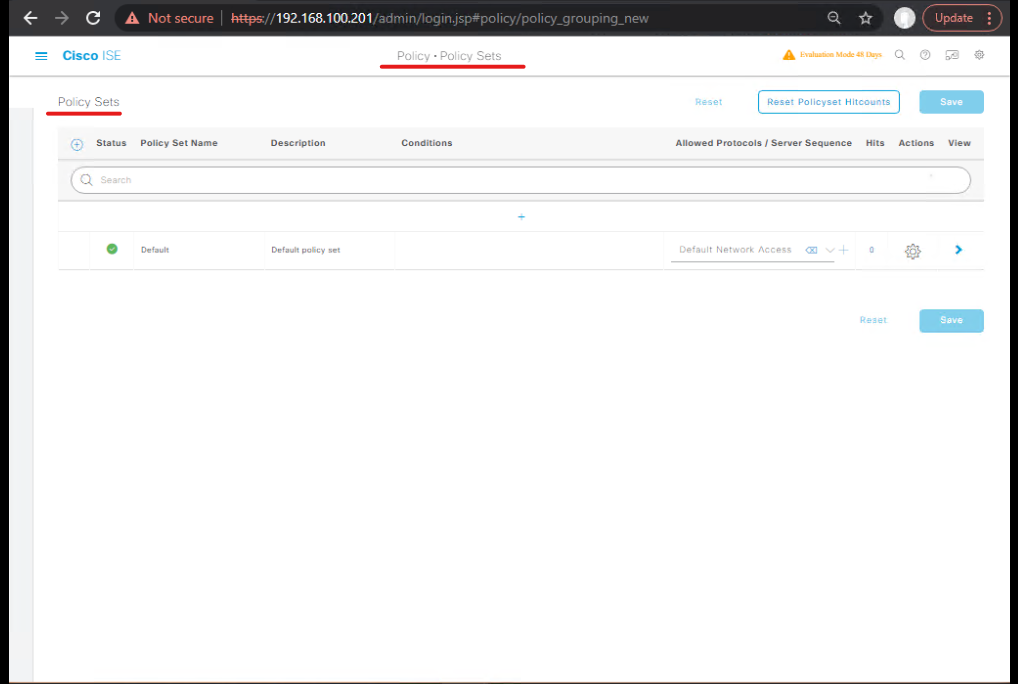
Step 6 — Authentication Policy: Require MFA & Posture for ZTNA
- Policy > Policy Sets: Add or edit policy set
ZTNA_Policy. Add conditions to match the access scenario (e.g., IfNetwork AccessisVPNor ifLocationequalsRemote). - Authentication: order rules so that for ZTNA scenarios you require primary authentication (AD) and then a second factor via External RADIUS (Duo) or native integration and posture. Example rule:
- Condition:
Network Device Group == VPNs - Authentication sequence:
AD (Primary) -> External RADIUS (Token)ORADthenPosturestep. - [Screenshot: Policy Sets > Authentication]
- Condition:
Validation: Initiate a VPN login; watch Operations > RADIUS > Live Logs for Access-Request and the subsequent token challenge/response.
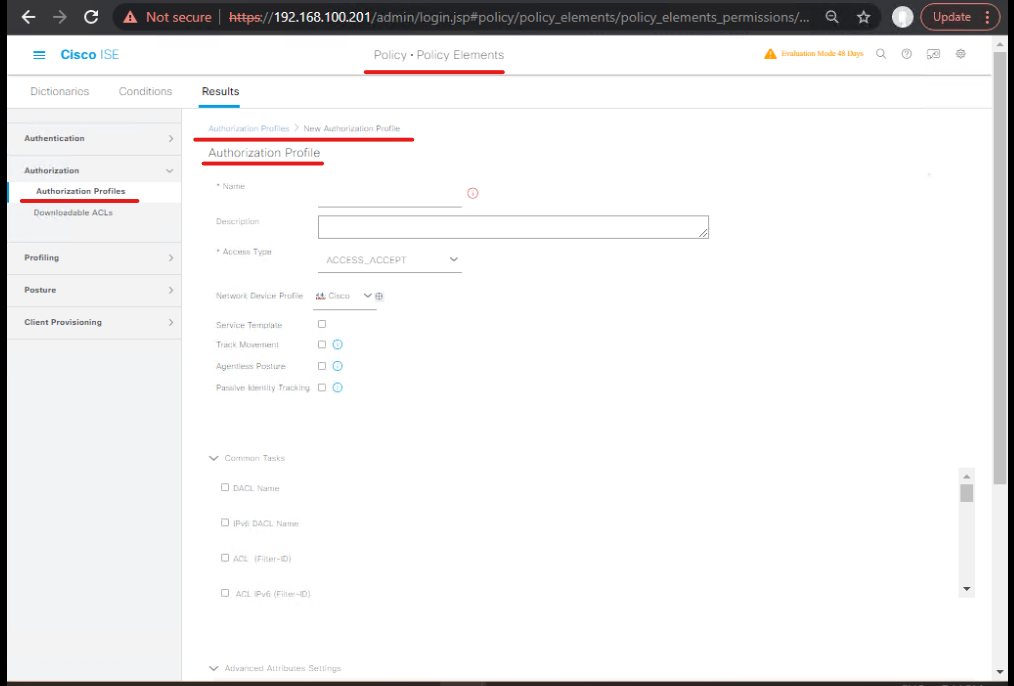
Step 7 — Authorization Profiles (dynamic enforcement)
Create Authorization Profiles that implement least privilege:
- Policy > Policy Elements > Results > Authorization > Add
ZTNA_App_Allow→ Access Type =ACCESS_ACCEPT, set downloadable ACL (dACL)allow_only_app_123or return SAML claim/Filter-ID used by ZTNA broker.ZTNA_Quarantine→ACCESS_ACCEPT, limited dACL to monitoring & remediation.ZTNA_LeastPrivilege→ returnTunnel-Private-Group-ID = 300(VLAN) or SGT tag name.- [Screenshot: Authorization Profile — dACL & VLAN fields]
- In Policy Sets > Authorization, add rules:
- If
AuthenticationStatus==AuthenticatedANDPosture==CompliantANDAD_Group==FinanceANDTime==BusinessHours→ ApplyZTNA_App_Allow(least privilege to finance apps). - Else if
Posture==Non-Compliant→ZTNA_Quarantine. - Ensure rules are ordered top→bottom.
- [Screenshot: Policy Sets > Authorization Rules]
- If

Validation: Authenticate a compliant lab user in the finance AD group. In Live Logs verify Access-Accept contains the returned attributes (VLAN/dACL/Filter-ID). On the enforcement point, confirm ACL/VLAN applied.
Step 8 — Enforcement Example: Switch + dACL (CLI)
Switch: RADIUS + dot1x + mab config (example IOS-XE)
configure terminal
radius server ISE
 address ipv4 10.10.10.11 auth-port 1812 acct-port 1813
 key ISE_SECRET
!
aaa new-model
aaa group server radius ISE_GROUP
 server name ISE
!
aaa authentication dot1x default group ISE_GROUP
aaa authorization network default group ISE_GROUP
!
interface GigabitEthernet1/0/5
 switchport mode access
 switchport access vlan 10
 authentication host-mode multi-auth
 authentication order dot1x mab
 authentication priority dot1x mab
 mab
 dot1x pae authenticator
 ip access-group 100 in    ! optional local ACL for pre-policy testing
end
Validation (switch CLI):
show authentication sessions interface Gi1/0/5 details
show running-config | section radius
show access-lists 100
When ISE returns dACL, the switch applies it dynamically — verify traffic allowed/blocked per dACL.
Step 9 — Enforcement Example: VPN (AnyConnect) + ISE
Steps:
- Configure ASA/FTD/NGFW to use ISE as RADIUS for VPN authentication.
- ISE returns VPN group/policy or Filter-ID to limit tunnels to a small set of internal hosts or to a ZTNA broker.
- For remote clients: require posture and MFA in authentication flow.
Validation:
- Connect via AnyConnect → see ISE Live Logs showing Posture check → Access-Accept with dACL or Filter-ID.
- On ASA/FTD, verify assigned group-policy or ACL applied to VPN session.
Step 10 — Returning SAML or Claims to Cloud ZTNA Broker
Flow:
- For web apps, ISE can integrate with cloud SSO or broker via pxGrid / API to communicate posture/identity. Alternatively, use external portal that consumes ISE ERS API to provision SAML assertions. The exact steps depend on the broker (Okta, Zscaler ZPA, Netskope).
Validation: Confirm ZTNA broker receives posture data (via pxGrid or REST) and allows/denies access accordingly.
Troubleshooting & Diagnostics
Always collect: ISE Live Logs, enforcement point logs, and packet captures.
A — Common validation commands & captures
ISE GUI checks
Operations > RADIUS > Live Logs— see Access-Request, chosen Authentication & Authorization Profile.Operations > Endpoints— check device attributes & posture.Work Centers > Posture > Live Sessions— posture state.
Switch CLI
show authentication sessions interface Gi1/0/5 details
show radius statistics
show logging | include RADIUS
VPN CLI
- ASA:
show vpn-sessiondb detail anyconnect - FTD:
show vpn session remote
Packet capture
sudo tcpdump -i any udp port 1812 or udp port 1813 -w radius.pcap
Open in Wireshark: filter radius and inspect Access-Request / Access-Accept attributes (look for Tunnel-Private-Group-ID, Filter-Id, cisco-av-pair).
B — Top issues & fixes
- User fails authentication — check AD bind, service account, time sync, verify Authentication Policy order.
- MFA doesn’t trigger — check external RADIUS token server presence, shared secret, or native Duo settings.
- Posture fails — ensure Posture Agent installed or host-scan enabled, confirm posture service reachable and correct checks configured.
- VLAN/dACL not applied — check returned RADIUS attributes in Live Logs; verify switch parses them (attribute names differ by vendor).
- CoA failed — confirm CoA port (3799), PSN reachability, and that NAD has dynamic auth configured. Inspect PCAP for CoA-NAK
Error-Cause. - False positives in authorization — confirm policy conditions (AD group) are exact and that identity groups are not overly broad; use test users.
Lab Walkthroughs with Validation
Two complete walkthroughs you should perform in class.
Walkthrough 1 — Corporate remote user (AnyConnect) → posture + MFA → least-privilege access
Goal: Remote user can access Finance apps only after AD + Duo + posture.
Steps:
- Configure AD + Duo in ISE (Steps 1–2).
- Build posture policy (Step 4) requiring AV running.
- Create Authorization rule that returns
ZTNA_App_AllowdACL forFinanceAD group when posture = Compliant. - Start AnyConnect VPN from client; provide AD creds → ISE triggers Duo push → Accept push → Posture runs → ISE returns dACL.
- Validate: On ISE Live Logs see sequence; on ASA/FTD check applied group-policy/ dACL; from client attempt to access allowed finance app and blocked internal resources.
Deliverables: screenshots of ISE Live Logs, ASA session detail, tcpdump of RADIUS, access test screenshots.
Walkthrough 2 — Wired user on corp LAN — BYOD device (non-compliant) goes to Quarantine VLAN
Goal: Onboarding a BYOD device that fails posture becomes isolated.
Steps:
- Configure switch port for 802.1X + MAB.
- Onboard device (or simulate non-compliant by missing a registry key).
- ISE identifies device via profiling; posture check fails → Authorization rule applies
ZTNA_QuarantineVLAN/dACL. - Validate:
show authentication sessionsshows endpoint in Quarantine VLAN; from quarantined client verify only remediation web traffic allowed.
Deliverables: ISE Live Logs, switch show authentication sessions, client browser showing portal for remediation.
Expert Level Use Cases (step-by-step mapping + validation)
Use Case A — Conditional access by application (micro-segmented ZTNA)
- Identify user + device (ISE).
- Determine application entitlement (AD group, AD attribute).
- Return per-app dACL or SAML claim to ZTNA broker.
- ZTNA broker enforces session on app only.
Validation: Attempt access to both allowed and blocked apps; only allowed app works.
Use Case B — Step-up MFA for high-risk actions
- ISE policy: if user requests access to admin portal or sensitive host, trigger step-up to MFA (call Duo).
- If successful, return SGT or dACL to allow admin functions.
Validation: Verify Live Logs show extra MFA challenge and final Access-Accept.
Use Case C — Automated SOC containment via pxGrid
- SIEM alerts on suspicious lateral behavior → orchestration calls ISE pxGrid to mark endpoint Quarantine.
- ISE applies quarantine Authorization Profile and issues CoA to NAD.
Validation: CoA Sent/Ack in Live Logs; NAD shows VLAN/dACL change; traffic is blocked.
FAQs: Zero Trust Network Access (ZTNA) with Cisco ISE
Q1. How does Cisco ISE enable Zero Trust Network Access (ZTNA) in an enterprise network?
A: Cisco ISE enforces ZTNA by ensuring continuous identity verification and context-based access. Instead of “trusting” a device after login, ISE uses posture assessment, profiling, certificates, and adaptive policies to dynamically validate the user/device throughout the session. This prevents lateral movement and enforces least-privilege access.
Q2. What is the difference between ZTNA and traditional NAC (Network Access Control) in Cisco ISE?
A: Traditional NAC is mostly about point-in-time access control (at login/connection). ZTNA extends this by enforcing continuous trust validation and granular segmentation using Scalable Group Tags (SGTs), posture re-checks, and dynamic policy re-evaluation. ISE + TrustSec/ACl + pxGrid integrations are what transform NAC into ZTNA.
Q3. Can Cisco ISE integrate with other ZTNA solutions like Cisco Duo or third-party MFA providers?
A: Yes. Cisco ISE integrates with Cisco Duo, RSA, Azure MFA, and others. For ZTNA, MFA is a key control layer. ISE works with RADIUS, SAML, and APIs to enforce step-up authentication and contextual MFA when risk factors change.
Q4. How do I validate Zero Trust policies in a Cisco ISE lab?
A: You can:
- Use
show logging application ise-psc.logfor policy evaluation logs. - Run
test aaa group radius <username> passwordon switches/WLC to simulate authentication. - Check ISE Live Logs for session classification.
- Validate TrustSec/SGTs using
show cts role-based sgt-mapandshow cts role-based permissions.
Q5. How do I configure ISE to enforce device posture before granting ZTNA access?
A:
- Enable Posture Services in ISE.
- Deploy the AnyConnect ISE Posture Module on endpoints.
- Create Posture Policies (e.g., check AV status, patch level, firewall ON).
- Bind posture result to an Authorization Policy (e.g., grant full access only if compliant).
- Validate using ISE Reports → Posture → Compliance Status.
Q6. What role does Cisco TrustSec play in implementing ZTNA with ISE?
A: TrustSec allows dynamic segmentation by tagging traffic with Scalable Group Tags (SGTs). Instead of using static VLANs/ACLs, ISE + TrustSec ensures each device/session receives an SGT. Policies are then enforced in hardware (switches, WLCs, Firewalls). This enables micro-segmentation and prevents lateral movement — a critical ZTNA principle.
Q7. Can ZTNA be implemented for remote workers through Cisco ISE?
A: Yes, but with integrations. Remote workers connect via Cisco VPN (AnyConnect/SD-WAN) or ZTNA cloud services (Cisco Duo, Secure Access). ISE still enforces posture/MFA policies, and pxGrid integrations provide telemetry to external enforcement points like firewalls and ZTNA gateways.
Q8. What are the minimum Cisco ISE licensing requirements for ZTNA implementation?
A:
- Base License → Authentication & Authorization (basic NAC).
- Plus License → Profiling & BYOD.
- Apex License → Posture and advanced TrustSec/ZTNA.
- Device Admin License (optional) → If TACACS+ device management is part of ZTNA enforcement.
For full ZTNA, you need Apex at minimum.
Q9. How does ISE ensure “continuous trust evaluation” in a ZTNA model?
A: Cisco ISE continuously monitors session context by:
- Profiling device traffic (via DHCP, HTTP, RADIUS probes).
- Re-authenticating sessions at intervals.
- Triggering CoA (Change of Authorization) if posture, device health, or threat feeds (via pxGrid) change.
- Working with Cisco SecureX/Firepower to dynamically quarantine compromised endpoints.
Q10. What are the most common troubleshooting steps if ZTNA enforcement fails in Cisco ISE?
A:
- Verify RADIUS communication:
debug radiuson switches/WLCs. - Check ISE Live Logs → Was policy matched? Wrong rule order?
- Ensure TrustSec/SGTs are being propagated:
show cts environment-data. - Confirm pxGrid is up for telemetry (ISE → pxGrid Services).
- Look at posture client logs (AnyConnect DART) for compliance checks.
- Use ISE Diagnostic Tools → Policy Set Simulator to test policy outcomes.
Closing Notes (Key Takeaways)
- ISE = policy brain for ZTNA: identity + posture + context → dynamic enforcement attributes.
- Build least-privilege policies, require MFA/ posture for sensitive resources, and enforce via switches, NGFW/VPN, or cloud brokers.
- Test in lab, start small, use monitor mode, and automate containment with pxGrid. Document rollback plans for OT/critical systems.
Upgrade Your Skills — Start Today
For in-depth, hands-on Cisco ISE Mastery training, subscribe to Network Journey on YouTube and join my instructor-led Fast-Track to Cisco ISE Mastery Pro — a 4-month course with EVE-NG/VMware labpacks, weekly live troubleshooting, and exam-style scenarios.
Reserve your seat and get the ZTNA lab pack: https://course.networkjourney.com/ccie-security/
Enroll Now & Future‑Proof Your Career
Email: info@networkjourney.com
WhatsApp / Call: +91 97395 21088
![[Day 25] Cisco ISE Mastery Training: Dynamic VLAN Assignment in Wired Networks](https://networkjourney.com/wp-content/uploads/2025/08/Day-25-Cisco-ISE-Mastery-Training-Dynamic-VLAN-Assignment-in-Wired-Networks.png)
![[Day 121] Cisco ISE Mastery Training: Automated Guest User Creation via API](https://networkjourney.com/wp-content/uploads/2025/08/Day-121-Cisco-ISE-Mastery-Training-Automated-Guest-User-Creation-via-API.png)