Trainer Sagar Dhawan
- Posted on
[Day 47] Cisco ISE Mastery Training: Customizing Guest Device Registration Portal
Table of Contents
Introduction
The Guest Device Registration Portal (GDRP) in Cisco ISE lets visitors self-register devices (MAC caching) and receive time-bound internet access—without burdening IT or exposing corporate networks. Customization matters because it directly controls security (device limits, expiries, CAPTCHA/OTP), user experience (branding, languages, fields), and operations (sponsor flows, notifications, audits). Today you’ll build a branded portal, wire it to your Guest policy, and validate the full redirect → register → CoA → internet flow.
Problem Statement
Typical guest Wi-Fi pitfalls:
- Open SSIDs or shared PSKs → no identity, no audit, no isolation.
- Generic portals → low completion, legal/compliance gaps (no ToS capture, no consent).
- No device control → one user onboards many devices; stale MACs persist; no expiries.
- IT bottleneck → helpdesk creates accounts; sponsors have no tooling.
You need a secure, automated, auditable flow that limits devices, expires access, brands the UX, and enforces guest-only connectivity.
Solution Overview (What you will implement)
- ISE GDRP (Self-registration) with branding, custom fields, ToS, email/SMS OTP, device limits, auto-expiry.
- Central Web Auth (CWA) on WLC with Redirect ACL and AAA override.
- Authorization Profiles:
Guest-Redirect(pre-auth),Guest-Internet(post-auth) + optional dACL/VLAN. - MAC caching: post-portal, the device is stored in ISE Endpoints and allowed back automatically until expiry.
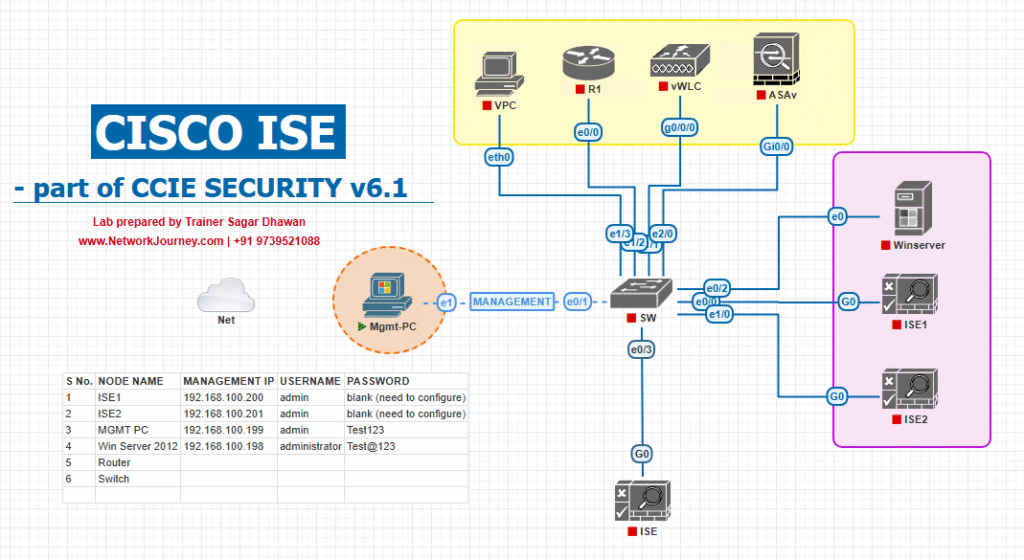
Sample Lab Topology
Environment
- Virtualization: VMware Workstation or EVE-NG
- ISE: 3.x (PAN/PSN single VM for lab)
- WLC: 9800-CL (recommended) or AireOS 8.10+
- Switch: Cat 9300 (or EVE-NG L2 image)
- Endpoints:
- Guest laptop/phone (wireless)
- Admin PC (ISE GUI + WLC GUI)
- Optional AD/DNS/SMTP for branding FQDN + email OTP
Topology Layout:
Step-by-Step GUI Configuration Guide
Prereqs (do once)
- DNS/NTP consistent across ISE/WLC/clients.
- ISE HTTPS cert trusted by clients (public CA or your internal CA pushed to clients).
- (Optional) SMTP/SMS connectors ready if you’ll use OTP/email.
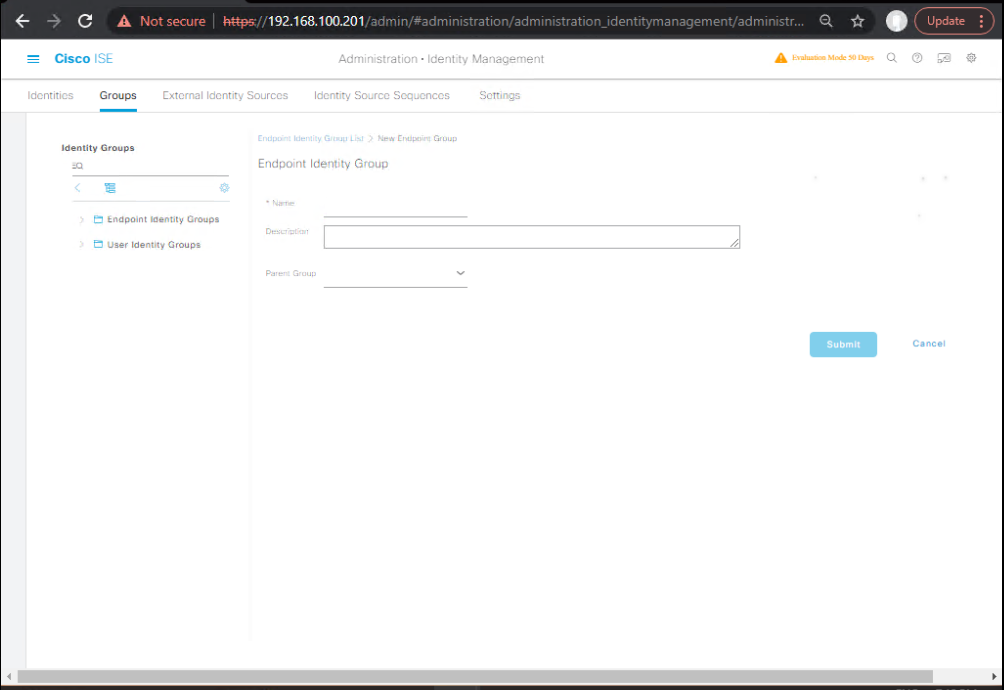
A) ISE: Create Endpoint Group + Guest Type
- Endpoint Group
- Administration > Identity Management > Groups > Endpoint Identity Groups > Add
- Name:
Guest-Registered-Devices - Description: “Devices registered via Guest DRP”
- Save
[Screenshot: ISE Endpoint Group]
- Name:
- Guest Type (device limits & timers)
- Work Centers > Guest Access > Portals & Components > Guest Types > Add
- Name:
Visitor-24h-1Device - Account Duration: 1 Day
- Max Devices per Account: 1
- Require Approval: Unchecked (self-approve)
- Sponsor Required: No
- Endpoint Group on Registration:
Guest-Registered-Devices - Save
[Screenshot: Guest Type Config]
- Name:

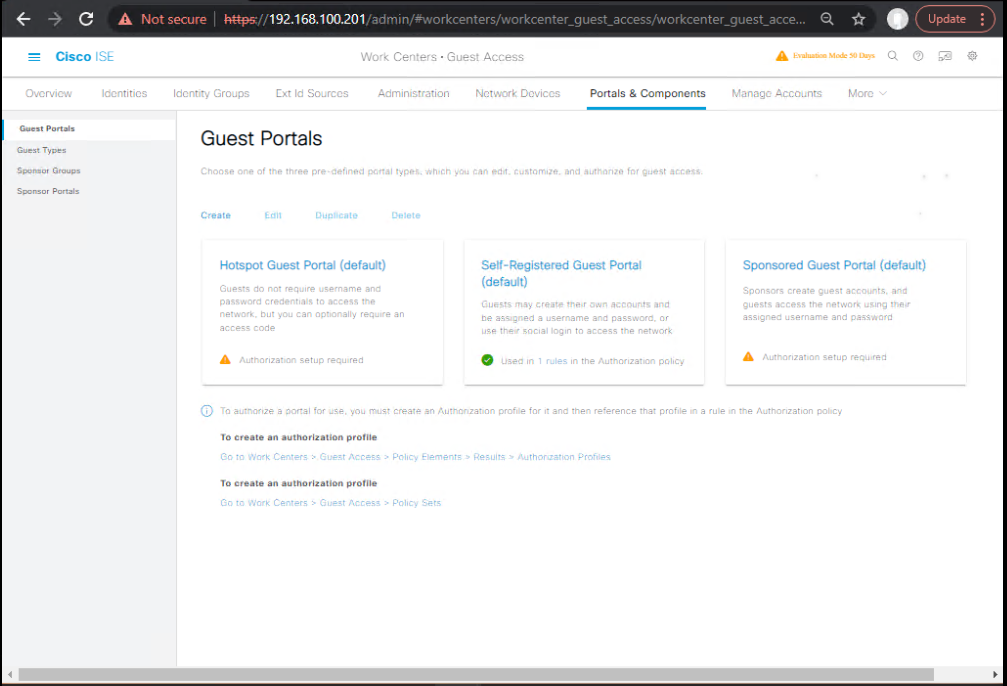
B) ISE: Build the Guest Device Registration Portal (GDRP)
- Create Portal
- Work Centers > Guest Access > Portals & Components > Guest Portals > Add
- Portal Type: Self-Registered Guest Portal (with Device Registration)
- Name:
Guest-DRP-Portal - URL auto-generates (note it)
[Screenshot: Create GDRP]
- Branding & Theme
- In the portal: Portal Page Customization
- Logo: upload PNG/SVG
- Colors/Theme: set corporate colors
- Footer: add company legal text
- Languages: enable additional languages if needed
[Screenshot: Portal Branding]
- Login & Registration Form
- Guest & Sponsor Settings > Guest Registration
- Registration workflow: Self-Registration (no sponsor)
- Fields: Enable First Name, Last Name, Email, Mobile, Company, Purpose
- Validation: Email format, Mobile format
- ToS: Enable Must Accept with time stamp capture
- reCAPTCHA: Enable (if you want bot protection)
[Screenshot: Registration Fields]
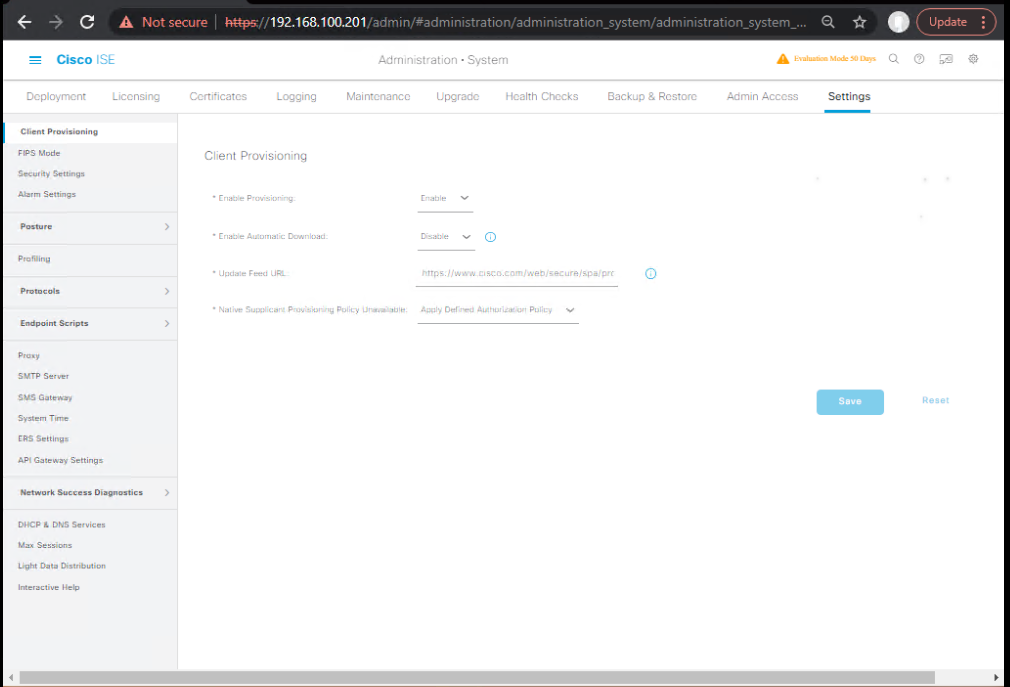
- Verification & Notifications (Optional but recommended)
- Identity Verification: choose Email OTP or SMS OTP
- Delivery: configure SMTP or SMS Gateway under Administration > System > Settings
- Customize Email/SMS templates with variables (e.g.,
$userName,$generatedPassword)
[Screenshot: OTP Template]
- Device Registration Settings
- Device Registration: Enabled
- Max Devices: inherit from Guest Type or override here
- Endpoint Group on Registration:
Guest-Registered-Devices - MAC Collection: Automatic (CWA) + allow manual entry if needed
- Post-Registration Action: Change of Authorization (CoA)
[Screenshot: Device Registration]
- Portal Test URL
- Note the Guest Portal URL (FQDN preferred) for WLC redirect.
[Screenshot: Portal Summary]
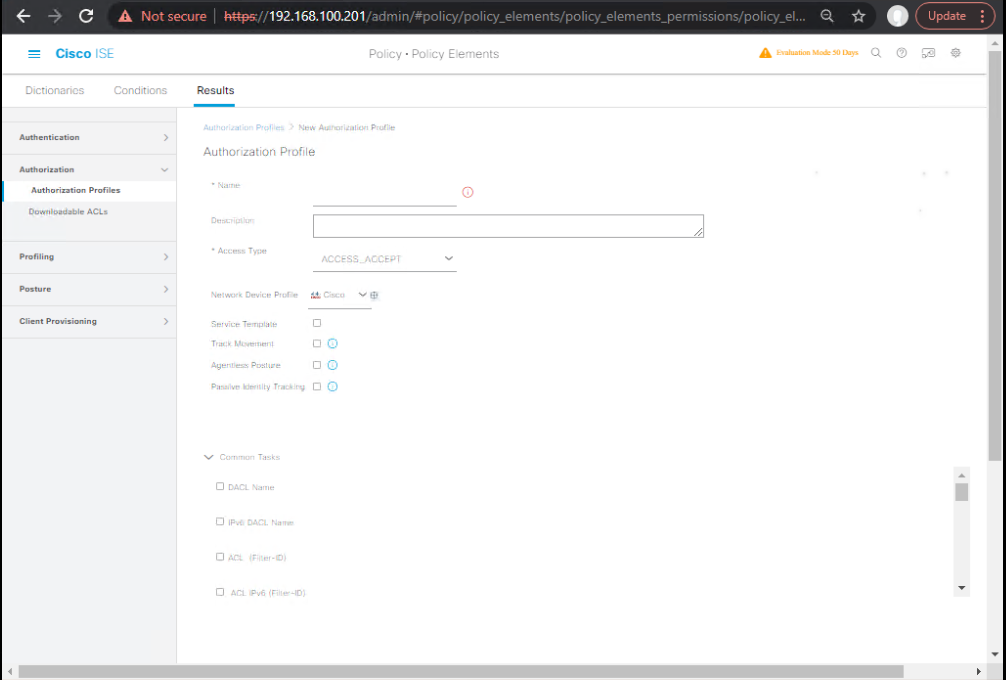
C) ISE: Authorization Profiles & Policy Set
- Authorization Profile – Pre-Auth Redirect
- Policy > Policy Elements > Results > Authorization > Authorization Profiles > Add
- Name:
Guest-Redirect - Access Type: ACCESS_ACCEPT
- Web Redirection (CWA): Centralized Web Auth
- ACL:
ACL-REDIRECT(the name you’ll create on WLC) - Redirect URL: use Portal URL from step B6
- ACL:
- (Optional) URL-Redirect-ACL value (for AireOS/9800 use matching name)
[Screenshot: AuthZ Profile Redirect]
- Name:
- Authorization Profile – Post-Auth Internet
- Add profile
Guest-Internet- VLAN:
Guest-VLAN(or) - dACL:
GUEST_INTERNET_ONLY(permit DNS, DHCP, HTTP/HTTPS to internet; deny RFC1918) - Session-Timeout:
86400(1 day)
[Screenshot: AuthZ Profile Internet]
- VLAN:
- Policy Set
- Policy > Policy Sets > Add
- Name:
Wireless-Guest-DRP - Condition:
Network Device:Device Type = WirelessANDRadius:Called-Station-ID CONTAINS Guest-DRP(or SSID match) - Authentication Policy:
If MAB→ Internal Endpoints (allows redirect flow)If Guest Portal Login→ Internal Users (Guests)
- Authorization Policy (top-down):
- IF
WLCANDSSID == Guest-DRPANDNetworkAccess:UseCase = Guest FlowANDAuthenticationStatus = Unknown→Guest-Redirect - IF
IdentityGroup = Guest-Registered-Devices→Guest-Internet - ELSE → Deny or Quarantine
[Screenshot: Policy Set Screen]
- IF
- Name:

D) WLC: SSID, ACL, and Redirect (9800-CL GUI shown; note equivalents exist on AireOS)
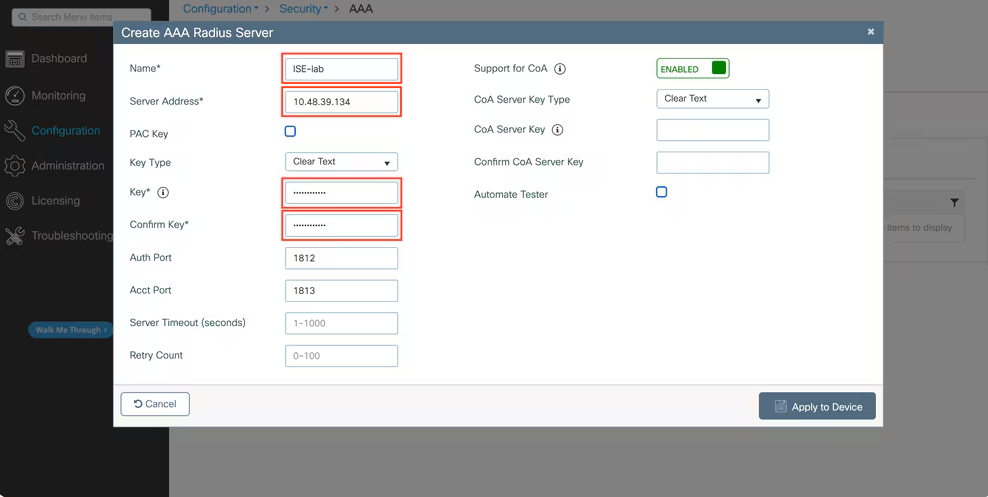
- RADIUS Server (ISE)
- Configuration > Security > AAA > Servers > RADIUS > Add
- IP, Key, AuthZ and Accounting enabled
[Screenshot: WLC RADIUS]
- IP, Key, AuthZ and Accounting enabled
- Pre-Auth Redirect ACL
- Configuration > Security > ACL > Add > Type: IPv4 Standard/Extended
- Permit: DHCP (UDP 67/68), DNS (UDP/TCP 53)
- Permit: ISE PSN IP (tcp/80,443)
- Deny: RFC1918 (optional)
- Deny: any other (implicit)
- Name it
ACL-REDIRECT(must match ISE profile)
[Screenshot: WLC ACL]
- WLAN/SSID
- Configuration > Tags & Profiles > WLANs > Add
- SSID:
Guest-DRP - Security > Layer 2: None (Open)
- MAC Filtering: Enabled (required for MAB/CWA)
- AAA: Bind RADIUS (ISE) for AuthN/AuthZ/Acct
- Policy Profile: Enable AAA Override
[Screenshot: WLAN Security]
- SSID:
- Web Auth Redirect
- WLAN > Security > Layer 3
- Web Auth: On
- Pre-Auth ACL:
ACL-REDIRECT - Redirect URL: paste the Portal URL from ISE
[Screenshot: WLAN L3 WebAuth]
- Accounting
- WLAN > Security > AAA
- RADIUS Accounting: Enable (helps profiling and session logs)
E) End-to-End Validation (GUI + CLI)
Flow to verify:
- Connect guest device to
Guest-DRP→ gets IP via Guest VLAN/DHCP. - Try browsing → redirected to ISE Guest-DRP Portal.
- Register (email/SMS OTP if enabled) → Accept ToS → Register device.
- ISE sends CoA → client reauths via MAB → hits
Guest-Internet→ gets internet.
ISE GUI Checks
- Operations > RADIUS > Live Logs
- Entry 1: MAB →
Guest-Redirect(URL-Redirect) - Entry 2: Guest Login success (UseCase: Guest)
- Entry 3: MAB post-CoA →
Guest-Internet
[Screenshot: ISE Live Logs]
- Entry 1: MAB →
WLC CLI (9800)
show wlan summary
show wireless client mac <client-mac>
show access-lists summary
show logging | inc Webauth|AAA|Redirect
debug wireless mac <client-mac> events
debug aaa all
undebug all
AireOS CLI (if used)
show client detail <mac>
show acl summary
debug client <mac>
debug aaa events enable
debug pem state enable
Portal Reachability (Admin PC)
nslookup <ise-fqdn>
curl -kI https://<ise-fqdn>:443/guestportal   # Expect 200/302
Endpoint Registration Check (ISE)
- Context Visibility > Endpoints → search MAC → Identity Group = Guest-Registered-Devices, Portal Used = Guest-DRP-Portal, Expiry visible.
[Screenshot: Endpoint Detail]
Expiry Test (fast)
- Temporarily set Guest Type duration to 30 minutes, wait for expiry, re-open browser → redirect back to portal (Live Logs confirm).
FAQs for Customizing Guest Device Registration Portal
1. Can I change the entire layout of the Device Registration Portal?
Yes. ISE allows deep customization of portal HTML, CSS, and JavaScript under Work Centers > Guest Access > Portals & Components > Device Registration Portal. You can fully alter branding, positioning, and text.
2. Can I pre-populate certain fields for known users?
Yes. Using identity variables (like $user.firstName or $user.email), you can auto-fill fields based on the authenticated user’s profile pulled from ISE or an external directory like Active Directory.
3. Is it possible to have different themes for different device types?
Indirectly, yes. You can create multiple Device Registration Portals (each with unique branding) and assign them through policy conditions matching device type, MAC OUI, or profiling results.
4. Can I restrict which device types can be registered?
Yes. You can add Policy Conditions in the authorization policy that check profiling results and allow or deny registration based on device type (e.g., only allow iOS and Android, block unknown devices).
5. How can I display custom instructions for BYOD onboarding?
You can insert custom text or instructional HTML in the portal’s Welcome Page and Registration Page. Many admins embed images or short GIF walkthroughs.
6. Can the portal automatically register a device without user interaction?
Yes. If the endpoint is authenticated and meets policy requirements, you can configure ISE to auto-register the MAC address without requiring the user to fill out the form.
7. Can I add extra fields like Employee ID or Department?
Yes. You can add custom attributes to the endpoint database and expose them in the registration form. These values can later be used in policy decisions.
8. What happens if a user tries to register the same device twice?
By default, ISE recognizes the MAC address and prevents duplicate entries unless the device record is removed from the Endpoints database.
9. Can I integrate the portal with a MDM solution during registration?
Yes. During registration, ISE can redirect to an MDM enrollment page, validate compliance, and then complete the device registration.
10. How do I test portal changes without affecting production?
Create a duplicate Device Registration Portal, apply changes, and bind it to a test SSID or VLAN in your authorization policy. This ensures production users are unaffected during customization testing.
YouTube Link
For more in-depth Cisco ISE Mastery Training, subscribe to my YouTube channel Network Journey and join my instructor-led classes for hands-on, real-world ISE experience
Closing Notes
You now have a branded, secured, rate-limited, and auditable Guest Device Registration experience. The flow is predictable (CWA → Register → CoA → MAB Allow), easy for visitors, and safe for your network. Keep ACLs clean, certs trusted, device limits tight, and expiry short.
Upgrade Your Skills – Start Today
Turn this lab into a deployable blueprint with expert coaching, graded labs, and interview prep.
Join 4-Month, Instructor-Led CCIE Security & ISE Mastery
- Live deep-dive classes (NAC, Firewalls, VPN, Threat Defense)
- Full EVE-NG topologies + lab workbooks & solution keys
- Real-world configs (CWA, dACLs, BYOD, pxGrid, SGT)
- Lifetime recordings, career mentorship, mock interviews
Bonus for enrollees this week:
- “Guest Access Playbook” (checklists, dACL templates, WLC/ISE snippets)
- “ISE Troubleshooting Field Guide” (Live Logs patterns + CLI cheats)
Secure your seat now: https://course.networkjourney.com/ccie-security/
(Enroll → get instant orientation kit + lab topology pack. Perfect for building your portfolio and collecting leads from your own deployments.)
Enroll Now & Future‑Proof Your Career
Email: info@networkjourney.com
WhatsApp / Call: +91 97395 21088
![[Day 40] Cisco ISE Mastery Training: End-to-End Wired Authentication Lab Validation](https://networkjourney.com/wp-content/uploads/2025/08/Day-40-Cisco-ISE-Mastery-Training-End-to-End-Wired-Authentication-Lab-Validation.png)