![[Day 5] Cisco ISE Mastery Training: Installing Cisco ISE in VMware ESXi / EVENG](https://networkjourney.com/wp-content/uploads/2025/08/Day-5-Cisco-ISE-Mastery-Training-Installing-Cisco-ISE-in-VMware-ESXi-EVENG.png)
Trainer Sagar Dhawan
- Posted on
[Day 5] Cisco ISE Mastery Training: Installing Cisco ISE in VMware ESXi / EVENG
Table of Contents
Introduction
This session shows you how to deploy Cisco Identity Services Engine (ISE) in a lab environment using VMware ESXi (vSphere client) and EVE-NG. Installing ISE correctly matters because ISE is the enforcement and policy brain for NAC — mis-provisioned VMs, wrong disk types, or snapshot usage can break clustering, DB replication, or leave services in a degraded state. This workshop focuses on:
- Pre-deployment checks and host configuration.
- OVA (preferred) or ISO deployment flow on ESXi.
- How to add ISE as a node in EVE-NG (ISO→qcow/ISO method).
- The initial ISE setup wizard (console) and post-deploy validations (GUI + CLI).
- Troubleshooting the common install pain points you’ll see in labs.
Problem Statement
In real networks:
- ISE nodes are central — if an Admin node fails or a PSN is mis-installed, RADIUS/TACACS can break widely.
- Common pain points during install: wrong VM sizing, unsupported snapshot/backup strategy, wrong NIC types, incorrect storage performance (IOPS) or thin provisioning, and DNS/NTP mismatches that cause AD join failures.
If you don’t follow proper install steps, you’ll waste hours debugging service start failures, AD-join problems, or replication faults. The goal of this lab is to install ISE in a repeatable, correct way so validation is quick and reliable.
Solution Overview
Correct installation practice prevents those issues:
- Follow Cisco VM resource recommendations (vCPU, RAM, disk) and use recommended disk provisioning and storage IO guidelines.
- Deploy using the OVA for ESXi (recommended). If using EVE-NG, upload the Cisco ISE ISO and register the node properly (rename to cdrom.iso).
- Perform console initial setup (network, NTP, DNS, admin password) using the interactive setup tool — it’s one-time and required.
- Validate via CLI & GUI: ping/DNS tests,
show application status ise, and confirm the Admin GUI loads.
Load-bearing references (quick):
- Cisco ISE VM & install requirements (OVA/ISO steps & storage I/O).
- OVA import / ZTP notes for ESXi flows.
- EVE-NG image upload and renaming steps. (eve-ng.net)
- CLI verification:
show application status ise/show version.
Sample Lab Topology
Goal: A single-node lab (PAN + PSN combined) for validation. For multi-node labs follow the same deploy steps for the other nodes and then join them together.
Components (VMware ESXi or EVE-NG):
- ISE VM (single node for lab): 4 vCPU, 16 GB RAM, 300 GB (evaluation) – storage: thick provision recommended.
- Windows Server 2019: Active Directory, DNS, DHCP (10.10.10.10)
- CSR1000v: Router for Internet simulation / default gateway (10.10.10.1)
- IOSv-L2 / Catalyst or physical switch: for wired port testing and RADIUS reachability
- WLC (9800 or 5508 image / simulated) for WebAuth testing
- Windows 10 client: wired test
- Wi-Fi client (laptop): wireless test
IP summary (suggested):
- Management network:
10.10.10.0/24 - ISE:
10.10.10.5/24(static) - AD/DNS:
10.10.10.10/24
Topology Layout:
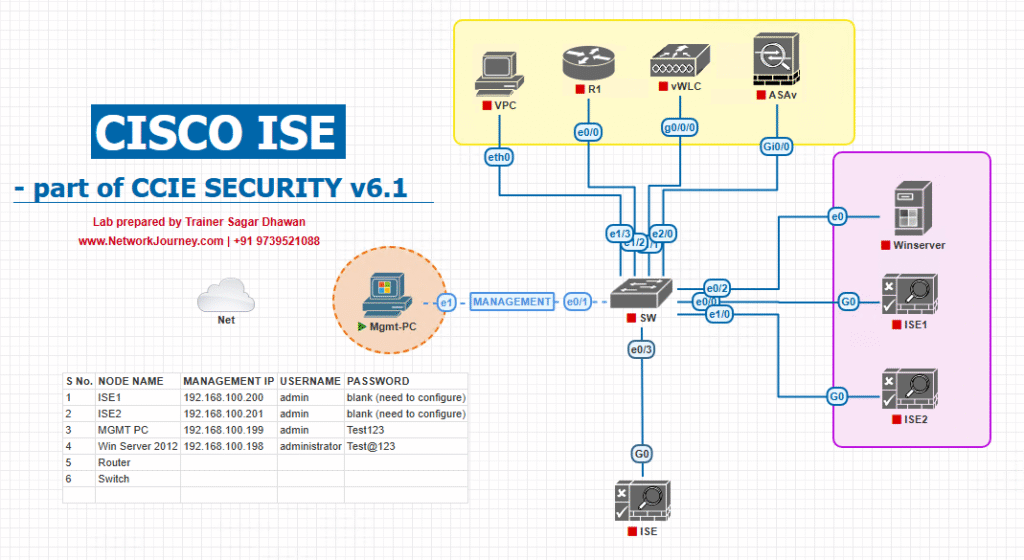
Diagram: Use your favorite diagram tool (Visio/Draw.io). Keep ISE and AD on a management VLAN so they can reach each other directly.
Step-by-Step GUI Configuration Guide (ESXi & EVE-NG) — Do every validation step
Important: Captures/snapshots of a production ISE are not supported — do not rely on VMware snapshots for backups. Use ISE native backup.
Pre-deploy checklist (do not skip)
- Host prerequisites
- Ensure VT-x/AMD-V is enabled in BIOS on the ESXi host.
- Reserve CPU & RAM for the ISE VM (Cisco recommends reserving resources and thick provisioning for ISE VMs).
- Storage
- Ensure consistent storage latency/IOPS — Cisco documents minimum read/write perf for the appliance and recommends fast disks for production.
- Networking
- Create a management portgroup in vSphere & ensure DNS can resolve AD FQDNs.
- Files required
- ISE OVA or ISO (download from Cisco software download), and if you use ZTP/extra config, have that image ready (for advanced flows).
A — Deploying Cisco ISE on VMware ESXi (OVA method) — preferred
Step 1 — Deploy OVA
- Open vSphere Client (HTML5) → Hosts & Clusters → choose the target host/cluster.
- Right-click → Deploy OVF Template → Browse to the Cisco ISE
.ovafile.
[Screenshot: vSphere Deploy OVF Template Screen]

- Accept the EULA, choose the VM name (e.g.,
ISE-PAN-LAB), pick datastore.
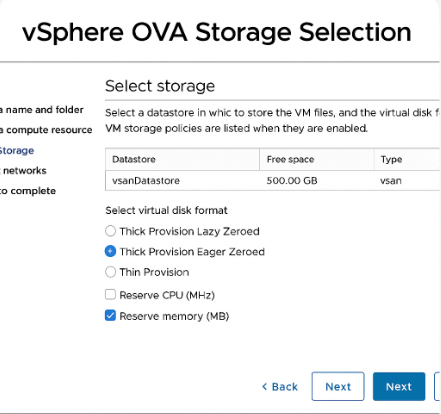
Important: Choose Thick Provision Eager Zeroed if storage allows; otherwise use Thick Lazy Zeroed — Cisco recommends not using thin for production. Reserve CPU/memory.
[Screenshot: vSphere OVA Storage Selection]
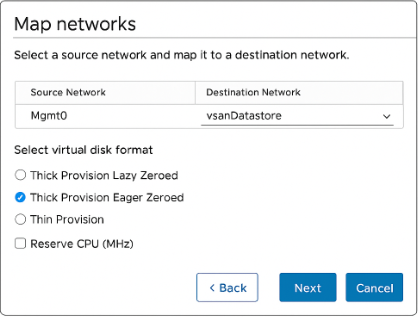
- Map networks: assign the ISE VM NIC to the management portgroup you created.
[Screenshot: vSphere Network Mapping]
- Finish and power on the VM.
Step 2 — (Optional) insert ZTP ISO (if you have a ZTP config)
- Attach the ZTP ISO to the VM CD drive before powering on, per Cisco instructions for zero-touch config flows.
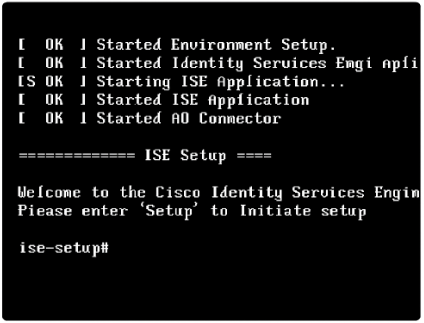
Step 3 — Open the VM console
- The ISE appliance boots and invokes the setup program (interactive CLI). Wait for the prompt.
[Screenshot: ISE Console During Setup]
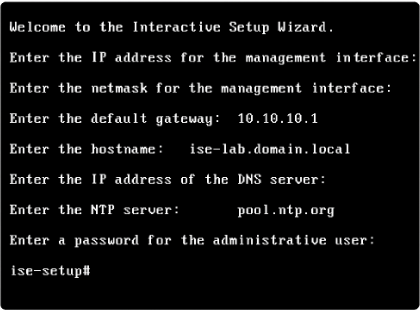
Step 4 — Console Initial Setup (one-time interactive wizard)
When the console setup runs, provide:
Management IP(e.g., 10.10.10.5) / netmask / gatewayHostname(ise-lab.domain.local)DNS server(10.10.10.10)NTP server(pool.ntp.org or your AD server)AdminGUI password (you will create it during setup)
These entries are provided via the interactive prompts described in the ISE install guide.
[Screenshot: ISE Setup Wizard – Network Entry]
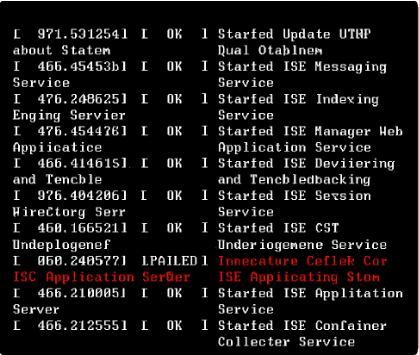
Step 5 — Wait for services
- The appliance will perform first-boot tasks and start services; this can take several minutes (be patient — 15–60+ minutes depending on node size). Use the console to watch messages.
[Screenshot: ISE Boot Messages]
Validation (ESXi/ISE):
Cisco ISE CLI Verification Commands – Initial Setup Validationise/admin# ping 10.10.10.1
Purpose: Checks basic IP connectivity to a default gateway or network device.
Expected Output: Replies with minimal latency and no packet loss.ise/admin# nslookup ad.domain.local 10.10.10.10
Purpose: Confirms DNS resolution of your Active Directory FQDN via a specific DNS server (10.10.10.10).
Expected Output: Shows resolved IP address of ad.domain.local.ise/admin# show application status ise
Purpose: Displays the running state of ISE application processes.
Expected Output:
All essential processes should show Running.
Example:Application Server Running Database Running M&T Session Database Running Certificate Authority Runningise/admin# show version
Purpose: Displays the current installed version of Cisco ISE and build info.
Expected Output:
Example:Cisco Identity Services Engine Version: 3.2.0.542
Final Validation:
The show application status ise output must eventually show all required processes in Running state. If any are stuck in Initializing or Stopped, troubleshooting is required before proceeding with configuration.
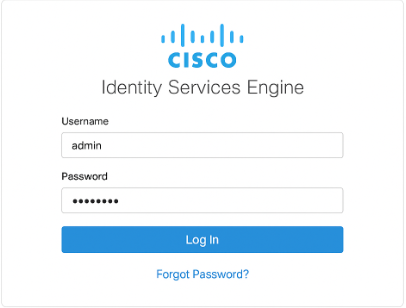
- From your workstation, open browser:
https://10.10.10.5/admin(orhttps://10.10.10.5/) and confirm the ISE Admin portal loads on HTTPS 443.
[Screenshot: ISE Admin Login Page]
- If the Admin GUI is unreachable but
show application status iselists processes running, trytech netstat | inc 443on ISE (or check firewall between your workstation and VM).
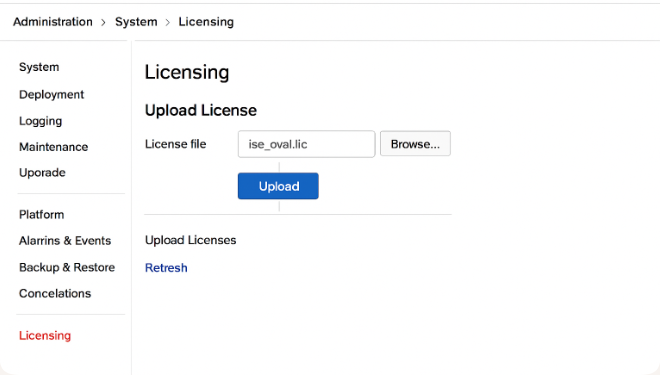
Step 6 — Upload License & Apply
- GUI:
Administration → System → Licensing→ Upload Evaluation or permanent licenses.
[Screenshot: ISE Licensing Upload]
Step 7 — Create Backup Immediately
- Use ISE’s built-in backup functionality (Administration → System → Backup). Do not use hypervisor snapshots to back up ISE.
B — Adding Cisco ISE to EVE-NG (ISO flow)
Note: EVE-NG does not include vendor images. You must upload a Cisco ISE ISO into the EVE filesystem and create the node. The steps below follow the EVE how to pattern. (eve-ng.net)
Step 1 — Prepare the EVE host
- SSH to EVE server as root. Create an image folder:
mkdir -p /opt/unetlab/addons/qemu/ise-<version>/ - Upload the Cisco ISE ISO using WinSCP/SFTP to that folder.
Step 2 — Rename & fix
- Inside EVE:
cd /opt/unetlab/addons/qemu/ise-<version>/ mv ise-<version>.SPA.x86_64.iso cdrom.iso /opt/unetlab/wrappers/unl_wrapper -a fixpermissions(Thecdrom.isoname is expected by EVE templates). (eve-ng.net)
Step 3 — Create node in EVE GUI
- In the EVE web UI, add a new qemu node using the ISE template (choose the folder you created), set vCPU/RAM (4 vCPU, 16GB), link to networks, and start the node. Open the console.
Step 4 — Run ISE console setup
- The ISE ISO will boot and run the same interactive setup wizard. Provide IP, DNS, NTP, hostname, admin credentials as for ESXi.
Validation (EVE-NG):
- From the EVE console run the same ISE CLI checks:
ping 10.10.10.1 nslookup ad.domain.local 10.10.10.10 show application status ise show version - From your laptop (or a routed connection), browse to
https://<ISE-IP>/adminand login.
Post-deploy Checks (GUI + CLI validation summary)
CLI commands (ISE node) — run these as soon as setup completes:
show application status ise— check all ISE services.show version— confirm installed version.ping <gateway>andnslookup <AD-FQDN>— basic network/DNS checks.application reset-passwd ise admin— (if you need to reset web GUI password from console). (packetmischief.ca)
GUI checks
- Admin login success at
https://<ISE-IP>/admin. Administration → System → Deployment— confirm node persona (PAN/PSN/MNT) and green status.Operations → RADIUS → Live Logs— after you configure a NAD (switch), verify RADIUS hits.
ESXi host checks
- Ensure VM shows expected resource reservation & no snapshots present. If backups are required, use ISE backup, not hypervisor snapshots.
FAQs
1. What is the minimum hardware requirement to install Cisco ISE on VMware/EVE-NG?
- Lab Minimum (for basic features):
- 4 vCPU
- 12 GB RAM
- 200 GB HDD
- Recommended (for profiling, posture, guest portals):
- 4–8 vCPU
- 16–32 GB RAM
- 300 GB+ HDD
- CLI Check:
show system resources - GUI Check:
- Navigate: Administration → System → Maintenance → System Summary
- Look for CPU/Memory Utilization.
2. Can I run Cisco ISE in EVE-NG without ESXi?
- Yes — EVE-NG supports ISE installation directly as a VM.
- Requirement: EVE-NG Pro or Community with nested virtualization enabled.
- Tip: Ensure the underlying physical CPU supports VT-x/AMD-V.
- Validation:
grep -E 'vmx|svm' /proc/cpuinfo
3. Why does my ISE installation hang at “Application Server is starting”?
- Usually caused by insufficient CPU/RAM allocation or slow disk I/O.
- Fix:
- Increase CPU/RAM.
- Use SSD storage for faster boot.
- CLI Check:
show application status iseEnsure all services are running.
4. Do I need to configure an IP address during installation, or can I do it later?
- You must configure:
- IP address
- Hostname (FQDN)
- DNS
- NTP server
- These settings are critical for AD integration later.
- Change later if needed:
conf t interface GigabitEthernet 0 ip address x.x.x.x y.y.y.yThen update in Administration → Deployment in GUI.
5. How do I verify ISE services after first boot?
- CLI:
show application status iseLook for all services in running state. - GUI:
- Login → Administration → System → Deployment
- Status column should show Running for the node.
6. My ISE web GUI is not loading — what should I check?
- Possible causes:
- HTTPS service not running.
- Firewall blocking TCP 443.
- CLI Fix:
application stop ise application start iseor restart:reload - Validation:
- Access via:
https://ISE_FQDN:443/admin - Ping FQDN from client.
- Access via:
7. What’s the default ISE admin username/password?
- No default — set during installation.
- If forgotten:
- Console into VM → Reboot → Select ISE Recovery Mode → Reset password.
- Command method:
application reset-passwd ise admin
8. Can I integrate ISE with Active Directory immediately after install?
- Yes — but ensure:
- Correct time sync with AD.
- DNS resolution works for domain controllers.
- CLI Check:
show ntp nslookup dc.domain.local - GUI Path: Administration → Identity Management → External Identity Sources → Active Directory.
9. How can I backup my ISE lab installation?
- GUI:
- Administration → Maintenance → Backup & Restore → Backup
- Store backup on FTP/SFTP server.
- CLI:
backup LAB_BACKUP repository MYREPO - Tip: In a lab, you can snapshot the VM in VMware/EVE-NG before changes.
10. How do I confirm ISE is reachable from switches/WLC?
- Ping Test:
ping ise.domain.local - RADIUS Test (from switch):
test aaa group radius <username> <password> new-code - GUI Validation in ISE:
- Operations → RADIUS → Live Logs — Look for test request entries.
YouTube Link
For more in-depth Cisco ISE Mastery Training, subscribe to my YouTube channel Network Journey and join my instructor-led classes for hands-on, real-world ISE experience
Upgrade Your Skills – Start Today
Take Your Cisco ISE Skills from Lab to CCIE-Level Expertise
You’ve just seen how powerful Cisco ISE can be when installed and configured properly — but this is just the tip of the iceberg.
If you’re serious about mastering Cisco ISE, NAC, and the full CCIE Security blueprint, join me, for my 4-Month Instructor-Led CCIE Security Mastery Program.
- Inside this training, you’ll get:
- 100% Live Sessions — Learn directly from me, not pre-recorded videos
- Full CCIE Security Course Outline — Covering Cisco ISE, Firepower, VPN, Advanced Threat Defense, and more (View Full Outline Here)
- Hands-On Labs — VMware ESXi, EVE-NG, and production-style setups
- 1-on-1 Doubt Sessions — Direct access to me to solve your unique challenges
- Real-World Scenarios — Learn configs and troubleshooting exactly as you’ll face in the field
- Exam & Job Prep — Build the skills to crack the CCIE lab and lead enterprise security projects
Next Batch Starts Soon — Seats Are Limited
Click below to reserve your spot and get started on your journey to becoming an elite network security engineer.
Reserve Your Seat Now
Enroll Now & Future‑Proof Your Career
Email: info@networkjourney.com
WhatsApp / Call: +91 97395 21088
![[Day 8] Cisco ISE Mastery Training: Integrating ISE with Active Directory](https://networkjourney.com/wp-content/uploads/2025/08/Day-8-Cisco-ISE-Mastery-Training-Integrating-ISE-with-Active-Directory.png)

