![[Day 6] Cisco ISE Mastery Training: Initial Setup Wizard & GUI Tour](https://networkjourney.com/wp-content/uploads/2025/08/Day-6-Cisco-ISE-Mastery-Training-Initial-Setup-Wizard-GUI-Tour.png)
Trainer Sagar Dhawan
- Posted on
[Day 6] Cisco ISE Mastery Training: Initial Setup Wizard & GUI Tour
Table of Contents
Introduction
You’ve deployed the ISE appliance — now what? The Initial Setup Wizard and the first GUI tour are the make-or-break steps that transform a running VM into a usable NAC controller. This session walks you through the exact steps to complete first-boot configuration, secure the admin plane, integrate identity sources, and validate connectivity so you can start building policies with confidence.
Why this matters: incomplete or incorrect initial setup causes AD join failures, certificate mismatches, broken RADIUS flows, and hours of wasted troubleshooting. This lesson removes that friction — you’ll leave with a validated, production-like ISE lab ready for policy work.
Problem Statement
Common real-world issues caused by rushed/incorrect initial setup:
- Time/Name mismatch (NTP/DNS) prevents AD join and SAML integrations.
- Missing or wrong certificates cause HTTPS/Admin access failures and RADUIS certificate errors.
- Unsecured admin access (weak passwords, unused accounts) increases risk.
- Network devices not registered with the correct shared secret -> RADIUS requests fail.
- Operators skipping validation — no Live Logs, no CLI checks, no working baseline.
This day fixes these by giving you a reproducible, step-by-step initial configuration and a validation checklist.
Solution Overview
Hands-on sequence to eliminate failure vectors:
- Complete console Initial Setup Wizard (network, hostname, DNS, NTP, admin password).
- Login to ISE Admin GUI and complete system hardening (certs, admin accounts).
- Configure Licensing, Backup, and Deployment persona checks.
- Add core resources: Network Devices (switch/WLC), Identity Source (AD), and Certificates (CA or self-signed for lab).
- Run verification:
ping,nslookup,show application status ise, and Live Logs for RADIUS test events.
The result: a validated ISE node that can authenticate RADIUS requests and host policy sets.
Sample Lab Topology
Platform: VMware ESXi or EVE-NG (single PAN+PSN combined node for lab). Use snapshots only for convenience in a lab (don’t rely on snapshots for real backups).
Nodes:
- ISE VM —
10.10.10.5/24(PAN + PSN combined) - Windows Server (AD/DNS/DHCP) —
10.10.10.10/24 - Catalyst switch (IOSv-L2 or physical) —
10.10.10.2/24 - WLC (optional) —
10.10.10.20/24 - Client (Windows 10) — DHCP in VLAN 10
Topology Layout:
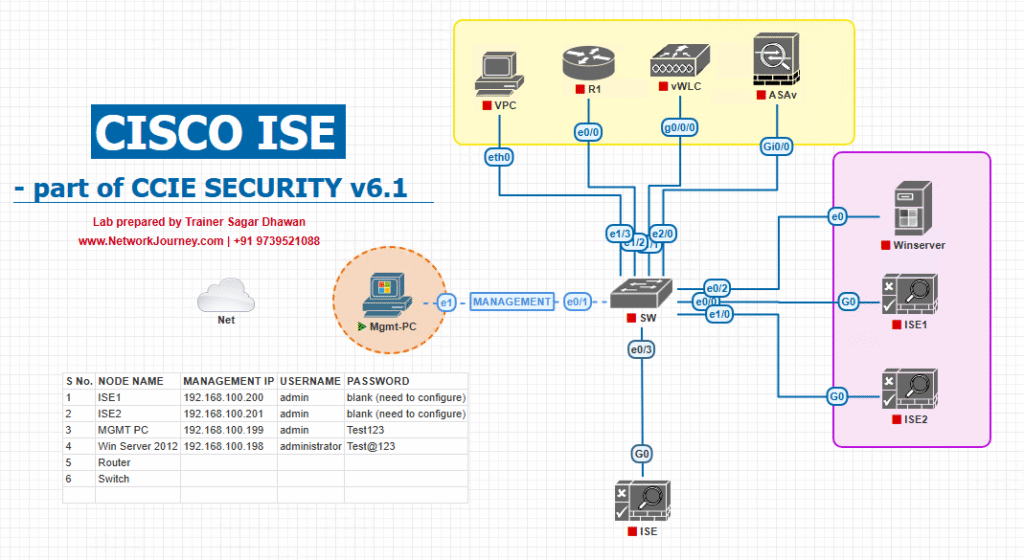
Notes: Keep ISE + AD on the same management L2 or ensure routes exist and DNS resolves.
Step-by-Step GUI Configuration Guide (with validation using GUI & CLI)
Assumption: ISE VM is powered on and you completed the console prompt for basic IP/hostname during first boot. If you didn’t, complete the console setup first. Use console if web GUI is not reachable.
Quick pre-checks on console (if still on console)
# Basic network
ping 10.10.10.10
nslookup ad.domain.local 10.10.10.10

# Check services
show application status ise

# NTP
show ntp status
If these fail — fix DNS/NTP first.
STEP 1 — Login to Admin GUI (first GUI action)
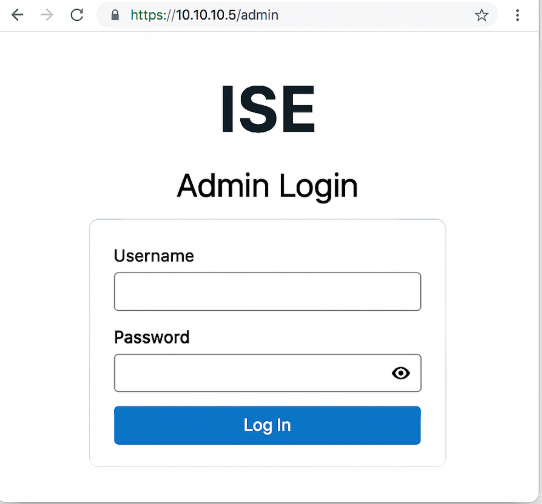
Validation (GUI):
- If login fails, check console
show application status ise— ensure web services areRunning. Also tryhttps://<ISE-IP>/(some versions redirect to Welcome page).
STEP 2 — System Summary & Deployment Check
- Navigate: Administration → System → Deployment.
[Screenshot: Administration → System → Deployment]

- Confirm node persona shows Policy Administration (PAN) and status is UP/Running (green). If secondary nodes exist, they should appear here.
CLI validation:
show application status ise
All processes (especially admin, tomcat, radius) should be Running.
STEP 3 — Configure NTP & Timezone (critical)
- GUI: Administration → System → Settings → NTP Servers → Add NTP server (e.g.,
10.10.10.10orpool.ntp.org).
[Screenshot: Administration → System → Settings → NTP]
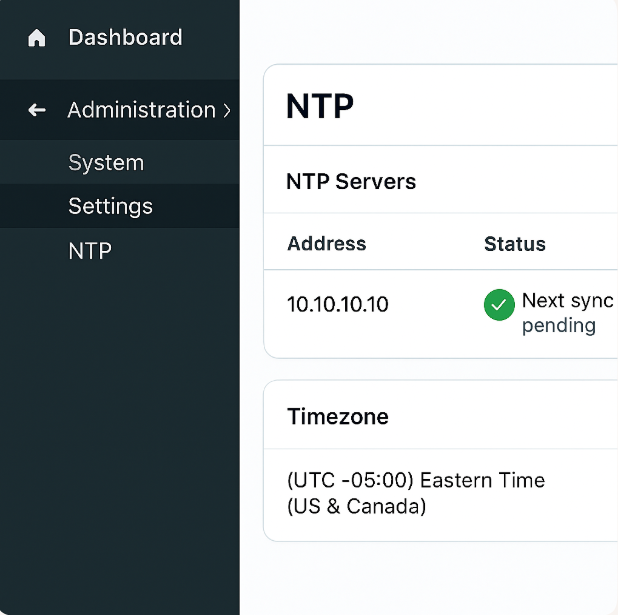
- Also verify timezone: Administration → System → Settings → Time/Locale.
CLI validation:
show ntp status
Ensure Synchronised and offset < 5 seconds (for AD join).
STEP 4 — DNS & Hostname verification
- GUI: Administration → System → Settings → DNS (verify FQDN and DNS servers).
[Screenshot: Administration → System → Settings → DNS]

- If you change DNS or hostname, reboot or restart relevant services per prompt.
CLI validation:
nslookup ad.domain.local 10.10.10.10
ping <AD-FQDN>
STEP 5 — Upload License & Configure Backup Repository
- GUI: Administration → System → Licensing → Upload Evaluation or Permanent License.
[Screenshot: Administration → System → Licensing]
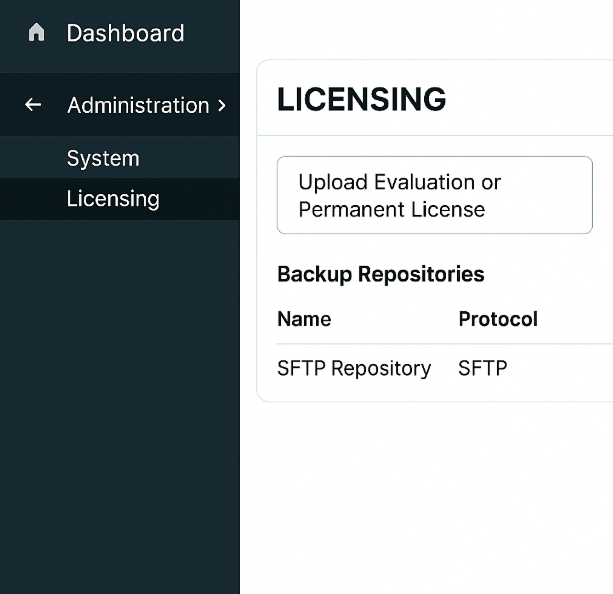
- GUI: Administration → System → Backup and Restore → Add a backup repository (SFTP/FTP) and schedule an immediate backup.
[Screenshot: Administration → System → Backup & Restore]
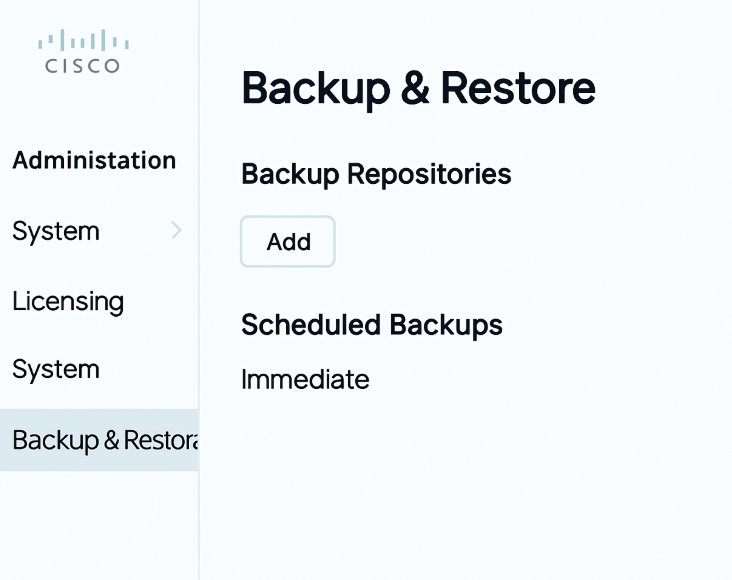
Validation: Confirm backup completes successfully in Jobs or Backup Status.
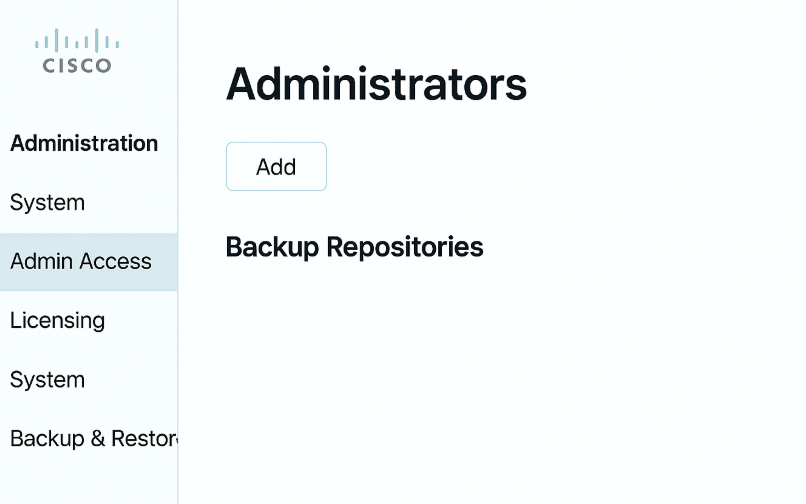
STEP 6 — Add Admin Users & RBAC
- GUI: Administration → System → Admin Access → Administrators → Add.
- Create an admin account (least privilege principle — create a full admin for lab, and operator-level for learners).
[Screenshot: Administration → System → Admin Access → Administrators]
- Create an admin account (least privilege principle — create a full admin for lab, and operator-level for learners).
- Configure Roles: Authorization Profiles for admin roles.
Validation: Log out and log in with the new admin user to verify permissions.
STEP 7 — Certificate Management (Lab CA vs Production CA)
- GUI: Administration → System → Certificates → Certificate Management.
- For lab: generate Self-Signed or import CA-signed certs from AD–CS.
[Screenshot: Administration → System → Certificates]
- For lab: generate Self-Signed or import CA-signed certs from AD–CS.

- Assign cert to Admin GUI: Administration → System → Certificates → System Certificate → Set as default for
tomcat/Web.
Validation: In browser, confirm HTTPS shows valid cert (or browser prompt for self-signed). You must avoid certificate errors for some integrations (SAML, EAP-TLS).
STEP 8 — Add Network Devices (Switch / WLC) and set shared secret
- GUI: Administration → Network Resources → Network Devices → Add.
- Fill Name, IP, Device Type.
- Under RADIUS Authentication Settings, set Shared Secret (e.g.,
cisco123).
[Screenshot: Administration → Network Resources → Network Devices → Add]
- Save and repeat for WLC.
Validation:
- Use switch/WLC to ping ISE. On switch run
ping 10.10.10.5. - ISE will show device under Network Devices list. There is also a Test Connection (or use RADIUS Live Logs when switch sends auth).
STEP 9 — Join Active Directory (Identity Source)
- GUI: Administration → Identity Management → External Identity Sources → Active Directory → Add.
- Enter Domain (e.g.,
domain.local) and AD server IP(s). - Provide a service account (least privilege) with join rights.
[Screenshot: Administration → Identity Management → Active Directory Join]
- Enter Domain (e.g.,
- Click Join and wait for success.
CLI validation:
nslookup dc1.domain.local 10.10.10.10
ping dc1.domain.local
GUI validation: The AD join status should be joined and green. Expand to view domain controllers and replication status.
STEP 10 — Basic Policy Set & Live Logs verification (first auth test)
- GUI: Policy → Policy Sets → Add → Create
Lab_Wired_802.1X. Create simple authentication rule: Identity Source = Active Directory. Create authorization rule to map AD group to VLAN 10.
[Screenshot: Policy → Policy Sets → Add → Authentication Rule] - Configure a switch port for 802.1X/MAB (example IOS snippet):
conf t
interface Gi1/0/1
 switchport mode access
 switchport access vlan 1
 authentication port-control auto
 dot1x pae authenticator
 mab
 spanning-tree portfast
- On the switch, add ISE as RADIUS server with the shared secret you configured:
radius server ISE
 address ipv4 10.10.10.5 auth-port 1812 acct-port 1813
 key cisco123
aaa group server radius ISE-GROUP
 server name ISE
aaa authentication dot1x default group ISE-GROUP
aaa authorization network default group ISE-GROUP
Validation:
- From the switch, manually trigger an authentication or have a client connect.
- GUI: Operations → RADIUS → Live Logs — watch for incoming authentication attempts. Filter by client IP or username.
[Screenshot: Operations → RADIUS → Live Logs] - CLI on switch:
show authentication sessions interface Gi1/0/1
show dot1x all
You should see the session state change to AUTHZ and ISE entry in Live Logs indicating Accept or Reject.
STEP 11 — Basic Profiler & Guest Work Center Tour (GUI tour)
- GUI Tour stops (click through these):
- Work Centers → Guest Access (configure guest portal templates). [Screenshot: Work Centers → Guest Access]
- Work Centers → Profiling (view discovered device types & profiler probes). [Screenshot: Work Centers → Profiling]
- Policy → BYOD (if enabled) — MyDevices and certificate flows. [Screenshot: Policy → BYOD]
- For each work center, create one sample object (e.g., enable guest portal with simple self-registration) and validate with a Wi-Fi client.
Validation (Live Logs & Reports): Guest creation event appears under Operations → Guest Access → Guest Accounts and RADIUS Live Logs show webauth events.
STEP 12 — Final housekeeping
- Configure Syslog / SNMP under Administration → System → Logging for central logging.
[Screenshot: Administration → System → Logging] - Create an immediate backup (Administration → System → Backup & Restore). Download backup off-box.
- Document admin accounts, shared secrets, and certificate thumbprints.
Validation: Successful backup file exists on SFTP and syslog messages are being received.
FAQs
1. What is the Initial Setup Wizard in Cisco ISE?
- Purpose: Helps configure basic system settings right after installation so ISE is ready for policy creation and integration.
- Settings Covered:
- Hostname / IP Address / DNS / NTP
- Administrator credentials
- Deployment node role (Standalone, Primary, Secondary)
- GUI Validation:
- Login → Wizard auto-launches → Review summary at the last step.
- CLI Validation:
show running-config show ntp
2. Can I skip the Initial Setup Wizard?
- Yes, but not recommended — skipping leaves ISE with incomplete configuration, causing integration issues with devices and AD.
- If skipped:
- Complete settings under Administration → System → Settings manually.
- CLI Cross-Check:
show hostname show timezone
3. How do I set up NTP during the wizard and verify it?
- Wizard Step: Enter NTP server address (preferably same as AD’s).
- GUI Validation:
- Administration → System → Settings → System Time → Status must be Synchronized.
- CLI Validation:
show ntpOutput should show synchronized with correct stratum.
4. How can I secure the admin login after initial setup?
- In Wizard: Use a complex admin password (minimum 8 chars, mix upper/lower/special).
- Post-Wizard:
- GUI: Administration → Admin Access → Administrators → Admin Users.
- CLI:
application reset-passwd ise admin
5. What are the default ports used after setup for accessing GUI and services?
- GUI Access: TCP 443
- RADIUS Auth: UDP 1812 / 1645
- RADIUS Accounting: UDP 1813 / 1646
- CLI Verification:
show application status ise show ip port
6. My setup wizard froze — what should I do?
- Cause: Browser timeout or ISE service restart.
- Fix:
- Close browser, clear cache.
- Restart GUI service:
application stop ise application start ise - Access again at
https://ISE_FQDN/admin.
7. How do I configure a secondary admin account during setup?
- The wizard supports only one initial admin.
- Post-install:
- GUI: Administration → Admin Access → Administrators → Admin Users → Add.
- CLI Validation:
show running-config | include admin
8. How do I confirm device time, hostname, and DNS are correct after wizard completion?
- CLI:
show clock show hostname show dns - GUI:
- Administration → System → Deployment → Select node → Check configuration summary.
9. Can I rerun the Initial Setup Wizard later?
- No — once completed, you configure settings manually.
- Workaround:
- Create a new node and rejoin deployment if you need a fresh wizard run.
- Or wipe config:
application reset-config
10. What’s the best practice after finishing the Initial Setup Wizard?
- Backup configuration:
- GUI: Administration → Maintenance → Backup & Restore
- CLI:
backup INITIAL_SETUP repository FTP_REPO
- Test GUI login from multiple devices.
- Ping and RADIUS test from network devices.
- Check System Health in GUI: Administration → System → Deployment → Health Status.
YouTube Link
For more in-depth Cisco ISE Mastery Training, subscribe to my YouTube channel Network Journey and join my instructor-led classes for hands-on, real-world ISE experience
Closing Notes
- Do the basics right: DNS + NTP + certs + backup — these are the most common failure points.
- Validate early & often: CLI
show application status ise,nslookup,ping, and GUI Live Logs are your three fastest validation tools. - Use RBAC & certs even in labs: They prevent bad habits and simulate real deployments.
- Document everything: admin users, shared secrets, cert thumbprints, and backup locations.
Upgrade Your Skills – Start Today
Ready to turn lab skills into a career? Join a live, mentored path to CCIE-level expertise.
I run a focused 4-month instructor-led CCIE Security & ISE mastery program where we convert lab work into real career outcomes:
- Live guidance every week — interactive labs, live troubleshooting, and exam-style scenarios.
- Complete CCIE Security syllabus including deep Cisco ISE, Firepower, VPN, Advanced Threat Defense.
- Hands-on labs in VMware ESXi & EVE-NG, real-time grading, and 1:1 mentoring sessions.
- Job-readiness: interview prep, resume review, and lab correction feedback.
Limited seats — we pre-qualify candidates to keep batch quality high.
Reserve your spot & request a free eligibility call: https://course.networkjourney.com/ccie-security/
Enroll Now & Future‑Proof Your Career
Email: info@networkjourney.com
WhatsApp / Call: +91 97395 21088
![[Day 14] Cisco ISE Mastery Training: Setting Up a Test Switch for Authentication](https://networkjourney.com/wp-content/uploads/2025/08/Day-14-Cisco-ISE-Mastery-Training-Setting-Up-a-Test-Switch-for-Authentication.png)