Trainer Sagar Dhawan
- Posted on
[Day 63] Cisco ISE Mastery Training: Self-Registration Portal for Guests
Table of Contents
Introduction
The Self-Registration Portal in Cisco Identity Services Engine (ISE) is a powerful NAC feature that allows visitors to create their own temporary guest accounts before accessing a wireless or wired network. This eliminates the dependency on IT or sponsors for basic guest onboarding, while still enforcing enterprise security policies.
Why it matters:
In a corporate environment with frequent visitors, relying solely on manual account creation by staff is inefficient and prone to delays. Self-registration automates the process, ensures compliance with password policies, enables approval workflows if needed, and keeps full logs for auditing. It’s a balance between convenience and security — letting guests onboard themselves, but only within the limits you define.
Problem Statement
Without a self-registration system:
- Guests must wait for IT staff or sponsors to create accounts.
- Receptionists may bypass security protocols to save time.
- No consistent password policy enforcement.
- Lack of accountability on who created which account.
- Potential unauthorized network access due to password sharing.
This leads to security gaps and poor visitor experience, especially in high-traffic guest environments like hotels, conference centers, and corporate lobbies.
Solution Overview
Cisco ISE’s Self-Registration Portal solves these challenges by:
- Allowing guests to create accounts themselves via a web portal.
- Applying corporate-defined Guest Types with role-based restrictions (e.g., time limits, bandwidth caps).
- Optionally requiring sponsor approval before activation.
- Enforcing password complexity, expiration, and reuse policies.
- Integrating with WLC redirection for wireless onboarding or wired switch redirection for LAN guests.
- Maintaining full audit logs in the ISE dashboard.
Sample Lab Topology
Lab Environment Components:
- VMware/EVE-NG running:
- Cisco ISE 3.x
- Cisco WLC 9800-CL
- Cisco Catalyst Switch (Layer 2/3 for wired testing)
- Endpoints:
- Guest Laptop (Windows/macOS)
- Guest Mobile Device (iOS/Android)
- Integration:
- WLC for wireless SSID “Guest-WiFi” with WebAuth redirection to ISE Self-Registration Portal.
Topology Layout:
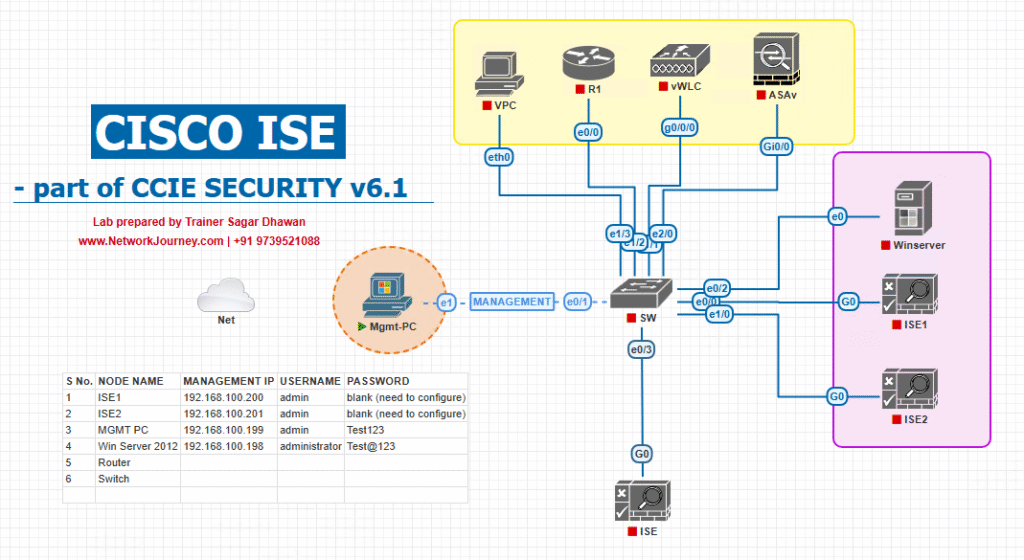
- Guest connects to “Guest-WiFi”.
- WLC redirects HTTP traffic to ISE Self-Registration Portal.
- Guest creates account → credentials stored in ISE internal DB.
- Authorization policy allows access upon successful authentication.
Step-by-Step GUI Configuration Guide
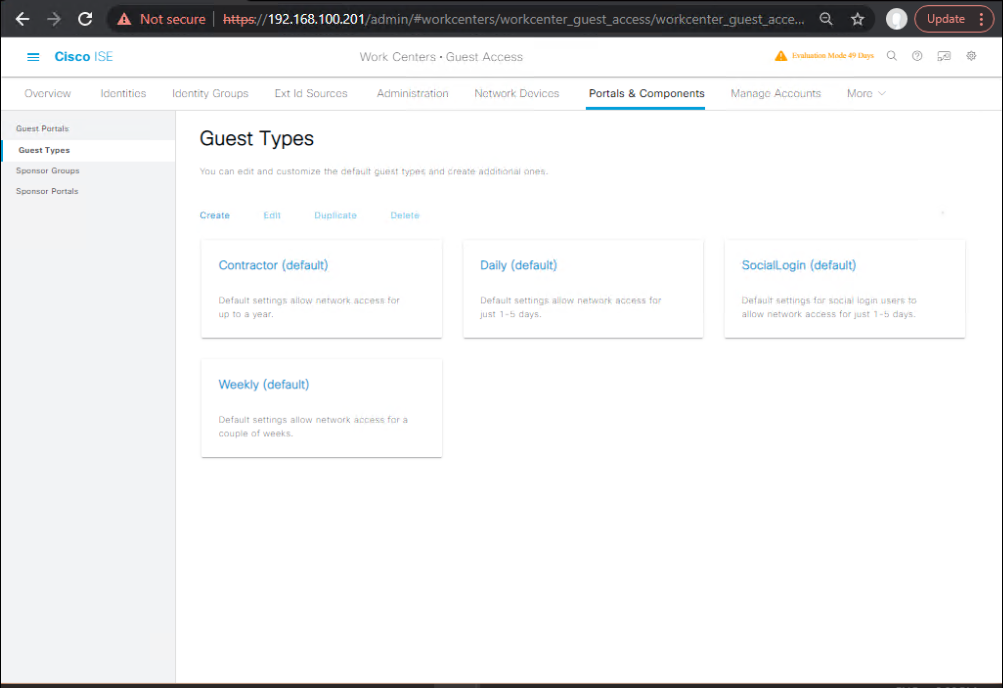
Step 1: Create a Guest Type
- Navigate to: Work Centers → Guest Access → Guest Types.
- Click Add.
- Name:
SelfReg-24Hours. - Set Account Duration: 1 Day.
- Enable Change password on first login if needed.
- Save.
[Screenshot: ISE Guest Type Configuration]
Step 2: Configure Self-Registration Portal
- Go to Work Centers → Guest Access → Portals & Components → Guest Portals.
- Click Add → Self-Registration Portal.
- Name:
SelfReg-Portal. - Select Guest Type:
SelfReg-24Hours. - Customize look and feel (logos, text).
- Optionally enable Sponsor Approval Required.
- Save.
[Screenshot: Self-Registration Portal Creation]
Step 3: Add WLC Redirect ACL
From WLC CLI:
config acl create SELFREG_REDIRECT
config acl rule add SELFREG_REDIRECT 1 permit tcp any any eq 80
config acl rule add SELFREG_REDIRECT 2 permit tcp any any eq 443
config acl rule add SELFREG_REDIRECT 3 deny ip any any
Step 4: Configure WLAN for WebAuth Redirect
- WLC GUI → WLANs → Create “Guest-WiFi”.
- Security Tab → Layer 3 → Web Policy: Authentication.
- Redirect URL:
https://<ISE_FQDN>:8443/guestportal/SelfReg-Portal. - Apply Redirect ACL:
SELFREG_REDIRECT.
[Screenshot: WLC WLAN Config]
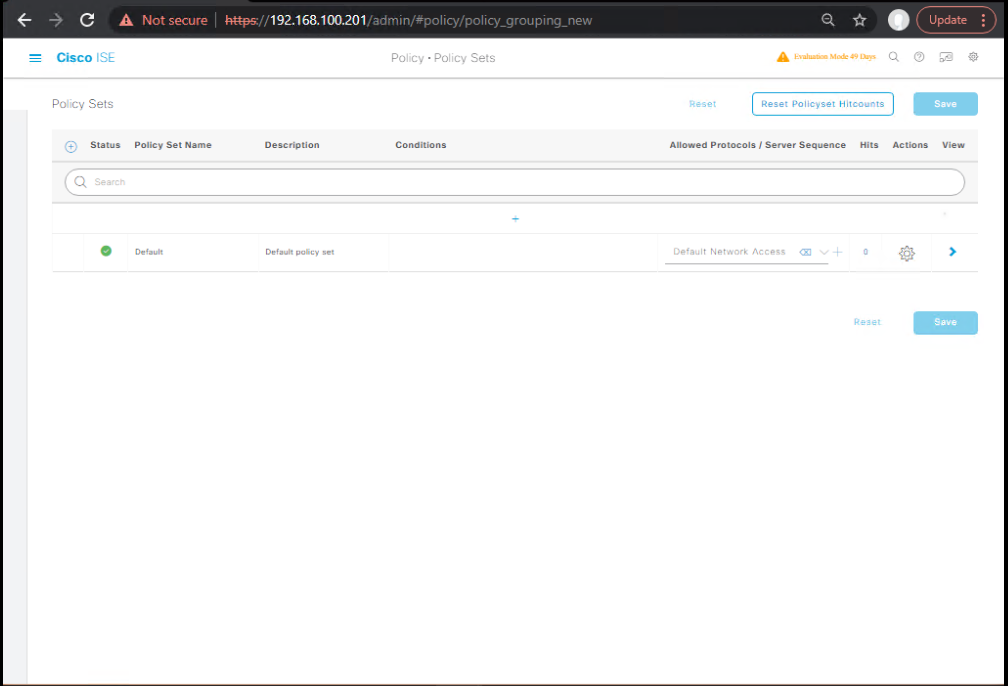
Step 5: Create ISE Authorization Policy
- ISE GUI → Policy → Policy Sets → Guest-WiFi Policy.
- Conditions:
- Wireless_MAB
- EndpointGroup:
Unknown
- Result: Redirect to
SelfReg-Portal. - Add Post-Auth rule:
- IdentityGroup:
GuestEndpoints - Authorization Profile:
Guest-Internet-Only.
[Screenshot: ISE Policy Set Screen]
- IdentityGroup:
Step 6: Test and Validate
- Guest Device connects to “Guest-WiFi” → Browser opens → Self-Registration form displayed.
- User fills details → Gets username/password.
- On reconnect, guest uses credentials → Internet access granted.
CLI Validation – ISE
show logging application ise-psc.log | include SelfReg
CLI Validation – WLC
show client detail <MAC>
show wlan summary
FAQs – Cisco ISE Self-Registration Portal for Guests
Q1: Can the self-registration portal be customized with company branding and logos?
A: Yes. In ISE Portals & Components → Portal Settings, you can upload a company logo, change background images, adjust colors, and modify portal text. This ensures the portal matches corporate branding and user trust.
Q2: Can we enforce that only corporate-issued domains (e.g., @company.com) can register?
A: Yes. Add a field validation regex in the portal configuration for the email field to allow only specific domains.
Q3: How does ISE prevent fake or spam guest registrations?
A: You can enable email verification or SMS OTP validation. Users must confirm their identity before credentials are activated.
Q4: What happens if a guest forgets their password after self-registration?
A: ISE allows password reset via portal if email/SMS verification is enabled, or the account can be reset by a sponsor/admin.
Q5: Can the self-registration workflow require sponsor approval before granting access?
A: Yes. Enable Require Approval in the Self-Registration Portal settings. Guests are placed in a pending state until a sponsor approves.
Q6: Is it possible to limit guest access time to a specific number of hours or days?
A: Yes. This is configured in the Guest Type settings, which define account duration and expiration.
Q7: Can the same guest account be used on multiple devices?
A: Yes, but you can restrict the maximum concurrent sessions in the Guest Type configuration.
Q8: Does the self-registration process work for both wired and wireless clients?
A: Yes. For wired, the access switch must support URL redirect ACLs. For wireless, the WLC must redirect to the portal.
Q9: How can I audit or track who registered and when?
A: Use Context Visibility → Endpoints or Reports → Guest Reports in ISE to view registration logs, timestamps, device MACs, and IP addresses.
Q10: Can we integrate the self-registration portal with external databases or identity providers?
A: Yes, via Identity Source Sequences. ISE can use external LDAP/AD or REST APIs to check or store guest account data.
YouTube Link
For more in-depth Cisco ISE Mastery Training, subscribe to my YouTube channel Network Journey and join my instructor-led classes for hands-on, real-world ISE experience
Closing Notes
Self-Registration Portals in Cisco ISE bridge security with user convenience, making it easy for visitors to get connected without bypassing corporate security controls. Properly configured, it minimizes IT overhead, enforces compliance, and provides a smooth guest experience.
Upgrade Your Skills – Start Today
For more in-depth Cisco ISE Mastery Training, subscribe to my YouTube channel Network Journey and join my instructor-led classes.
I run a focused 4-month instructor-led CCIE Security training covering Cisco ISE in depth.
Course details: https://course.networkjourney.com/ccie-security/
Enroll Now & Future‑Proof Your Career
Email: info@networkjourney.com
WhatsApp / Call: +91 97395 21088
![[Day 32] Cisco ISE Mastery Training: Configuring Cisco AnyConnect NAM for Wired Auth](https://networkjourney.com/wp-content/uploads/2025/08/Day-32-–-Cisco-ISE-Mastery-Training-Configuring-Cisco-AnyConnect-NAM-for-Wired-Auth.png)
![[Day 14] Cisco ISE Mastery Training: Setting Up a Test Switch for Authentication](https://networkjourney.com/wp-content/uploads/2025/08/Day-14-Cisco-ISE-Mastery-Training-Setting-Up-a-Test-Switch-for-Authentication.png)