![[Day 7] Cisco ISE Mastery Training: Configuring Certificates (Self-Signed & CA-Signed)](https://networkjourney.com/wp-content/uploads/2025/08/Day-7-Cisco-ISE-Mastery-Training-Configuring-Certificates-Self-Signed-CA-Signed.png)
Trainer Sagar Dhawan
- Posted on
[Day 7] Cisco ISE Mastery Training: Configuring Certificates (Self-Signed & CA-Signed)
Table of Contents
Introduction
TLS certificates are the backbone of secure ISE operations — they authenticate the ISE Admin GUI and portals, secure EAP/RADIUS server identity for wireless/wired 802.1X, enable pxGrid trust, and sign SAML assertions. A wrong certificate, missing CA chain, or expired cert will break 802.1X, WebAuth guest flows, BYOD certificate enrollment, and admin access.
Today we’ll configure both self-signed (for fast labs) and CA-signed (production-like) certificates in ISE, bind them to the correct services (Admin GUI, EAP, Portal, pxGrid, etc.), and validate everything using GUI, CLI, and OpenSSL so you can prove trust end-to-end.
Problem Statement
Common certificate-related failures in NAC deployments:
- Clients reject EAP server (ISE) because the certificate CN/SAN does not match the FQDN they expect.
- Wireless clients see authentication errors (PEAP/EAP-TLS) because the ISE cert is self-signed and the client does not trust the CA.
- Admins can’t reach the ISE GUI due to browser certificate errors.
- BYOD/EST/PKI flows fail because ISE lacks a complete trusted CA chain or the internal ISE CA isn’t configured/replicated across nodes.
We solve these by generating correct CSRs, importing CA chains, binding certs to the right roles, and validating trust from clients and network devices.
Solution Overview
Two practical options covered here:
- Self-Signed Certificates (fast lab)
- Generate in ISE GUI and enable for Admin/EAP/Portal. Good for throwaway labs but not trusted by real endpoints.
- CA-Signed Certificates (recommended for production & realistic labs)
- Generate a CSR in ISE → submit to Windows AD CS (or external CA) → export cert + chain → import to ISE → bind to services. Ensures clients that trust your enterprise CA will trust ISE during 802.1X and GUI sessions.
ISE also has an Internal CA (optional) and EST support for BYOD; understand internal CA behavior if you plan to run ISE as a full PKI root in a lab.
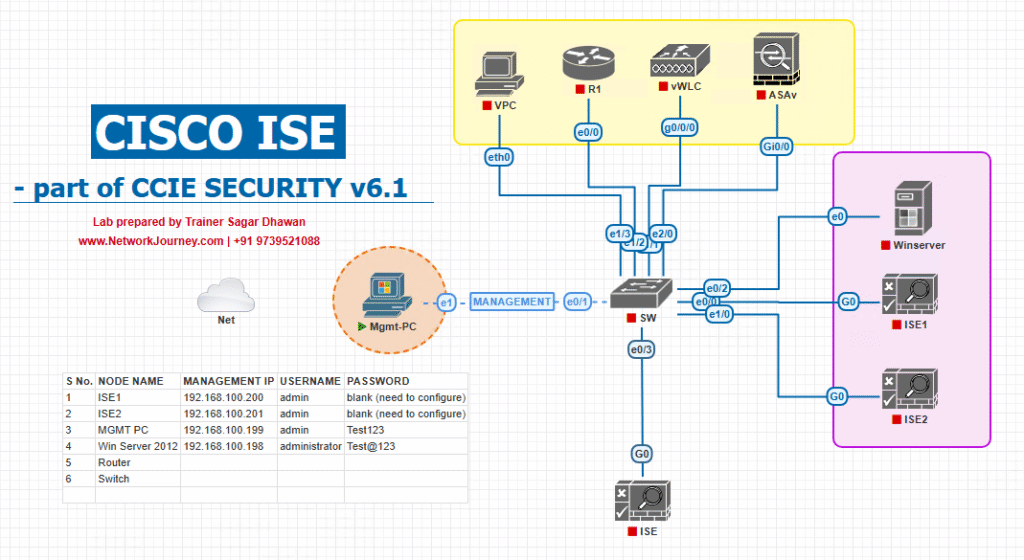
Sample Lab Topology
Platform: VMware ESXi or EVE-NG (single-node ISE + Windows AD CA).
Nodes:
- ISE VM (PAN+PSN, 4 vCPU, 16GB RAM) —
ise.lab.local / 10.10.10.5 - Windows Server (AD + AD CS) —
ad.lab.local / 10.10.10.10(Certificate Authority) - Catalyst switch (IOSv-L2) — for 802.1X tests
- WLC (optional) — for wireless WebAuth/EAP tests
- Windows client — joined to AD (trusted CA) — for EAP and GUI tests
IP plan (example):
- Management:
10.10.10.0/24 - ISE:
10.10.10.5 - AD/CA:
10.10.10.10
Topology Layout:
Step-by-Step GUI Configuration Guide (Self-Signed & CA-Signed)
(Each numbered step includes validation using GUI/CLI/OpenSSL — insert screenshots where placeholders show.)
PRE-CHECKS (do this first)
- Ensure ISE and AD/CA have correct DNS and NTP.
CLI on ISE:ise/admin# nslookup ad.lab.local 10.10.10.10 ise/admin# show ntp status - Ensure ISE hostname is the FQDN you plan to use (e.g.,
ise.lab.local). The certificate CN/SAN must match the FQDN clients use. GUI: Administration → System → Settings → Hostname.
[Screenshot: Administration → System → Settings → Hostname]
FLOW A — Generate & Use a SELF-SIGNED Certificate (quick lab)
Step A1 — Generate self-signed certificate
- GUI:
Administration → System → Certificates → System Certificates→ click Generate Self Signed Certificate.- Fill in Common Name =
ise.lab.local(must match FQDN). - Optional: SANs (add DNS names / IPs if needed for your test clients).
[Screenshot: Certificates → System Certificates → Generate Self Signed Certificate]
- Fill in Common Name =

- Click Save and wait. ISE will create the cert and show it in the System Certificates list.
Validation A1
- GUI: Click the new cert → View → check
Issued To/Issued By(same for self-signed). - CLI: (basic app status)
ise/admin# show application status ise - Browser test: Open
https://ise.lab.local/admin— browser will show a certificate warning (self-signed). You can import the ISE cert to your test client’s trusted root store to eliminate the warning for lab users.
Bind Self-Signed Cert to Services
- GUI: In System Certificates, select the cert → Edit → check roles: Admin, EAP Authentication, Portal (as needed) → Save.
- Warning: enabling Admin usage restarts ISE services (downtime). Cisco docs: enabling Admin role restarts services.
[Screenshot: System Certificates → Edit → Bind Roles]
- Warning: enabling Admin usage restarts ISE services (downtime). Cisco docs: enabling Admin role restarts services.
Validation A2
- After bind, test Admin GUI:
https://ise.lab.local/admin(import cert into browser or accept risk). - For EAP: configure a client supplicant to trust the certificate (if the cert is imported to client’s trust store, PEAP/EAP-TLS will succeed). Use
show authentication sessionson switch after client connects.
FLOW B — Generate CSR in ISE and get CA-SIGNED certificate (recommended lab/prod)
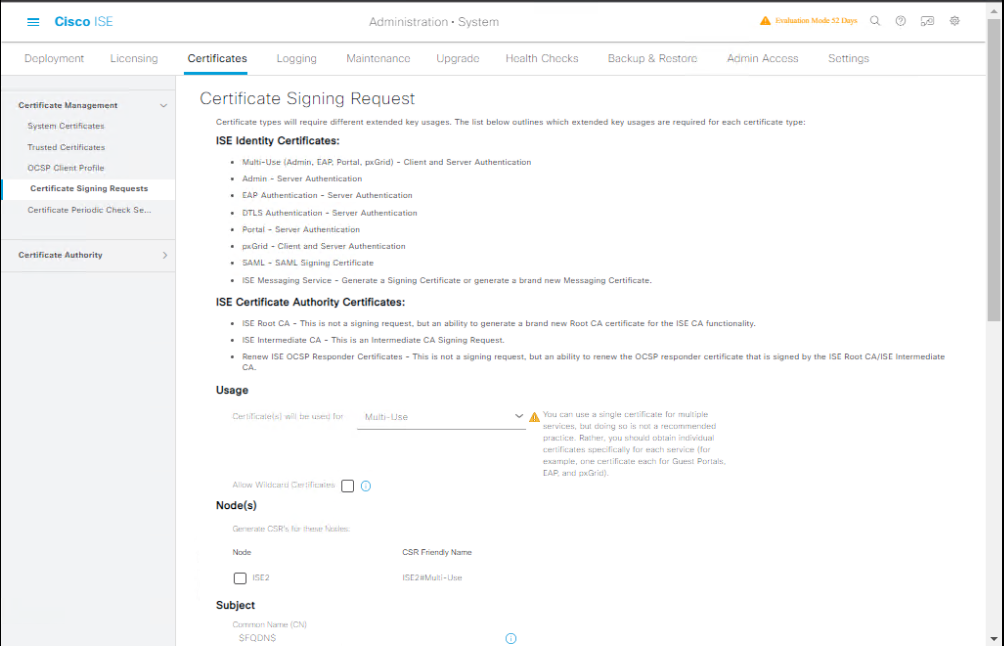
Step B1 — Generate CSR in ISE
- GUI:
Administration → System → Certificates → Certificate Signing Requests→ Generate Certificate Signing Request (CSR).- Fill fields:
- Common Name (CN):
ise.lab.local(must match FQDN) - Organization, OU, etc.
- Key type/length: RSA 2048 or 4096.
- Subject Alternative Names (SANs): add DNS entries (e.g.,
ise.lab.local,ise) and IP (optional).
- Common Name (CN):
- Click Generate → download the CSR file (PEM/Base-64).
[Screenshot: Certificate Signing Requests → Generate CSR]
- Fill fields:
Step B2 — Submit CSR to Windows AD CS (two quick methods)
Method 1 — GUI (certreq / web enrollment)
- Open CA web enrollment
http://ad.lab.local/certsrvor use the MMC on CA server. Submit the CSR, choose the correct Certificate Template (e.g., Web Server or ISE-specific template with Server Authentication EKU), issue the cert. Export with the full chain (Base-64 encoded).- Important: Use a template that includes Server Authentication (OID) and allows private key usage if needed.
Method 2 — certreq (CLI)
- On a Windows host (or CA), create
request.inf:[NewRequest] Subject = "CN=ise.lab.local, O=YourOrg, C=US" KeyLength = 2048 Exportable = TRUE KeyAlg = RSA [Extensions] 2.5.29.17 = "{text}" _continue_ = "DNS=ise.lab.local&DNS=ise&DNS=othername" - Run:
certreq -new request.inf ise.csr certreq -submit -config "ad.lab.local\CAName" ise.csr ise.cer- Export
ise.ceralong with root/intermediate as a single.ceror bundle.
- Export
Step B3 — Export certificate + chain
- On CA or via mmc: export certificate in Base-64 (.CER) and export the entire certificate chain (root + intermediates) into separate files or a combined .pem.
Step B4 — Import the CA-signed cert back into ISE
- GUI:
Administration → System → Certificates → Certificate Signing Requests→ find your CSR entry → click Bind Certificate (or Import Certificate). Upload the signed cert and any intermediate/root(s) if prompted. ISE allows importing CA chain.
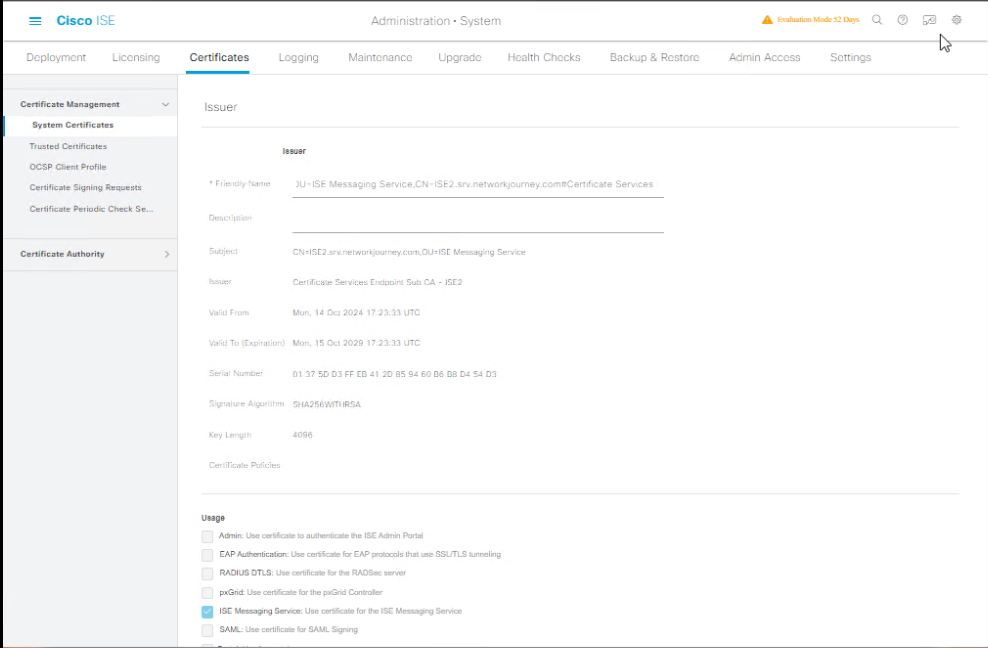
[Screenshot: Certificate Signing Requests → Bind Certificate / Import Certificate] - After import, go to
Administration → System → Certificates → System Certificates→ the new certificate should be present. Edit and enable roles (Admin, EAP, Portal, pxGrid as applicable). Note: enabling Admin will restart services.
Validation B
- OpenSSL check from a jump host (Linux/macOS):
openssl s_client -connect ise.lab.local:443 -showcerts- Verify the server presents the CA-signed cert and the chain is complete (no missing intermediate).
- Browser check: open
https://ise.lab.local/admin— no certificate warnings if client trusts AD root CA (typically by AD-joined machines). - EAP check: configure a domain-joined client (trusts AD CA) and perform 802.1X; verify
Operations → RADIUS → Live Logsshows Accept. - ISE GUI:
Administration → System → Certificates → Certificate Authority Certificates→ confirm root/intermediate are present and set for EAP trust if needed.
Additional: Import Trusted Root/Intermediate & CRL config
Step C1 — Import CA root & intermediate into ISE Trusted Store
- GUI:
Administration → System → Certificates → Certificate Authority → Certificate Authority Certificates→ Add → upload root CA cert (Base-64). Mark as trusted for EAP (Extensible Authentication Protocol-CTL / EAP-CTL) if required.
Step C2 — Configure CRL/OCSP (optional but recommended)
- While editing the CA certificate in ISE, configure CRL retrieval URL or OCSP responder and set the polling interval. ISE will fetch CRLs to validate revocation; failure to reach CRL can generate alarms (CRL retrieval failed). Validate network reachability to CRL URLs.
Validation C
- GUI: choose root CA and click Validate or View to see CRL/OCSP configuration.
- CLI / Router:
curlthe CRL URL to ensure accessibility from ISE network segment.
Helpful CLI / OpenSSL commands for validation
# Basic ISE service status
ise/admin# show application status ise

# Check ISE hostname and FQDN
ise/admin# show hostname

# Verify NTP (critical for cert verification)
ise/admin# show ntp status

# From a Linux jump host, inspect server cert & chain
openssl s_client -connect ise.lab.local:443 -servername ise.lab.local -showcerts

# If using radsec (RADIUS over TLS) or pxGrid, test TLS endpoints similarly:
openssl s_client -connect ise.lab.local:8089 -showcerts  # pxGrid default port example
FAQs – Cisco ISE: Configuring Certificates (Self-Signed & CA-Signed)
1. Why does Cisco ISE need certificates in the first place?
Cisco ISE uses certificates to secure communication between endpoints, network devices, and administrators. They enable HTTPS access to the ISE GUI, secure RADIUS communication (EAP-TLS, PEAP), and trust establishment with Active Directory and other services.
2. Can I use the default self-signed certificate for production?
No, self-signed certificates are fine for lab environments but not recommended for production because they are not trusted by clients and can cause connection warnings. For production, use a CA-signed certificate from an internal enterprise CA or a public CA.
3. What’s the difference between a self-signed certificate and a CA-signed certificate?
- Self-Signed: Generated by ISE itself; only trusted if manually installed on each client.
- CA-Signed: Issued by a Certificate Authority (internal or external); trusted automatically if the CA’s root certificate is in the client trust store.
4. How do I validate that my certificate is correctly installed in ISE?
Use both GUI and CLI:
- GUI:
Navigate to Administration → System → Certificates → System Certificates and check the “Usage” column. - CLI:
ise/admin# show run | i certificate ise/admin# show application status iseAll relevant services (HTTPS, EAP) should be using the correct certificate.
5. Which certificate formats does ISE accept for import?
ISE supports .pem, .der, .crt, .cer for certificates and .key for private keys. PKCS#12 (.pfx, .p12) is also supported if the certificate and private key are bundled.
6. How do I generate a CSR (Certificate Signing Request) in Cisco ISE?
GUI path:
Administration → System → Certificates → Certificate Signing Requests → Generate CSR.
Fill in CN (Common Name) with the FQDN of ISE, assign Key Length (2048/3072/4096), and select SHA256 as the signing algorithm.
You then submit the CSR to your CA for signing.
7. My ISE shows “Untrusted Certificate” warning in browsers — why?
This happens because your browser doesn’t have the Root CA that signed the ISE certificate in its trust store. You must install the Root CA certificate on all client devices or use a publicly trusted certificate.
8. Can I use one certificate for both HTTPS admin access and EAP authentication?
Yes — Cisco ISE supports multi-use certificates. When importing or generating a certificate, enable both “Admin” and “EAP Authentication” usage during configuration.
9. How do I verify EAP-TLS is using the correct certificate?
CLI Command:
ise/admin# show running-config eap
Check the assigned certificate in the EAP profile.
GUI Path:
Administration → System → Certificates → System Certificates → Usage → verify EAP points to the correct cert.
10. What happens if a certificate expires in ISE?
- Admin access via HTTPS may fail with “Not Secure” warnings.
- EAP methods (like EAP-TLS) will fail, blocking network access for 802.1X clients.
- Solution: Monitor expiry dates and renew certificates at least 30 days in advance.
YouTube Link
For more in-depth Cisco ISE Mastery Training, subscribe to my YouTube channel Network Journey and join my instructor-led classes for hands-on, real-world ISE experience
Closing Notes (Key takeaways)
- Match FQDN & SANs to what clients will use — SANs are king.
- Import complete CA chains (root + intermediates) into ISE trusted store; configure CRL/OCSP.
- Bind certificates by role (Admin, EAP, Portal, pxGrid) in ISE — be aware enabling Admin causes service restarts.
- For realistic labs, use AD CS to issue certs to ISE and ensure domain-joined clients trust the CA — that gives true end-to-end validation.
Upgrade Your Skills – Start Today
Ready to stop guessing and master Cisco ISE for career-level outcomes?
I run a focused 4-month instructor-led CCIE Security & ISE Mastery program — live classes, graded labs (VMware/EVE-NG), one-on-one doubt sessions, and real exam-style scenarios designed to convert lab practice into certification and job readiness.
- Live weekly labs (deep dives into ISE certificates, EAP, BYOD, pxGrid)
- Full CCIE Security course outline and roadmap. (See course: https://course.networkjourney.com/ccie-security/)
- Free eligibility call & lab review for qualified applicants — limited seats to keep batches high quality.
Reserve a free eligibility call and secure your seat: https://course.networkjourney.com/ccie-security/
(Submit your lab details and someone from Network Journey will schedule a 15-minute review to recommend the right batch and offer a tailored study plan.
Enroll Now & Future‑Proof Your Career
Email: info@networkjourney.com
WhatsApp / Call: +91 97395 21088

![[Day 18] Configuring Wired 802.1X on a Cisco Switch](https://networkjourney.com/wp-content/uploads/2025/08/Day-18-Cisco-ISE-Mastery-Training-Configuring-Wired-802.1X-on-Cisco-Switch.png)