![[Day#1b PyATS Series] Step-by-Step: Install pyATS in PyCharm (Ubuntu) [Python for Network Engineer]](https://networkjourney.com/wp-content/uploads/2025/07/Day_1b-PyATS-Series-Step-by-Step-Install-pyATS-in-PyCharm-Ubuntu-Python-for-Network-Engineer.png)
Dhawan Sagar
- Posted on
[Day#1b PyATS Series] Step-by-Step: Install pyATS in PyCharm (Ubuntu) [Python for Network Engineer]
If you’re exploring Python for Network Engineers, mastering tools like pyATS is a game-changer for automating network testing and validation. This guide walks you through setting up pyATS in PyCharm on Ubuntu, step by step, so you can build robust network automation workflows with confidence. Whether you’re a beginner in network automation or a seasoned engineer transitioning to Python, this tutorial will help you streamline device testing, configuration validation, and multi-vendor network operations using Cisco’s pyATS framework.
Table of Contents
Prerequisites
- Python 3.8–3.11 installed (check with
python3 --version) - PyCharm installed
pipandvenvinstalled:
sudo apt update
sudo apt install python3-pip python3-venv
Step 1: Create a Virtual Environment
- Open a terminal.
- Create a venv for your PyCharm project:
sudo sumkdir ~/pyats_project
cd ~/pyats_project
apt install python3.10-venv
python3 -m venv venv
- Activate it:
source venv/bin/activate
- Upgrade pip:
pip install --upgrade pip
Step 2: Install pyATS (full version)
Install pyATS and Genie:
pip install pyats[full]
Verify:
pyats version check
Expected output:
pyATS 23.x
Genie 23.x
Step 3: Set Interpreter in PyCharm
- Open PyCharm → File → New Project → Python
- Select:
“Existing Interpreter”
Point to:~/pyats_project/venv/bin/python
or~/pyats_project/ - Click Create from Existing Sources > New Window
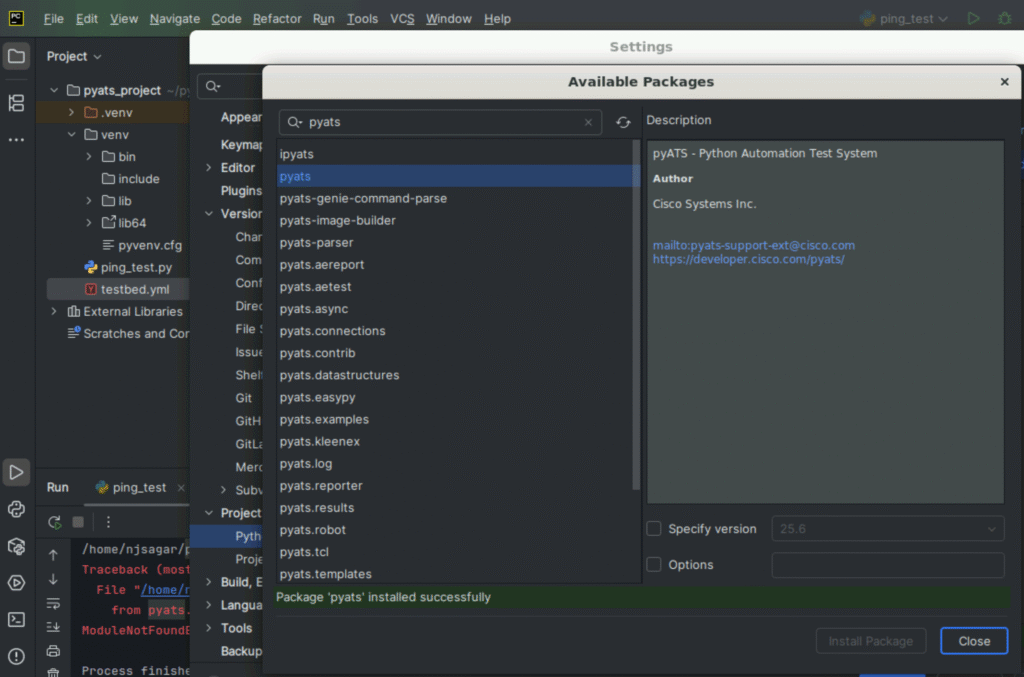
Alternatively, on your Pycharm (Ubuntu) > File > Settings > Project Interpreter > Click “+” > Install “pyATS” as shown below:
Step 4: Create pyATS Test Files
testbed.yml
testbed:R01
name: my_testbed
devices:
:
os: iosxe
type: router
connections:
defaults:
class: unicon.Unicon
cli:
protocol: ssh
ip: 192.168.1.1
credentials:
default:
username: admin
password: cisco
ping_test.py
from pyats.topology import loader
import os

# Load testbed
testbed = loader.load('testbed.yml')

# Clean up old known_hosts entries
for dev in testbed.devices.values():
    ip = dev.connections['cli']['ip']
    os.system(f'ssh-keygen -f "~/.ssh/known_hosts" -R "{ip}"')

# Proceed with connection
device = testbed.devices['R01']
device.connect()

# Ping test
result = device.ping('8.8.8.8')
print("Ping result:", result)

device.disconnect()
Explanation:
| Step | Description |
|---|---|
| 1 | Loads the testbed.yml file which defines the devices and their access info. |
| 2 | Iterates over all devices in the testbed, extracts the SSH IP, and removes any stale/changed SSH keys using ssh-keygen. |
| 3 | Connects to R01 using Unicon/pyATS. |
| 4 | Runs a ping test from the device to a public IP (8.8.8.8). |
| 5 | Cleanly disconnects the session. |
Step 5: Run the Script
- Right-click
ping_test.py→ Run
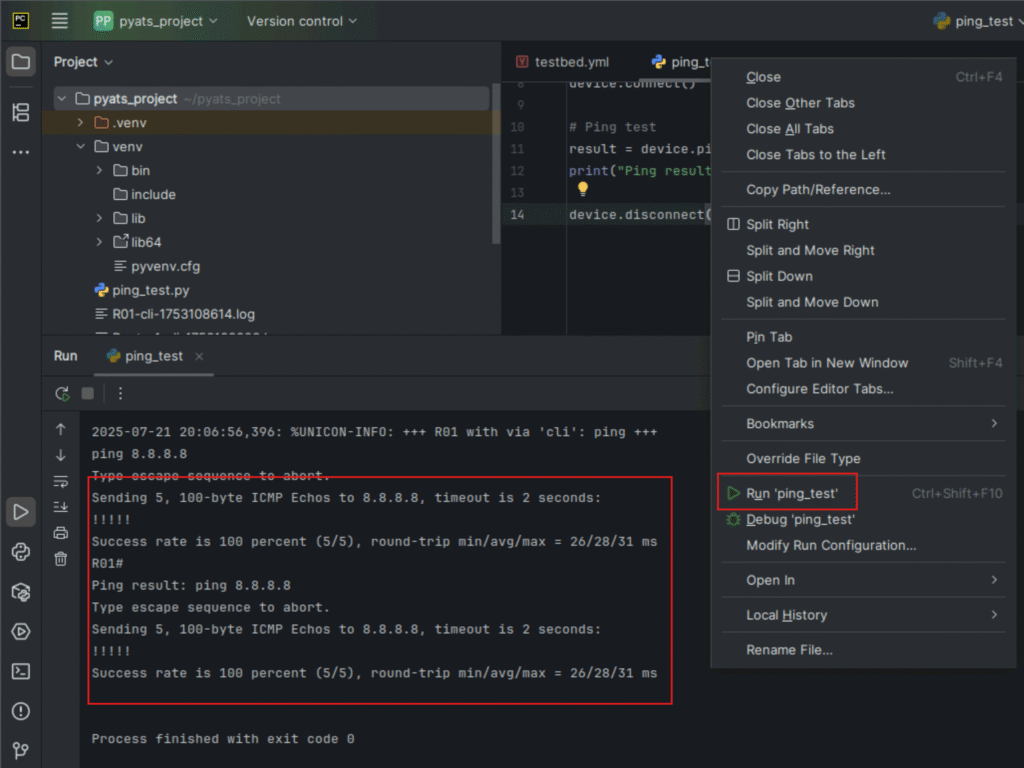
- Or open PyCharm terminal and activate venv:
source venv/bin/activate
python ping_test.py
Bonus: Run pyATS CLI
In PyCharm terminal:
pyats learn interface --testbed-file testbed.ymlFAQs
1. What are the prerequisites for installing pyATS in PyCharm on Ubuntu?
You need Python 3.6 or higher, a stable internet connection, and an updated Ubuntu system. PyCharm (Community or Professional) should be installed. It’s also recommended to have pip and virtualenv installed before starting.
2. Do I need a virtual environment for pyATS installation?
Yes, creating a virtual environment isolates your pyATS installation and prevents conflicts with other Python packages. In PyCharm, you can easily set up a virtual environment during project creation.
3. How do I install pyATS via PyCharm’s terminal?
Open the terminal inside PyCharm and run:
pip install pyats[full]
This installs the full pyATS suite, including Genie parsers, job libraries, and topology utilities.
4. How can I verify if pyATS is installed correctly?
After installation, run:
pyats version check
You should see version information confirming successful installation.
5. What additional packages are recommended with pyATS?
You might want to install genie, unicon, and pyats.contrib to enhance functionality. These support device connections, parsing outputs, and vendor-agnostic testing.
6. Does pyATS work only on Cisco devices?
No. While developed by Cisco, pyATS supports multi-vendor automation. You can use it with Arista, Palo Alto, Fortinet, Juniper, and others via Genie and custom parsers.
7. How do I configure PyCharm to use the pyATS virtual environment?
Navigate to Settings → Project Interpreter in PyCharm and select the virtual environment where pyATS is installed. This ensures all scripts run with the correct interpreter.
8. Can I use pyATS scripts in a CI/CD pipeline after installing in PyCharm?
Yes. Once you develop and test scripts locally in PyCharm, you can integrate them into Jenkins, GitHub Actions, or other CI/CD tools for automated network testing.
YouTube Link
Watch the Complete Python for Network Engineer: Step-by-Step: Install pyATS in PyCharm (Ubuntu) [Python for Network Engineer] Lab Demo & Explanation on our channel:
Join Our Training
Learning how to build pyATS testscripts is just the beginning. To become proficient in Python for Network Engineer automation, you need structured guidance and real-world practice.
Trainer Sagar Dhawan offers a 3-month instructor-led training covering Python, Ansible, API integrations, and Cisco DevNet skills. This program is designed for network engineers who want to master automation tools and advance their careers.
Join the training here and take your first step towards becoming a network automation expert.
Enroll Now & Future‑Proof Your Career
Email: info@networkjourney.com
WhatsApp / Call: +91 97395 21088
![[Day #87 PyATS Series] Automated RMA Device Onboarding (Multi-Vendor) Using pyATS for Cisco [Python for Network Engineer]](https://networkjourney.com/wp-content/uploads/2025/09/Day-87-PyATS-Series-Automated-RMA-Device-Onboarding-Multi-Vendor-Using-pyATS-for-Cisco-Python-for-Network-Engineer-470x274.png)
![SNMPv2 vs SNMPv3: Secure and Scalable Network Monitoring [CCNP ENTERPRISE]](https://networkjourney.com/wp-content/uploads/2025/06/SNMPv2-vs-SNMPv3-Secure-and-Scalable-Network-Monitoring_networkjourney.png)
![[Day #100 PyATS Series] Production-Grade Automation Audit Reports for Management Using pyATS for Cisco [Python for Network Engineer]](https://networkjourney.com/wp-content/uploads/2025/09/Day-100-PyATS-Series-Production-Grade-Automation-Audit-Reports-for-Management-Using-pyATS-for-Cisco-Python-for-Network-Engineer-470x274.png)