Trainer Sagar Dhawan
- Posted on
[Day#2 PyATS Series] Setting up Python Virtual Environments for pyATS for Cisco [Python for Network Engineer]
Table of Contents
1. Introduction on the Key Points
In the evolving world of network automation, learning how to integrate Python for Network Engineer tasks has become essential. If you’re a Cisco network professional looking to automate testing, validation, or configuration, pyATS (Python Automated Test System) is your best friend.
In this second article of our multi-day pyATS series, we will walk through setting up a clean and isolated Python virtual environment. This setup allows you to manage dependencies, keep your automation scripts clean, and prepare for real-world projects involving Cisco routers, switches, firewalls, and SD-WAN platforms.
By the end of this article, you will:
- Understand why virtual environments are crucial
- Set up a
venvfor pyATS using best practices - Install pyATS core components and verify their versions
- Begin your journey toward automating network testing the right way
2. Topology Overview
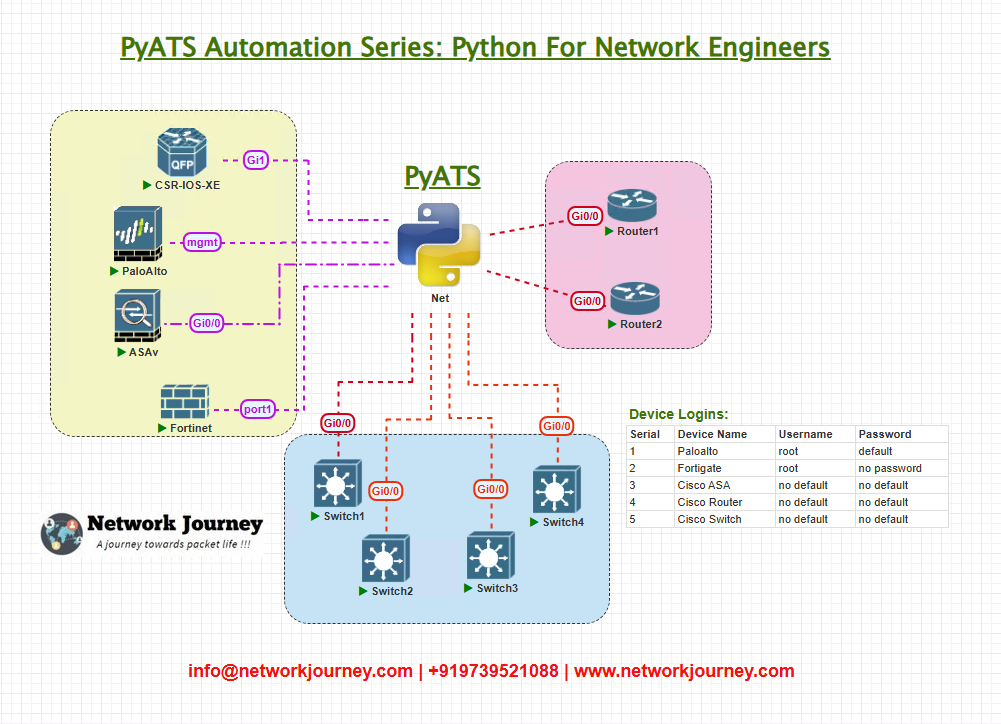
Though today’s task is environment setup, here is the logical flow we’ll be using in later labs:
All devices will be accessed via SSH from your local machine using the testbed YAML file (which we’ll preview later).
3. Topology & Communications
We’ll focus on:
- pyATS virtual environment setup
- Installing required modules (pyats, unicon, genie)
- Validating connectivity to testbed (router/switch)
This is the foundation for running real-world tests like interface status checks, configuration drift detection, or ping reachability.
4. Workflow Script
Here’s a simplified script that validates your pyATS environment is set up correctly:
# Step 1: Create Python venv
python3 -m venv pyats_lab_env

# Step 2: Activate it
source pyats_lab_env/bin/activate  # For Linux/macOS
# pyats_lab_env\Scripts\activate   # For Windows

# Step 3: Install pyATS
pip install pyats[full]

# Step 4: Confirm installation
pyats version check

# Optional: Upgrade pip
python -m pip install --upgrade pip
5. Explanation by Line
python3 -m venv pyats_lab_env: Creates a self-contained environment calledpyats_lab_envsource pyats_lab_env/bin/activate: Activates the environment so that all installations remain isolatedpip install pyats[full]: Installs the entire pyATS suite, including unicon and genie librariespyats version check: Validates that pyATS and its components are correctly installed
6. testbed.yml Example
testbed:
  name: cisco_testbed
  credentials:
    default:
      username: admin
      password: cisco123

devices:
  R1:
    os: iosxe
    type: router
    connections:
      cli:
        protocol: ssh
        ip: 192.168.1.1
Save this as testbed.yml in your project folder.
7. Post-validation CLI Screenshots (Real expected output)
After installation, run:
pyats version check
Expected output:
| Package      | Version  |
|--------------|----------|
| pyats        | 23.5     |
| unicon       | 23.5     |
| genie        | 23.5     |
FAQs
Q1: Why should I use a Python virtual environment when working with pyATS?
Answer:
A Python virtual environment isolates your pyATS installation and its dependencies from the system-wide Python setup. This is crucial because:
- It prevents conflicts between different Python packages or versions.
- Allows you to create multiple environments for different projects (e.g., pyATS for Cisco, Ansible automation).
- Keeps your base operating system clean and stable.
- Makes it easier to upgrade or remove pyATS without affecting other Python applications.
Q2: What Python version should I use for setting up pyATS?
Answer:
Cisco officially supports Python 3.6 to 3.10 for pyATS. It is recommended to use:
- Python 3.8 or 3.9 for maximum compatibility.
- Avoid using Python 3.11+ as some libraries might not yet fully support it.
- You can check your Python version with:
python3 --version
Q3: How do I create a Python virtual environment for pyATS?
Answer:
Follow these steps:
- Install Python and
venvif not already installed:sudo apt update sudo apt install python3 python3-venv - Create a virtual environment:
python3 -m venv pyats_venv - Activate the environment:
source pyats_venv/bin/activate - Install pyATS:
pip install pyats[full]
Q4: How do I know my virtual environment is active?
Answer:
When a virtual environment is active:
- Your terminal prompt changes to show the environment name (e.g.,
(pyats_venv) user@server). which pythonorwhich pippoints to the virtual environment’s directory instead of the system path.- Any packages installed via
pipgo into the isolated environment folder.
Q5: Can I deactivate or remove a virtual environment without affecting pyATS?
Answer:
Yes. To deactivate:
deactivate
To remove the environment completely:
rm -rf pyats_venv
This will not harm your system Python or other projects since everything is contained within the pyats_venv directory.
Q6: How can I manage multiple virtual environments for different projects?
Answer:
You can create multiple environments, each with different package versions:
python3 -m venv pyats_project1
python3 -m venv pyats_project2
Activate the one you need before running your scripts. Tools like virtualenvwrapper or pyenv can help manage multiple environments easily.
Q7: What is the difference between venv and virtualenv for pyATS?
Answer:
venv: Built-in with Python 3.x, simpler to use, no extra installation needed.virtualenv: A third-party tool that works for both Python 2 and 3 and offers additional features like faster environment creation.
For most pyATS use cases,venvis sufficient and recommended.
Q8: Do I need to activate the virtual environment every time I use pyATS?
Answer:
Yes. Each time you open a new terminal session and want to work with pyATS, you must activate the environment:
source pyats_venv/bin/activate
This ensures you’re using the correct Python interpreter and installed packages.
YouTube Link
Watch the Complete Python for Network Engineer: Setting up Python Virtual Environments for pyATS (Ping Tests) using pyATS (Vendor-Agnostic) – Cisco, Arista, Palo Alto, Fortigate Lab Demo & Explanation on our channel:
Join Our Training
If you’re enjoying this hands-on series and want to fast-track your journey into network automation, I invite you to join our 3-month instructor-led training:
Course: Python, Ansible, API & Cisco DevNet for Network Engineers
Check Full Curriculum Here
Led personally by Trainer Sagar Dhawan, this course is designed to:
- Turn you into a confident Python for Network Engineer
- Teach real-world use of pyATS, Ansible, REST APIs
- Build real labs across Cisco, Arista, Palo Alto, Fortigate
Enroll Now & Future‑Proof Your Career
Email: info@networkjourney.com
WhatsApp / Call: +91 97395 21088
Seats fill fast — start your automation journey today.
![[Day #44 Pyats Series] Cross-check BGP route attributes (AS path, next hop) using pyATS for Cisco [Python for Network Engineer]](https://networkjourney.com/wp-content/uploads/2025/08/Cross-check-BGP-route-attributes-AS-path-next-hop-using-pyATS-for-Cisco.png)
![[Day #86 PyATS Series] Automated RMA Device Onboarding (Multi-Vendor) Using pyATS for Cisco [Python for Network Engineer]](https://networkjourney.com/wp-content/uploads/2025/09/Day-86-PyATS-Series-Automated-RMA-Device-Onboarding-Multi-Vendor-Using-pyATS-for-Cisco-Python-for-Network-Engineer-470x274.png)
![iBGP vs eBGP Differences – A Deep Dive with Real-World Examples [ CCNP ENTERPRISE ]_networkjourney](https://networkjourney.com/wp-content/uploads/2025/06/iBGP-vs-eBGP-Differences-–-A-Deep-Dive-with-Real-World-Examples.png)