Trainer Sagar Dhawan
- Posted on
[Day 130] Cisco ISE Mastery Training: Non‑Cisco Switch & WLC Integration
Table of Contents
Introduction
Mixed vendor environments are the norm — Aruba switches and controllers in some buildings, Juniper edge switches in another, Ruckus controllers in wireless zones, and maybe a small Cisco footprint. Cisco ISE must act as the central RADIUS and policy engine across all of them. That’s simple in concept but messy in practice: each vendor expects different RADIUS attributes (VSAs), CoA behaviours, redirect mechanics for captive-portals, and HA/cluster semantics.
This Article converts that mess into a repeatable engineering process. You’ll learn exactly how to:
- Register non-Cisco NADs in ISE (with the correct device profiles).
- Map ISE Authorization Profiles to vendor VSAs and expected attribute formats.
- Configure non-Cisco switches and WLCs to accept dynamic actions (RFC-3576 CoA).
- Validate with ISE Live Logs, NAD CLI, and packet captures.
- Troubleshoot the top 10 real world failures.
By the end of this Article you will be able to design, deploy and debug ISE working reliably across Aruba, Juniper and Ruckus — confidently.
Problem Statement
Real challenges this topic solves:
- Attribute mismatch — ISE sends attributes in one format; the NAD expects another (role names, VLAN names vs IDs, vendor VSAs).
- Dynamic Auth (CoA) incompatibility — differing default CoA ports, NAT/firewall issues and cluster addressing cause CoA to fail.
- Portal/Redirect quirks — captive portal redirect behavior differs across controllers (WLC vs Ruckus vs Aruba).
- Troubleshooting complexity — three different systems produce separate logs and different error messages; engineers waste time chasing symptoms.
We will eliminate guesswork with a prescriptive configuration, validation checklist, and troubleshooting playbook.
Solution Overview
High-level approach:
- ISE as single policy engine: Add every NAD with the correct Network Device Profile, shared secret and CoA settings.
- Vendor mapping layer: Build Authorization Profiles that emit vendor-specific VSAs (Aruba, Juniper, Ruckus) and numeric vs name VLAN attributes.
- NAD configuration: Enable RADIUS auth/accounting + dynamic authorization (RFC-3576) on each switch/controller and match ports.
- Validation & observability: Use triple view — ISE Live Logs, NAD CLI/debug, and packet capture — to confirm behavior.
- Automation & orchestration: Use ISE REST APIs / Monitoring APIs for scripted CoA during incidents.
This workbook teaches each step with copy-paste CLI and GUI checkpoints.
Sample Lab Topology
Platform: VMware or EVE-NG (recommended: EVE-NG for mixed vendor images).
Appliances/VMs
- Cisco ISE PAN + PSN (ISE 3.x recommended) — PAN:
10.10.10.10, PSN:10.10.10.11. - Aruba AOS-CX switch VM —
10.10.30.20. - Aruba Mobility Controller (optional) —
10.10.30.21. - Juniper EX Virtual Switch (vQFX/EX) —
10.10.30.30. - Ruckus vSZ or SmartZone (wireless controller) —
10.10.30.40. - Windows 10 client (wired) —
172.16.110.10. - Wireless client (smartphone) — DHCP from guest networks.
- Lab host for packet captures/automation —
10.10.99.50.
IP plan (example)
- ISE PAN: 10.10.10.10
- ISE PSN: 10.10.10.11
- Aruba switch: 10.10.30.20
- Juniper switch: 10.10.30.30
- Ruckus controller: 10.10.30.40
- Client VLAN (Guest): 172.16.110.0/24
Topology diagram:

Notes
- Ensure ISE PSN IP is reachable from NADs for CoA (use PSN real IP, not LB VIP).
- If simulating WLCs, use vendor virtual controller images; otherwise emulate via vendor CLI features available in EVE-NG.
Step-by-Step GUI Configuration Guide
Phase 1 — ISE: Add NADs & Device Profiles
1.1 — Add network device profile (if not present)
- ISE GUI → Administration > Network Resources > Network Device Profiles
- Confirm Aruba, Juniper and Ruckus profiles exist. If not, Add a profile and set Vendor and default CoA port.
- [Screenshot: ISE Network Device Profiles]
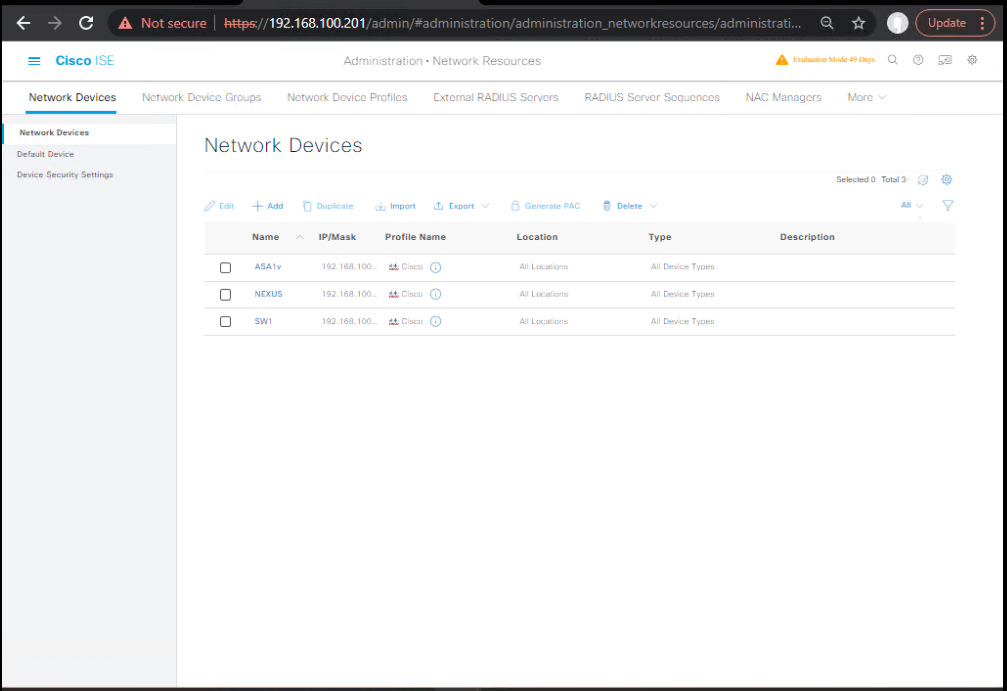
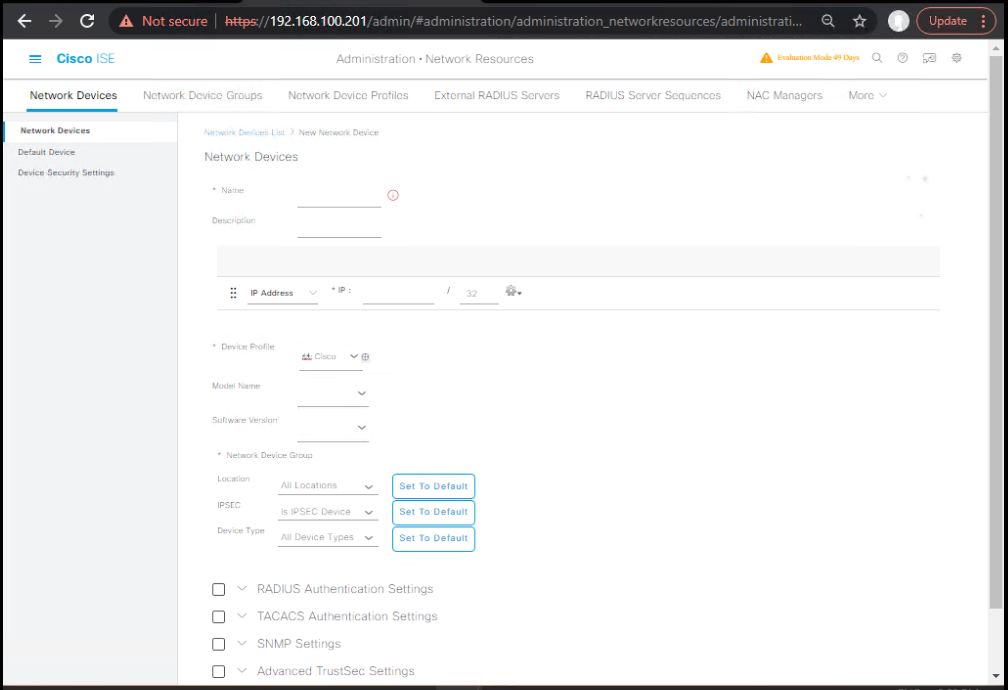
1.2 — Add each network device
- ISE GUI → Administration > Network Resources > Network Devices > Add
- For Aruba AOS-CX:
- Name:
Aruba-AOSCX-1 - IP:
10.10.30.20 - Device Profile:
Aruba - Shared Secret:
ISE_SECRET - Check Radius Authentication & Radius Accounting and Enable CoA/Dynamic Authorization (if option present).
- [Screenshot: ISE Add Network Device — Aruba]
- Name:
- Repeat for Juniper and Ruckus with correct profile and secret.
- Save and Test (use the Test tab where available to check reachability — ISE will do a RADIUS test).
Validation: On ISE: Operations > Network Devices → newly added devices listed. Confirm no certificate/secure channel errors.
Phase 2 — ISE: Authorization Profiles (Vendor VSA Mapping)
2.1 — Build Authorization Profiles for each vendor
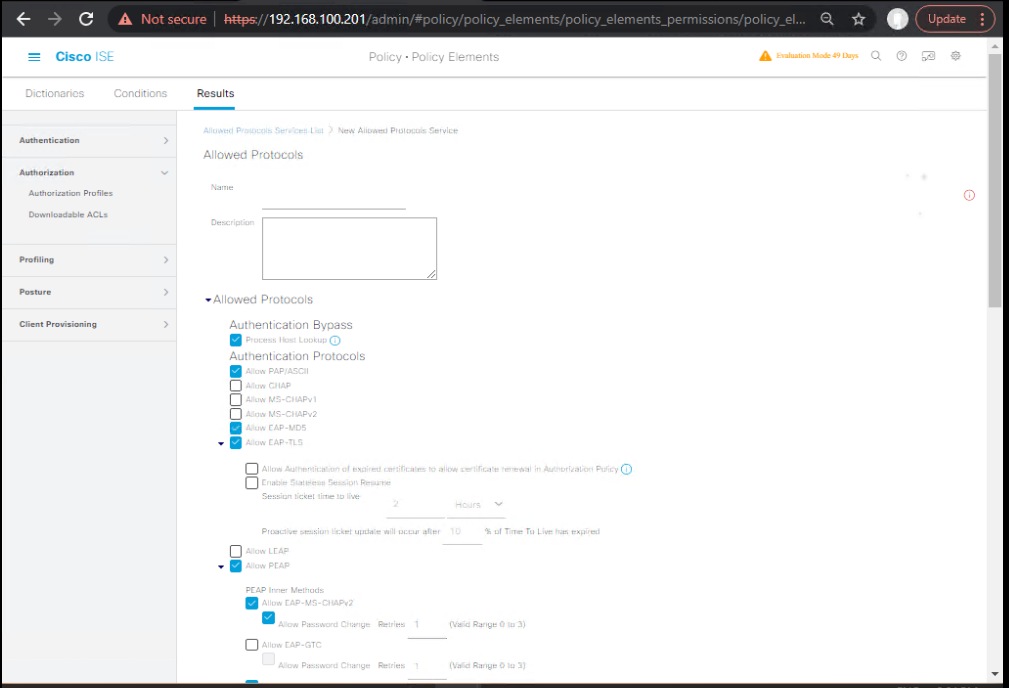
- ISE GUI → Policy > Policy Elements > Results > Authorization > Authorization Profiles > Add
- Aruba_Full_Access: Access Type
ACCESS_ACCEPT→ Common Tasks: VLAN Name set toCORP_VLANor use Aruba role attribute: Add Attribute:Aruba-User-Role= “employee”.- [Screenshot: ISE Authorization Profile — Aruba]
- Juniper_Full_Access: Access Type
ACCESS_ACCEPT→ Add VSA:Juniper-Local-User-Role = StaffORJuniper-Switching-Filterattribute with filter name.- [Screenshot: ISE Authorization Profile — Juniper]
- Ruckus_Full_Access: Add Ruckus VSA like
Ruckus-User-Role = employeeor send Tunnel-attributes based on controller expectations.
Validation: On ISE, use Preview or test RADIUS reply tool to see resulting Access-Accept attributes and verify VSAs are included.
Phase 3 — ISE: Policy Set & Authentication/Authorization Flow
3.1 — Create Policy Set for mixed devices
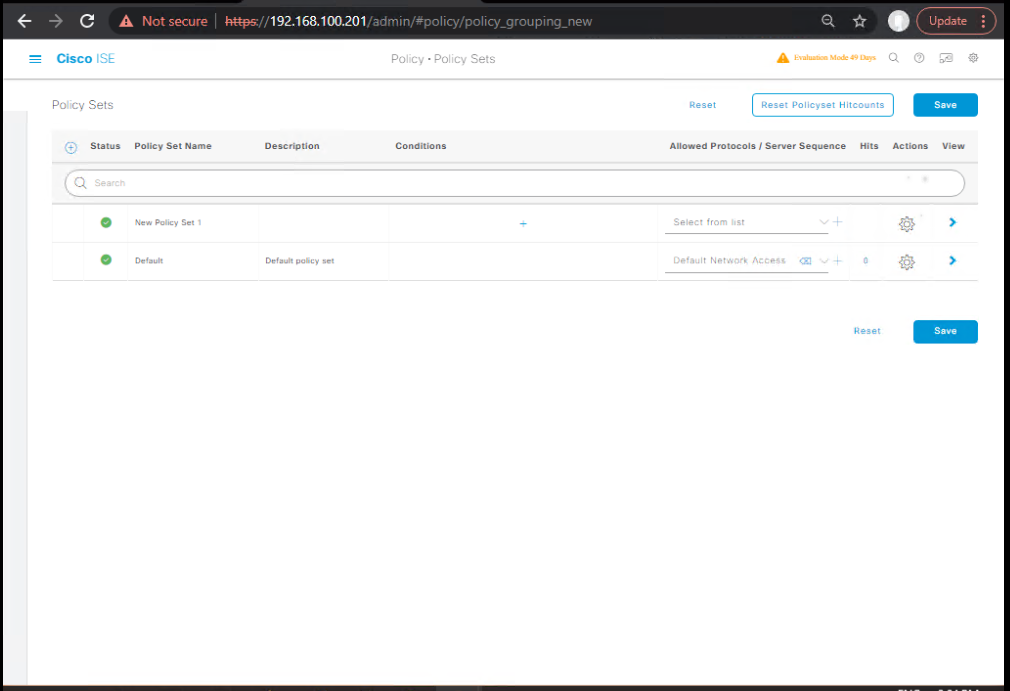
- ISE GUI → Policy > Policy Sets > Add →
MixedVendor_Policy - Condition: Internal Users or Network Device Group equals
Mixed-Vendor-NADs. - Authentication: EAP methods (EAP-TLS + PEAP) and fallback MAB.
- [Screenshot: ISE Policy Set – Authentication]
- Authorization: Create rules ordering by NAD type:
- If
Network Device == ArubaANDAuthentication == EAP-TLS→Aruba_Full_Access - If
Network Device == JuniperANDAuthentication == MAB→Juniper_Quarantine - Else default →
BYOD_Onboarding - [Screenshot: ISE Policy Set – Authorization]
- If
Validation: Use test clients to trigger each rule and confirm chosen profile in Operations > Live Logs.
Phase 4 — Configure Aruba AOS-CX (sample CLI)
Goal: Configure RADIUS auth/accounting and RFC-3576 dynamic auth (CoA) on Aruba AOS-CX.
# Configure RADIUS server
configure terminal
radius server ISE
  host 10.10.10.11
  key ISE_SECRET
  port 1812
  accounting-port 1813
exit

# Configure AAA and associate RADIUS server group
aaa authentication-server radius ISE-SRV
  server 10.10.10.11
  key ISE_SECRET
exit

aaa authentication port-access-method default radius
aaa authorization port-access default radius

# Configure RFC-3576 (dynamic auth) server entry
aaa rfc-3576-server ISE-COA
  host 10.10.10.11
  key ISE_SECRET
  port 3799
exit

write memory
Validation CLI
show radius statistics
show aaa rfc-3576-server
show authentication sessions interface GigabitEthernet1/0/10
Expect: RADIUS counters, RFC-3576 server configured, and auth session details.
Phase 5 — Configure Juniper EX (sample Junos)
Goal: Configure RADIUS + dynamic requests on Junos (CoA).
configure
set system services radius-server 10.10.10.11 secret ISE_SECRET
set system services radius-server 10.10.10.11 port 1812
set system services radius-server 10.10.10.11 accounting-port 1813

# enable dynamic-requests (CoA)
set access radius-server ISE address 10.10.10.11 secret ISE_SECRET dynamic-requests true
set access radius-server ISE dynamic-request-port 3799
commit
Validation CLI
show configuration access
show log radius
show authentication sessions
Expect: radius server entries and dynamic request enabled.
Phase 6 — Configure Ruckus SmartZone (example instructions)
Goal: Add ISE as RADIUS server and enable CoA.
- GUI → Configuration > Authentication > RADIUS Servers → Add ISE
10.10.10.11with shared secret. - GUI → Configuration > Authentication > Dynamic Authorization (CoA) → Add ISE as CoA server with port
3799.- [Screenshot: Ruckus SmartZone RADIUS + CoA settings]
Validation: Use SmartZone CLI or GUI to view active sessions and CoA counters.
Phase 7 — Configure Captive-Portal Redirects on Non-Cisco Controllers
Aruba Controller (ArubaOS)
- Configure WebAuth/Guest captive portal with redirect URL to ISE or a cloud portal and ensure the Redirect ACL allows the portal IP and DNS. Use
show portalto validate.
Ruckus
- Under configuration for WLAN → Web Authentication, set redirect URL and ensure controller allows portal host via firewall rules.
Validation:
- Connect unauthenticated client, open web browser, expect redirect to portal. On ISE Live Logs you should see Access-Reject with redirect attributes or WLC/Controller performing redirect.
Phase 8 — CoA / Disconnect Testing
- Authenticate a client (MAB or 802.1X) and capture session.
- ISE Live Logs → open session → Take Action → Reauthenticate or Disconnect.
- On specific NAD CLI (Aruba / Juniper / Ruckus) run debug to watch CoA traffic.
Packet capture (lab host)
sudo tcpdump -i eth0 udp and \(port 3799 or port 1700\) -w coa.pcap
Open in Wireshark — look for Radius CoA-Request and CoA-Ack.
Troubleshooting & Diagnostics (vendor-specific)
A — General checks (always first)
- Confirm shared secret between ISE network device entry and NAD config.
- Verify CoA port (1700 vs 3799) configured and allowed through firewall.
- Ensure ISE PSN IP is reachable (CoA must target PSN IP, not PAN VIP).
- NTP time sync across ISE, NAD, and clients.
B — ISE side checks (GUI/CLI)
- Live Logs (Operations > RADIUS > Live Logs) — locate the session and inspect attributes & Action history. [Screenshot: ISE Live Logs]
- Monitoring > Nodes — verify PSN health and communication.
- Debug logs on PSN (only during lab): enable
debug loggingfor RADIUS and Monitoring services (be careful in prod). Use ISE logs in/var/log/if you have shell access (lab only).
C — Aruba diagnostics (CLI)
Useful commands
show radius statistics
show authentication sessions interface Gi1/0/10
show aaa rfc-3576-server
show eventlog | match radius
If CoA not arriving: capture on Aruba management interface:
sudo tcpdump -i mgmt0 udp and port 3799 -w /tmp/coa_aruba.pcap
Common fixes:
- Recreate
aaa rfc-3576-serverentry; ensure the key matches ISE. - For controller clusters, ensure CoA target is reachable from ISE (cluster IP vs node IP).
D — Juniper diagnostics (CLI)
Useful commands
show log radiusd
show authentication sessions
show system connections | match 3799
monitor traffic interface <if> matching "udp port 3799"
Common fixes:
- Ensure
dynamic-requestsis enabled inaccessconfig. - If NAK returned, inspect
show log radiusdfor Error-Cause. Junos often reports attribute parsing errors.
E — Ruckus diagnostics
Useful GUI/CLI
- GUI sessions view for client, CoA counters.
- CLI capture:
tcpdumpon controller to see 3799 packets. - Controller logs show CoA acceptance or rejection.
F — Packet capture approach (wire sniff)
- Capture between ISE PSN and NAD (preferred). Filter:
udp.port == 3799 || udp.port == 1700 || radius. - Inspect RADIUS CoA-Request attributes: ensure
NAS-IP-AddressorNAS-Identifiercorresponds to NAD and that VSAs are correctly present.
Lab Walkthroughs with Validation (scenarios + commands)
Walkthrough 1 — Aruba AOS-CX wired 802.1X + CoA reauth
Steps
- Configure Aruba as shown (Phase 4).
- Configure switchport for dot1x and MAB fallback.
- Authenticate Windows client with 802.1X (PEAP). Confirm
Access-AcceptwithAruba-User-Role=gueston ISE Live Logs. - From ISE Live Logs, change authorization to
Aruba_Full_Accessand Take Action → Reauthenticate. - On Aruba:
show authentication sessions interface Gi1/0/10 details
show aaa rfc-3576-server
- Validate: session now shows new role/VLAN. Packet capture shows CoA-Request and CoA-Ack.
Expected outputs
- ISE Live Logs:
CoA SentthenCoA Ack. - Aruba:
Authentication Sessionshows new VLAN/role.
Walkthrough 2 — Ruckus wireless guest redirect + ISE guest portal
Steps
- Add ISE as RADIUS + CoA server in SmartZone.
- Configure guest WLAN with WebAuth redirect to ISE portal.
- Connect smartphone to guest SSID; open browser → redirected to portal.
- Complete guest flow; ISE issues Authorization Profile with
Ruckus-User-Role=guest. - Validate on SmartZone GUI that user session has
guestrole and on ISE Live Logs access accepted.
Commands / Checks
- SmartZone GUI: Clients → find MAC & role.
- ISE: Live Logs show Access-Accept with Ruckus VSA.
Expert Level Use Cases (step-by-step mapping + validation)
Use Case A — Cross-Vendor Incident Containment (SOC integration)
- SOC detects suspicious MAC on Juniper switch.
- Automation calls ISE Monitoring API to Disconnect session.
- ISE sends CoA Disconnect to both Juniper and Aruba (if client is multihomed).
- Validate:
show authentication sessionson both NADs shows session removed. Packet captures show CoA-Request/ACK.
Validation: ISE Monitoring API returns success, NAD session tables cleared.
Use Case B — Vendor Migration (Aruba → Juniper) with staged cutover
- Add Juniper devices to ISE and create device group
NewVendor. - Write Authorization Profiles for Juniper with equivalent VSAs.
- Cutover a small set of ports; verify auth & CoA behaviors.
- Load test CoA bursts for scale and watch NAD CPU.
Validation: Functional parity on test set, no regressions on CoA.
Use Case C — Central Guest Portal, local controllers
- Host guest portal centrally (cloud). Controllers (Ruckus/Aruba) redirect to portal. Portal calls ISE ERS API to create guest and ISE issues CoA to controller to lift redirect.
- Validate: ERS API call logs, ISE Live Logs with guest created, controller receives CoA and client can access internet.
Validation: ERS POST returns 201, ISE guest record present.
FAQs
Q1 — Which CoA UDP port should I open, 1700 or 3799?
Answer:
- Juniper, Aruba, Ruckus typically use 3799 (RFC-3576). Cisco historically used 1700 in old gear. Use the port configured on the NAD (
aaa rfc-3576-server ... port <n>or vendor default) and open that UDP port between ISE PSN and NAD. Always confirm both sides match.
Validation: show aaa rfc-3576-server (Aruba), show system services radius (Juniper), tcpdump for 3799.
Q2 — ISE says “CoA Sent” but NAD ignored it. Why?
Answer:
Common causes: shared secret mismatch, CoA targeted wrong IP (PSN vs VIP), NAT/firewall blocking, or NAD not configured to accept dynamic requests. Packet capture on NAD will show nothing if packets are blocked. If NAD NAKs, inspect the Error-Cause field in the RADIUS NAK.
Validation: run tcpdump at NAD for 3799; check show log radius or event logs. On ISE Live Logs check CoA Sent and timestamp.
Q3 — How do I send vendor VSAs from ISE (example: Juniper filter)?
Answer:
Create Authorization Profiles that include Vendor Specific Attributes (VSA). In ISE GUI add an attribute with vendor ID and attribute name/value (e.g., Juniper-Local-User-Role). Test the RADIUS reply preview to ensure VSAs are present and correctly formatted.
Validation: capture Access-Accept and inspect VSAs in Wireshark.
Q4 — Should I configure NADs with the ISE VIP or PSN IP for CoA?
Answer:
Use the ISE PSN real IP for CoA. The PSN that handled the session owns the session state; sending CoA to a VIP/load-balanced IP may not hit the right PSN. Document PSN IPs and use those for CoA. Some deployments use dynamic routing to ensure CoA reaches correct PSN.
Validation: ISE Live Logs show CoA Ack only when sent to correct PSN; if not, CoA returns NAK or is dropped.
Q5 — How do I test vendor specific behavior without changing production?
Answer:
Build a lab with virtualized NAD images (EVE-NG) or use a dedicated test VLAN. Use radclient to craft Access-Accept with vendor VSAs and verify NAD parsing. Use packet captures and NAD debug logs to inspect behavior.
Validation: radclient simulated RADIUS flows and NAD debug outputs.
Q6 — How do redirect / captive portal flows differ across vendors?
Answer:
- Aruba controllers implement built-in captive portal with redirect ACL names and expected attributes.
- Ruckus uses controller webauth redirect tied to WLAN config.
- Juniper EX often relies on switches to support redirect via controller or external portal.
Each vendor requires specific redirect ACL formats and allowed traffic for DNS/portal access. Test DNS resolution & HTTP reachability from client during redirect.
Validation: client browser is redirected; ISE Live Logs show Access-Reject with redirect attributes if centralized web auth used.
Q7 — Do non-Cisco controllers support downloadable ACLs (dACLs)?
Answer:
Many do, but implementation varies: Aruba uses roles that map to ACLs on controller; Juniper uses firewall filters; Ruckus uses role-based ACLs. ISE can send role names or VSAs — NAD must have preconfigured ACLs/filters for the role name.
Validation: After Access-Accept, verify the client is constrained by ACL by attempting blocked/allowed traffic and checking NAD role/ACL mapping.
Q8 — What are common CoA failure error codes and fixes?
Answer:
- NAK: Invalid Request — Attribute missing or malformed — check VSAs.
- NAK: Unknown NAS —
NAS-IP-Addressmismatch — ensure NAS IP matches NAD config or useNAS-Identifier. - Timeout — firewall/NAT blocking or NAD not listening on configured port.
Fix by correcting attributes, secrets, and networking.
Validation: packet capture reveals Error-Cause attribute in CoA-NAK.
Q9 — How to scale CoA across many NADs?
Answer:
Test ISE PSN capacity for CoA bursts; throttle automation so you don’t overwhelm NAD CPUs. Maintain NAD health monitoring and stagger CoA commands. Use monitoring APIs to check PSN queue depth.
Validation: run load tests in lab and monitor CPU/CoA queue.
Q10 — Live class demo: fastest way to demonstrate CoA working?
Answer:
- Authenticate client to Guest VLAN (MAB).
- On ISE Live Logs, select session → Take Action → Reauthenticate (or Disconnect).
- At NAD CLI run
show authentication sessionsand watch change. Capture packets for 3799 to show CoA-Request and CoA-Ack. This triple view is compact and convincing.
YouTube Link
For more in-depth Cisco ISE Mastery Training, subscribe to my YouTube channel Network Journey and join my instructor-led classes for hands-on, real-world ISE experience
Closing Notes
- Mixed-vendor ISE deployments are not mysterious — they require discipline: correct device profiles in ISE, exact mapping of Authorization Profiles to vendor expectations, precise NAD configuration for RADIUS/CoA, and a consistent validation workflow (ISE Live Logs + NAD CLI + packet capture).
- Common failures are networking/mismatch issues, not ISE logic — focus first on secrets, ports, and PSN addressing.
- Teach students to always reproduce in lab before touching production, and to use packet captures to remove ambiguity.
Upgrade Your Skills — Start Today
For deeper hands-on labs and instructor-led walkthroughs, subscribe to Network Journey on YouTube and join the Fast-Track to Cisco ISE Mastery Pro — my 4-month intensive, lab-heavy course (EVE-NG/VMware). Get lab packs, runbooks and 1:1 lab reviews: https://course.networkjourney.com/ccie-security/
Enroll Now & Future‑Proof Your Career
Email: info@networkjourney.com
WhatsApp / Call: +91 97395 21088
![Ticket#1-Enterprise Slowness: High CPU on Core Switch – Step-by-Step Troubleshooting [CCNP ENTERPRISE]](https://networkjourney.com/wp-content/uploads/2025/07/nj-blog-post-Ticket-1.jpg)