![[Day 20] Cisco ISE Mastery Training: Configuring Authorization Profiles](https://networkjourney.com/wp-content/uploads/2025/08/Day-20-Cisco-ISE-Mastery-Training-Configuring-Authorization-Profiles.png)
Trainer Sagar Dhawan
- Posted on
[Day 20] Cisco ISE Mastery Training: Configuring Authorization Profiles
Table of Contents
Introduction
Authorization in Cisco ISE is not just about “yes” or “no” access — it’s about what happens after authentication.
Once a device or user is authenticated, Cisco ISE decides what level of access they should get: full access, guest access, VLAN assignment, ACL application, dACL, downloadable policy, redirection to a captive portal, or quarantine.
Authorization Profiles are reusable policy objects in ISE that define these post-authentication permissions.
They save you time, reduce errors, and allow for consistent policy enforcement across wired, wireless, and VPN access.
Why this matters:
- Streamlined security posture enforcement.
- Consistent network experience for users.
- Rapid deployment for NAC across enterprise networks.
Problem Statement
Without a centralized authorization mechanism:
- Switches and WLCs need manual per-port ACL/VLAN configurations.
- Inconsistent user experiences (e.g., HR gets IT access, contractors get internal resources).
- Troubleshooting becomes a nightmare — especially in large environments.
- Compliance audits fail due to uncontrolled network access.
Solution Overview
Cisco ISE Authorization Profiles allow you to:
- Define access levels once and apply them anywhere.
- Dynamically assign VLANs, ACLs, QoS policies.
- Redirect to portals for onboarding, guest login, or posture remediation.
- Apply downloadable ACLs (dACLs) without touching network devices.
- Integrate with profiling for context-aware access control.
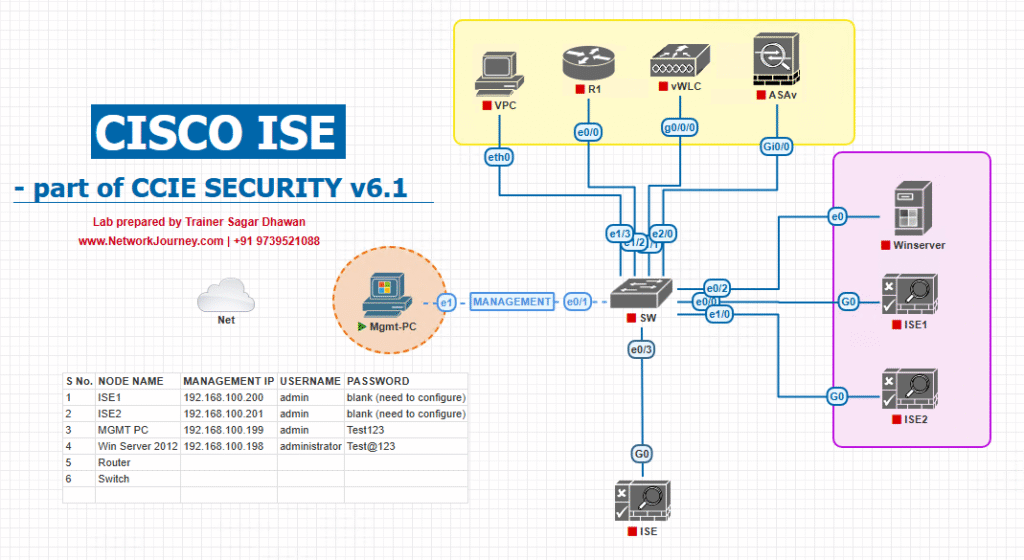
Sample Lab Topology
Platform: VMware Workstation or EVE-NG
ISE Version: 3.x+
Devices:
- 1x Cisco ISE Node (Policy Administration + Service)
- 1x Catalyst 9300 switch (EVE-NG or physical)
- 1x Wireless LAN Controller (WLC) (optional for future labs)
- 2x Endpoints (Windows 10, Ubuntu, or MAC)
- 1x AD Server (for identity integration)
Diagram Description:
- Endpoints connect to Catalyst 9300 Access Switch.
- Switch authenticates endpoints via 802.1X to Cisco ISE.
- ISE applies authorization profile → VLAN assignment + ACL.
- AD server handles user authentication.
Topology Diagram
IP / VLAN Plan
- Management network: 10.10.10.0/24
- Router/Internet: 10.10.10.1
- Switch (mgmt): 10.10.10.2
- ISE: 10.10.10.5
- AD/CA: 10.10.10.10
- Data VLANs (dynamic assignment via ISE)
- VLAN 20 — Corporate (192.168.20.0/24)
- VLAN 30 — Guest (192.168.30.0/24)
- VLAN 40 — Voice (for IP phones) (192.168.40.0/24)
RADIUS ports: UDP 1812 (auth), UDP 1813 (acct) — ensure firewall/ACL allow switch → ISE.
EVE-NG / VMware mapping & node resources
EVE-NG nodes (recommended):
- IOSv-L2 or C9300 image — 1 node (Switch)
- CSR1000v — Router (optional)
- Cisco ISE VM (OVA) — 4 vCPU, 16 GB RAM, 300+ GB disk (ISE is disk/hungry)
- Windows Server 2019 — DC + CA — 2 vCPU, 8–12 GB
- Windows 10 VM(s) — 2 vCPU, 4 GB each
VM networking tips (VMware):
- Create a
Mgmtvirtual switch for ISE/AD/Switch mgmt NICs. - Create
Datavirtual networks for VLAN 20/30 if you need routed separation in lab.
Ports & Link mapping (physical/virtual)
- Switch Gi0/1 → Windows 10 (802.1X client) — Access port (auth).
- Switch Gi0/2 → IP Phone — Access (voice + MAB fallback).
- Switch Gi0/3 → Guest Laptop — Access (WebAuth / Guest VLAN redirect).
- Switch SVI (Vlan10) → mgmt IP 10.10.10.2 — used for mgmt & RADIUS source.
- Switch trunk → CSR/Router for inter-VLAN routing / internet simulation.
Example switch config snippets (IOS) — drop into lab switch
! RADIUS and AAA
conf t
aaa new-model
radius server ISE
 address ipv4 10.10.10.5 auth-port 1812 acct-port 1813
 key cisco123
aaa group server radius ISE-GROUP
 server name ISE
aaa authentication dot1x default group ISE-GROUP
aaa authorization network default group ISE-GROUP

! 802.1X global
dot1x system-auth-control

! Mgmt SVI (optional)
interface Vlan10
 ip address 10.10.10.2 255.255.255.0
 no shutdown

! Example access port (802.1X with MAB fallback)
interface GigabitEthernet1/0/1
 description PC-802.1X
 switchport mode access
 switchport access vlan 1          ! temporary until auth
 authentication port-control auto
 authentication order dot1x mab
 authentication priority dot1x mab
 dot1x pae authenticator
 mab
 spanning-tree portfast

! Optional: set source interface for RADIUS (important in multi-VRF labs)
ip radius source-interface Vlan10
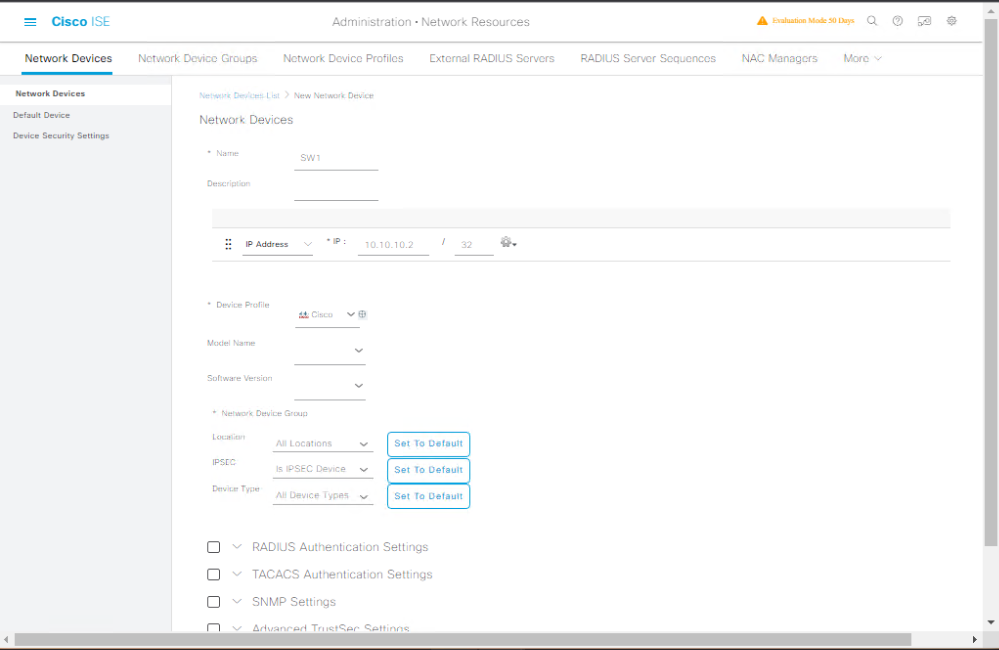
ISE-side notes (GUI steps you should already have)
- Add Network Device: Administration → Network Resources → Network Devices
- Name:
SW1, IP:10.10.10.2, Shared Secret:cisco123
- Name:
- Join AD / CA: Administration → Identity Management → External Identity Sources → Active Directory
- Ensure DNS & NTP aligned.
- Policy Set: Policy → Policy Sets → Wired Policy Set
- Authentication rules: 802.1X → AD; fallback MAB → Internal Endpoints
- Authorization: AD group map → Authorization Profile (Corp_Full_Access → VLAN 20)
- Live Logs: Operations → RADIUS → Live Logs (for testing & troubleshooting)
How to test (quick checklist)
- Ensure NTP + DNS correct on ISE, AD, Switch, and endpoints.
- Ping ISE from switch:
ping 10.10.10.5andshow radiusto verify. - Enable Windows 802.1X supplicant on the lab PC.
- Plug PC into Gi1/0/1 and watch:
- On switch:
show authentication sessions interface Gi1/0/1 detail - On ISE: Live Logs → see Access-Request / Access-Accept and applied Authorization Profile.
- On switch:
- Test MAB: connect IP phone (no supplicant) → check ISE shows MAB flow and correct profile/VLAN.
Optional: Mermaid diagram (if you want to render visually)
graph LR
  Internet --> CSR[CSR1000v\n10.10.10.1]
  CSR --> Switch[Cat9300\n10.10.10.2]
  Switch --> PC[Windows 10\n(802.1X)]
  Switch --> Phone[IP Phone\n(MAB)]
  Switch --> Guest[Guest Laptop\n(WebAuth)]
  Switch --> ISE[ISE Server\n10.10.10.5]
  ISE --> AD[AD/CA\n10.10.10.10]
Step-by-Step GUI Configuration Guide
Step 1: Access the ISE Admin Portal
- Log into ISE at:
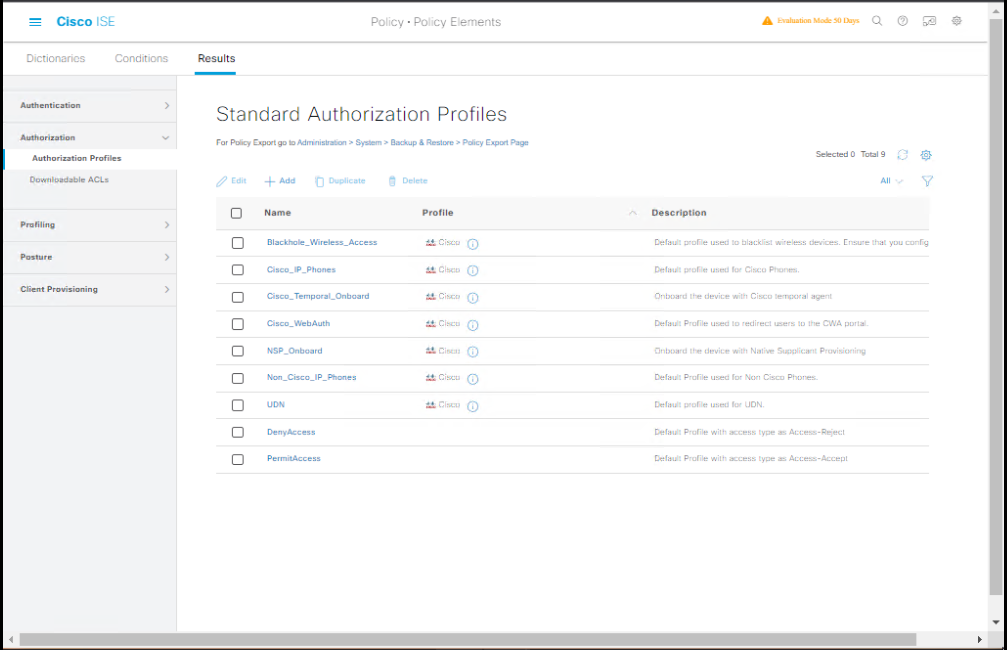
https://<ISE-IP>:port/admin - Navigate to: Policy → Policy Elements → Results → Authorization → Authorization Profiles
[Screenshot: ISE Authorization Profiles Screen]
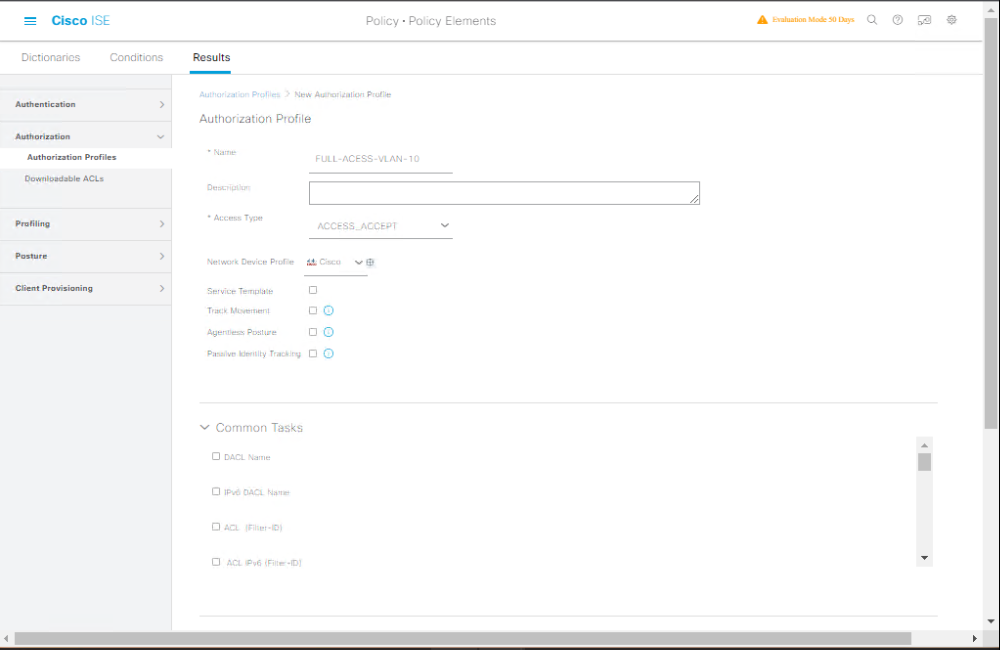
Step 2: Create a New Authorization Profile
- Click Add.
- Name:
Full_Access_VLAN_10 - Description: “Full employee access VLAN 10”
- Access Type: ACCESS_ACCEPT
- VLAN Assignment:
- Check “VLAN”
- VLAN ID:
10
- dACL (Optional):
- Select downloadable ACL
PERMIT_ALL
- Select downloadable ACL
- Other settings: Leave defaults unless redirecting to a portal.
[Screenshot: Authorization Profile Creation Screen]
Step 3: Create a Limited Access Profile
- Name:
Guest_Internet_Only - VLAN:
20 - ACL:
DENY_INTRANET_ALLOW_INTERNET - Optional: Redirect to guest portal → choose CWA (Central Web Authentication).
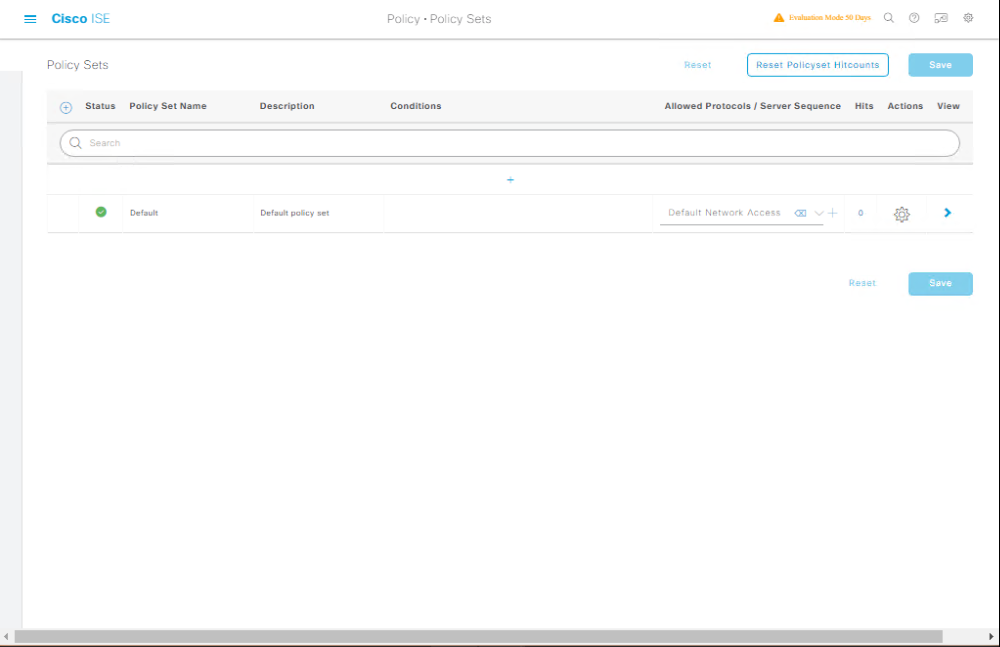
Step 4: Apply Authorization Profiles in Policy
- Navigate: Policy → Policy Sets.
- Choose the Wired Policy Set.
- Under Authorization Policy:
- Condition:
AD-Group = Employees→ Profile:Full_Access_VLAN_10 - Condition:
Endpoint Group = Guest→ Profile:Guest_Internet_Only
- Condition:
[Screenshot: ISE Policy Set Screen]
Step 5: Validate via CLI on Switch
show authentication sessions
show authentication sessions interface Gi1/0/5
Check VLAN and dACL applied:
Interface: Gi1/0/5
  MAC: 0050.56aa.bbcc
  VLAN: 10
  ACL: PERMIT_ALL
  Status: Authorized
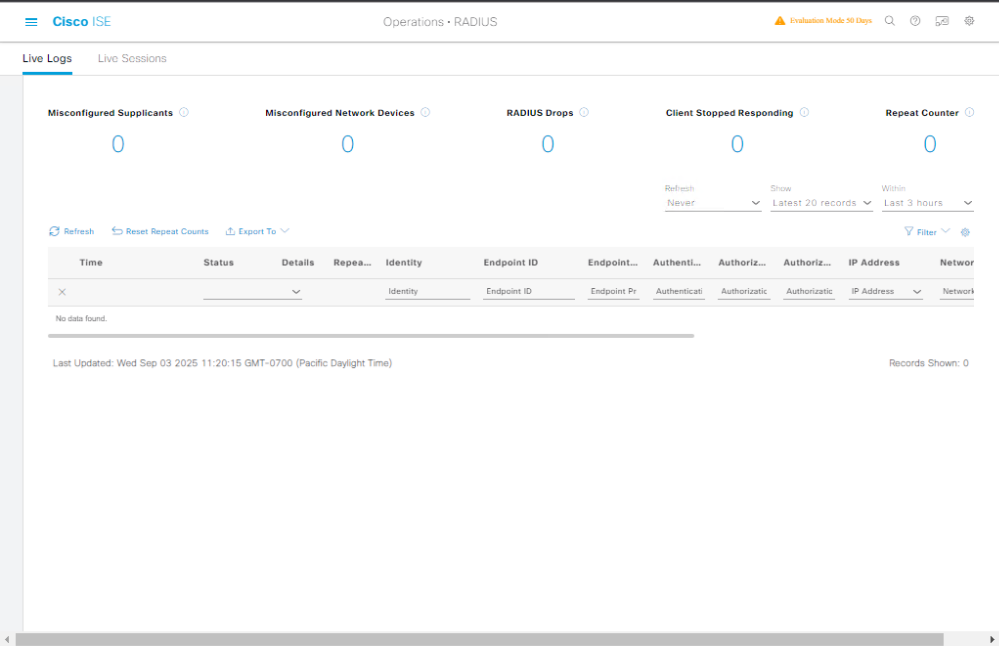
Step 6: Validate via ISE Live Logs
- Navigate: Operations → RADIUS → Live Logs.
- Look for the client MAC address.
- Verify:
- Authc Passed
- Authz Profile matches expected.
[Screenshot: ISE Live Logs Screen]
FAQs
1. What exactly is an Authorization Profile in Cisco ISE?
An Authorization Profile is a reusable policy object in ISE that tells the network device what to do after authentication — for example, assigning a VLAN, applying a downloadable ACL (dACL), redirecting to a web portal, or setting QoS attributes. It separates policy logic from the physical device configuration so policies can be changed centrally without touching each switch or WLC.
2. How is it different from an Authorization Policy?
- Authorization Policy: The decision-making rule — “If user is in HR group, then give HR VLAN.”
- Authorization Profile: The action object — “Assign VLAN 20 + apply HR_dACL.”
Policies reference profiles to actually apply network changes.
3. Can I use a single Authorization Profile for both wired and wireless?
Yes. Most attributes like VLAN ID, ACLs, and dACLs work on both wired and wireless. However, wireless may have WLC-specific options (like QoS profiles) that don’t apply to wired.
4. Do I need to create a profile for every VLAN?
In most enterprise setups, yes. Each VLAN gets its own profile so you can clearly map users or devices to their network segment. This keeps policies modular and easy to manage.
5. What’s the difference between static VLAN assignment on the switch and dynamic VLAN assignment via ISE?
- Static VLAN: Set per switchport, no change unless done manually.
- Dynamic VLAN (via ISE): Assigned at login based on authentication results — users can move around the campus and still get the right VLAN.
6. How do dACLs in Authorization Profiles work?
A downloadable ACL is stored in ISE, not on the switch. When a user is authorized, ISE sends the ACL to the switch dynamically. This reduces per-device config and allows you to change ACLs centrally without reconfiguring network devices.
7. Can I redirect wired clients to a captive portal using an Authorization Profile?
Yes. Use the Web Redirection option in the profile. Common cases:
- Guest redirection to a self-registration portal (CWA).
- Posture remediation redirection for non-compliant devices.
8. What happens if no Authorization Profile is matched?
ISE will apply the default result in the Authorization Policy set — typically “DenyAccess” or “Quarantine VLAN.” This means the user/device won’t have normal network access until a valid profile is matched.
9. Do Authorization Profiles affect already connected sessions?
No. Changes take effect only on new authentications or when an existing session is reauthenticated (manually or by session timeout).
10. How can I troubleshoot if an Authorization Profile isn’t applying?
- Check ISE Live Logs for the matched rule and profile name.
- Verify the switch/WLC supports the attribute being sent (e.g., VLAN ID, dACL).
- Use
show authentication sessionson the switch to confirm applied VLAN/ACL. - Ensure your Authorization Policy conditions are correct (e.g., AD group match, endpoint profile match).
YouTube Link
For more in-depth Cisco ISE Mastery Training, subscribe to my YouTube channel Network Journey and join my instructor-led classes for hands-on, real-world ISE experience
Closing Notes
Configuring Authorization Profiles is a core NAC skill. It defines what an authenticated user can or cannot do on the network. By mastering this, you can enforce corporate access policies dynamically, centrally, and consistently.
Upgrade Your Skills – Start Today
Become a Cisco ISE Expert
Master NAC, 802.1X, advanced policy sets, profiling, and posture assessment in 4 months of live instructor-led training.
Includes real-world lab simulations, resume-building projects, and career coaching.
- Next Batch: Limited seats available
- Course Outline: https://course.networkjourney.com/ccie-security/
- Reserve your seat now and fast-track your CCIE Security and NAC career.
Enroll Now & Future‑Proof Your Career
Email: info@networkjourney.com
WhatsApp / Call: +91 97395 21088

![MST Region Configuration Explained: Streamlining Spanning Tree for Scalable Networks [CCNP Enterprise]](https://networkjourney.com/wp-content/uploads/2025/06/MST-Region-Configuration-Explained_Streamlining-Spanning-Tree-for-Scalable-Networks_networkjourney.png)
![Hub-and-Spoke in Modern WANs: Still Relevant in 2025?[ccnp enterprise]](https://networkjourney.com/wp-content/uploads/2025/06/Slide1.jpg)