Trainer Sagar Dhawan
- Posted on
[Day 96] Cisco ISE Mastery Training: Upgrading Cisco ISE
Table of Contents
Introduction
An ISE upgrade touches every control path—RADIUS/EAP, pxGrid, portals, TACACS+, ERS/Sponsor, logging—and any mistake can drop authentications, cut integrations, or corrupt data.
This workbook is a hands-on run book to execute upgrades with zero/near-zero downtime, using both GUI Split Upgrade and CLI Full/One-shot methods, with pre-checks, sequencing, rollback, and post-validation baked in. We’ll work as if you’re on change window, ticking boxes as you progress.
Problem Statement
- Data/Schema drift across versions → upgrade failures if you don’t pre-validate.
- Wrong node order / role flaps → outages, orphaned sessions.
- Missing repositories / bad checksums → aborted upgrade mid-maintenance.
- Browser/pxGrid feature changes across releases → post-upgrade breakage unless prepped.
- Long maintenance windows if you don’t use Split Upgrade iterations or plan a Full Upgrade efficiently.
Solution Overview
Cisco ISE provides multiple supported approaches:
- Split Upgrade (GUI) — upgrade nodes in iterations/batches with built-in pre-checks, staging, and minimal downtime. (3.2 P3/3.3 introduce the new Split Upgrade wizard and iterations up to 15 nodes). (Cisco, Cisco Live)
- Full Upgrade (CLI) — parallelizes node upgrades with simplified steps; retains roles and reduces API dependence vs older split. Choose when you can accept a tight but short maintenance window. (Cisco)
- Backup/Restore (Re-image) — clean build on new VMs with restore; great for hardware refresh or large version jumps, using upgrade path/matrix as guardrails. (Cisco, Cisco Community)
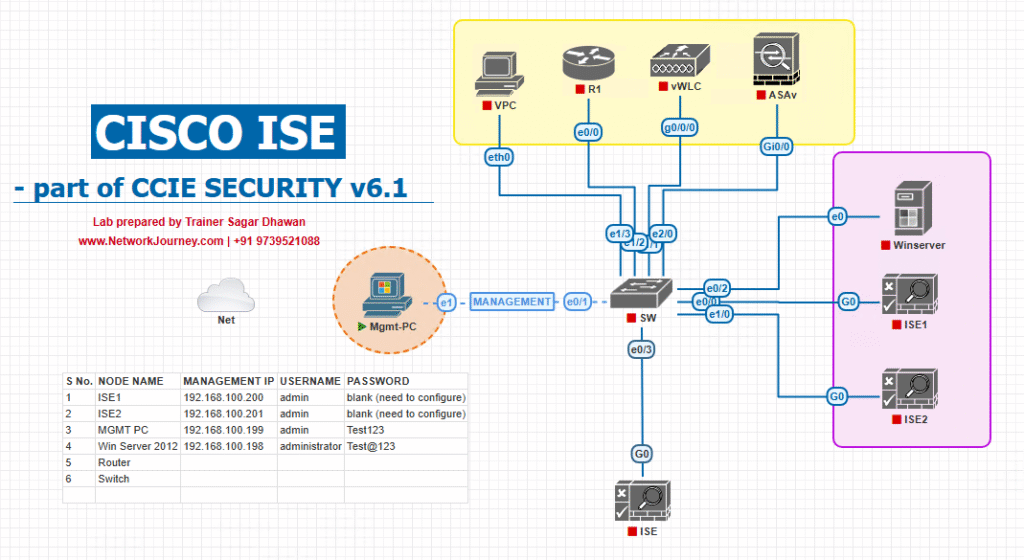
Sample Lab Topology (VMware/EVE-NG)
Compute:
- ESXi or EVE-NG hosting:
- ISE-PAN/MnT (Primary)
- ISE-PAN/MnT (Secondary) (optional)
- ISE-PSN1, ISE-PSN2
- Windows AD/ADCS (for AAA & certs), Linux SFTP repo
- Windows 11 & macOS test clients, Linux jump host
Network topology:
- Catalyst access switch (802.1X/MAB test)
- WLC 9800 + AP (WPA2-Enterprise SSID test)
Step-by-Step GUI Configuration Guide
A) Pre-Flight: Governance + Safety (Do before any upgrade)
Checklists (tick as you go):
- Maintenance plan approved; change window start/end; backout plan documented.
- Current version/patch inventory (PAN/MnT/PSNs). GUI: Administration → System → Settings → About.
- Upgrade path validated against Cisco Upgrade Matrix (e.g., direct 2.7→3.2→3.3). (Cisco Community)
- Browser compatibility for target release noted (helpful for admin login issues). (Cisco)
- Feature caveats for target release checked (e.g., pxGrid Direct must be removed/re-added when upgrading 3.2→3.3). (Cisco)
- Licensing verified (Smart Licensing account connectivity).
- NTP/DNS health on all nodes. CLI:
show ntp,show dns. - System resources (CPU/RAM/disk). CLI:
show cpu,show memory,show disk. - Backups (config + operational data as needed) completed to SFTP repository. (Repository setup below)
URT / Data Validation
- Run Upgrade Readiness Tool (URT) to catch schema/data issues before upgrade. (Available from Cisco docs; run on PAN and review output.) (Cisco)
- URT report is clean or all items addressed.
- Attach URT report to change record.
B) Build / Verify Repository (SFTP/NFS/DISK)
GUI (PAN): Administration → System → Maintenance → Repository → Add
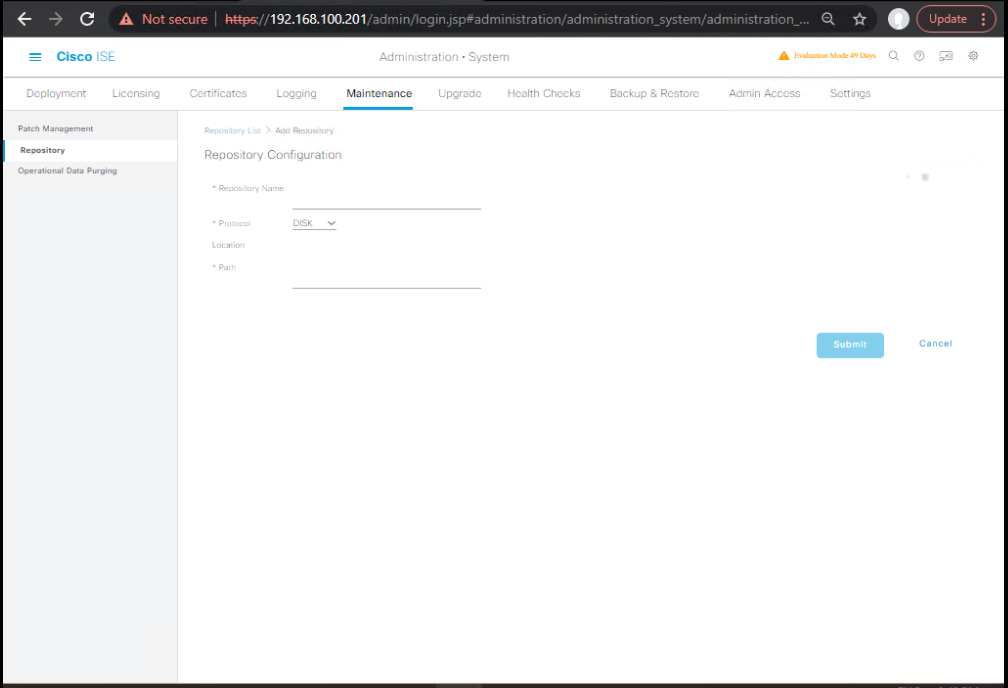
- Protocol = SFTP (preferred) or NFS/DISK
- Enter Server, Path, Username, Password → Submit
- [Screenshot: Repository – Add SFTP] (Cisco)
CLI:
conf t
repository UPGREPO
  url sftp://10.10.10.50/ise
  user ise-backup password <SECRET>
end
show repository UPGREPO
dir repository UPGREPO
Checksum discipline (MANDATORY):
- Download upgrade bundle/patch from Cisco and verify SHA512 before using. (Cisco/DoD STIG requires checksum verification.)
- Linux/macOS:
shasum -a 512 ise-upgradebundle.tar.gz→ compare to Cisco value. (Cisco, STIG VIEWER) - SHA512 matches the Cisco portal.
- Linux/macOS:
C) Backups (Cold, Known-Good)
GUI: Administration → System → Backup & Restore → Backup
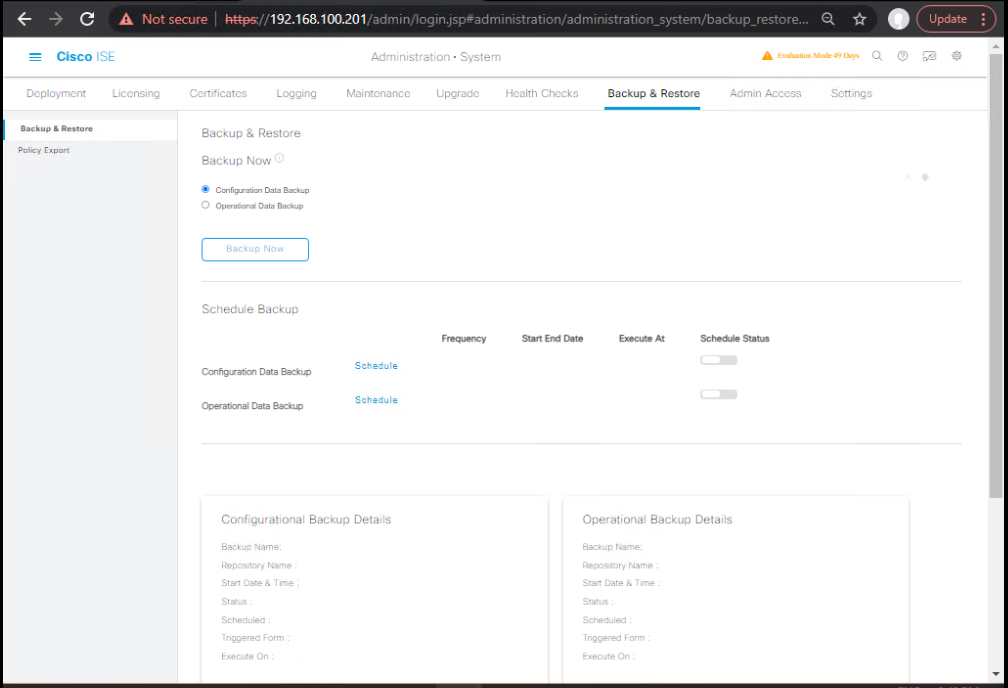
- Scope: Configuration (+ Operational if needed)
- Repository: UPGREPO
- [Screenshot: Backup – Create]
CLI (optional):
backup ise_config_backup repository UPGREPO encryption-key <KEY>
Validate:
dir repository UPGREPOshows the backup files.- Restore test on lab (optional but ideal).
D) Method Choice: Split vs Full vs Re-image
Decision Box:
- If you want near-zero downtime and staged rollout → Split Upgrade (GUI) with Iterations. (Cisco)
- If you prefer shortest overall time and can afford a unified window → Full Upgrade (CLI). (Cisco)
- If doing hardware refresh / big version leap → Backup→Re-image→Restore. (Cisco)
Note (3.2P3/3.3): The new Split Upgrade wizard adds pre-checks, bundle download, staging, iterations, and batching up to 15 nodes. (Cisco, Cisco Live)
PATH 1 — Split Upgrade (GUI, Iterations/Batches)
Use when: you need services to remain available while upgrading in batches.
E) Split Upgrade Wizard (PAN GUI)
GUI: Administration → System → Upgrade (wizard opens)
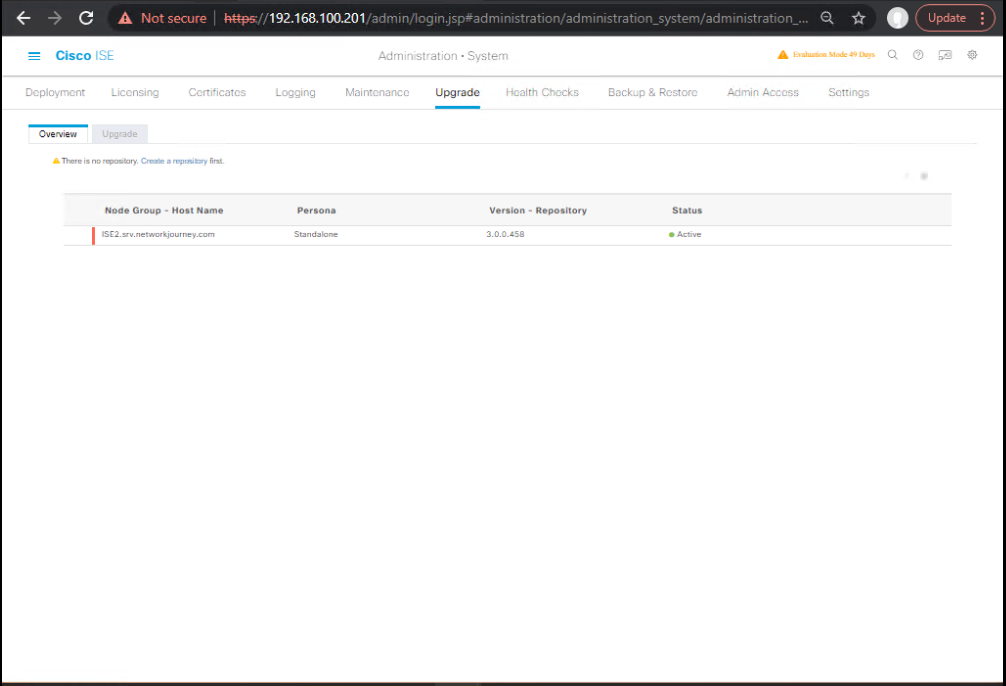
- Welcome → reads current topology.
- Checklist → confirms repository, bundle, disk space, memory.
- Select Nodes for Iterations → e.g., Iteration-1 (PSN1), Iteration-2 (PSN2), Iteration-3 (PAN/MnT).
- Prepare for Upgrade → upload bundle or let ISE download & stage from repository.
- Staging → pre-checks (repo validation, memory, patch bundle if present).
- Upgrade Nodes → executes per iteration; services drain/flip as needed.
- Summary → results and logs.
[All wizard steps are documented with screenshots in Cisco’s “New Split Upgrade” guide.] (Cisco)
Special pre-step for 3.2→3.3:
- Delete any pxGrid Direct connectors and policies that use them before upgrade; re-add after. (Release Notes specific caveat.) (Cisco)
Recommended Iteration Plan (example):
- Iter-1: PSN1 (validate EAP/portals)
- Iter-2: PSN2 (validate again; now both PSNs new)
- Iter-3: Secondary PAN/MnT (if present)
- Iter-4: Primary PAN/MnT (short GUI outage during role move)
Validation after each Iteration
- RADIUS/EAP: from switch/WLC
# Switch test aaa group radius ISE_PSN <user> <pass> show aaa servers debug dot1x events # WLC 9800 test wireless aaa authentication <user> radius <server-name> show wireless client mac <mac> detail - Portals: open Guest/BYOD URL → padlock valid.
- PAN GUI: login, check Operations → Reports for authentications flowing.
If an Iteration fails
- Use wizard’s rollback for the iteration or restore from backup (as per change plan).
- Review logs at Operations → Troubleshoot → Download Logs.

PATH 2 — Full Upgrade (CLI, Parallelized)
Use when: you want fastest overall upgrade and can take a tight maintenance window. It retains roles and reduces failure points vs older split method. (Cisco)
F) Upload & Prepare Bundle (per node)
CLI (on each node; recommend remote console):
# Verify repository contents
dir repository UPGREPO

# Optional: Pre-upload bundle into local staging (faster)
application upgrade prepare ise-upgradebundle-3.x.x.SPA.x86_64.tar.gz UPGREPO
# Wait for 'prepare' to complete (checks space, unpacks, stages)
(These commands and the recommended workflow are covered in Cisco Live BRKSEC-2889.) (Cisco Live)
Validate:
show logging application | include upgradeshows staging OK.show diskhas adequate free space.
G) Execute Upgrade (per node)
# Start the actual upgrade
application upgrade proceed
# Observe progress; node will reboot during the process
- Upgrade PAN last if you prefer to validate PSNs first; or parallelize per Full Upgrade plan if window allows. (Full Upgrade reduces sequencing fuss, but keep a sensible order for validation.) (Cisco)
Monitor:
show application status ise
show logging application | include upgrade
ESXi Note (post-upgrade):
- After major version jump, update VM Guest OS type, then reboot if required. (Cisco Live)
PATH 3 — Re-Image + Restore (Clean Build)
Use when: changing hypervisor hardware/storage, or hopping through multiple versions beyond direct upgrade support.
Workflow:
- Back up config/ops to UPGREPO.
- Deploy new ISE OVA/ISO at target version (sized properly).
- Run initial setup to get to CLI prompt.
- Restore configuration to PAN → rejoin PSNs → sync.
[Install/Upgrade guides list detailed steps.] (Cisco)
Validate:
- Nodes registered & in sync
- RADIUS tests, portals, pxGrid consumers re-established
H) Post-Upgrade Health Pack (All Methods)
GUI checks:
- Administration → System → Settings → About shows target version & patch.
- Administration → System → Deployment → all nodes Green/Connected.
- Operations → Reports → RADIUS Authentications shows live entries.
- pxGrid Services → Client Management → all consumers online.
- Certificates still bound & valid; portals open with valid chain.
CLI checks:
show application status ise
show tech-support ise brief
show logging application | include (error|exception|CRL|OCSP|radius)
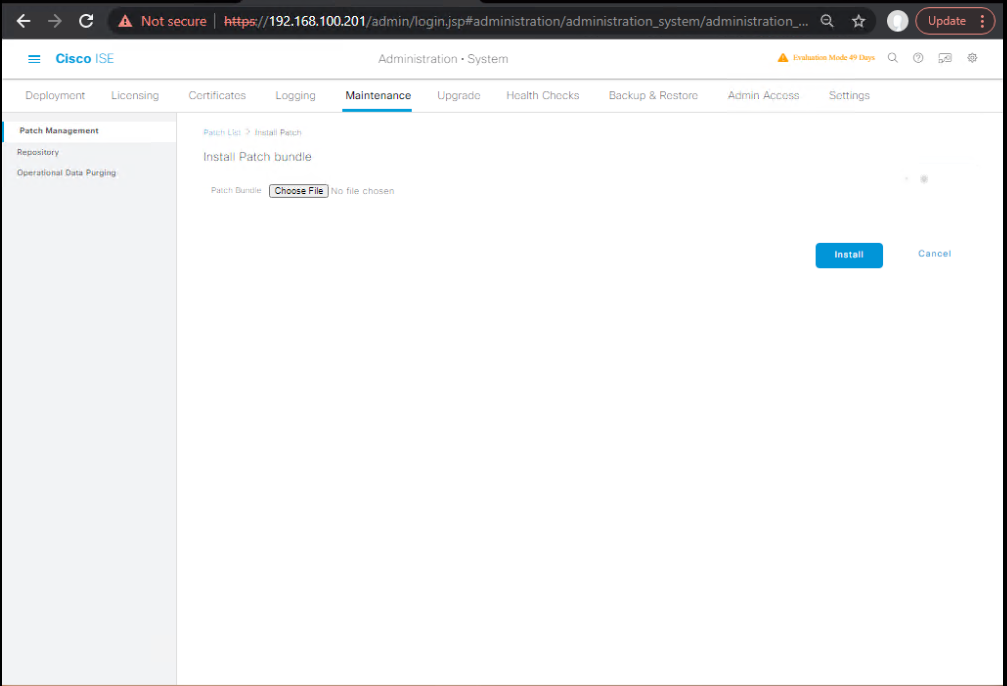
Patch the target release (if available):
- GUI: Administration → System → Maintenance → Patch Management → Install (verify checksum first). (Cisco)
Feature-specific caveats (example for 3.3):
- Re-add pxGrid Direct connectors and related policies after upgrade. (Cisco)
FAQs – Cisco ISE Upgrading
1. Which is the correct upgrade order for distributed ISE deployments?
Answer:
The recommended order is:
- Secondary PAN (so Primary PAN remains operational)
- PSNs (Policy Service Nodes) – upgrade one at a time to maintain authentication continuity
- MnT (Monitoring Node)
- Primary PAN
Validation:
- GUI:
System → Deployment → Check version consistency - CLI:
show version
2. Can I upgrade directly from ISE 2.4 to 3.2?
Answer:
No. Cisco mandates supported upgrade paths. Example:
- From 2.4 → must upgrade to 2.7 first → then to 3.2.
Check the official Cisco ISE Upgrade Path Matrix before starting.
Pro tip: Run this on CLI to confirm version:
show version | include Version
3. How do I verify if the upgrade repository is reachable?
Answer:
Before upgrade, validate connectivity to repository.
show repository UPGRADE_REPO
If you see the list of files, the repo is valid. If not, check firewall/credentials.
4. What happens if a PSN is being upgraded? Will clients fail authentication?
Answer:
Yes – the specific PSN is unavailable during upgrade.
But if you have multiple PSNs load-balanced, client authentication continues via other nodes.
Validation:
- Check RADIUS live logs under Operations → RADIUS → Live Logs.
- CLI test from switch:
test aaa group radius ISE_PSN1 testuser cisco123
5. Do ISE certificates survive an upgrade?
Answer:
Yes, ISE preserves installed certificates and bindings.
But always export and backup certificates before upgrade.
Post-Upgrade Validation:
- GUI:
Administration → System → Certificates - CLI:
show crypto pki certificates
6. How do I validate that replication is working after upgrade?
Answer:
Run:
show replication status
Status should be “SUCCESS” on all nodes.
GUI: Administration → System → Deployment → Replication Status.
7. Can I upgrade using GUI instead of CLI? Which is better?
Answer:
- GUI: Easy, guided process but requires stable web session.
- CLI: More reliable, especially in production.
Most engineers prefer CLI for robustness.
8. What should I do if the upgrade fails mid-way?
Answer:
- Restore from last full backup.
- If VM-based, revert to snapshot.
- For hardware appliances, reload and reattempt upgrade.
CLI restore command:
application restore ise_full_backup_2025 repository UPGRADE_REPO encryption-key mySecretKey
9. How long does a typical upgrade take?
Answer:
Depends on:
- ISE node role
- Database size
- System resources
Typical: 30–90 mins per node. PAN usually takes longest.
10. Do I need to re-import licenses after upgrade?
Answer:
- Smart Licensing: Persists across upgrades.
- Classic Licensing: Still valid, but verify after upgrade.
Validation CLI:
show license status
Validation GUI: Administration → System → Licensing.
YouTube Link
For more in-depth Cisco ISE Mastery Training, subscribe to my YouTube channel Network Journey and join my instructor-led classes for hands-on, real-world ISE experience
Closing Notes
- Plan → Pre-check → Stage → Upgrade → Validate → Patch.
- Use Split (GUI) when uptime is king; use Full (CLI) for fastest total time with an agreed window.
- URT + SHA512 + Repository health are non-negotiable.
- Treat PSNs as canaries—upgrade one, validate, then roll.
Upgrade Your Skills – Start Today
For more in-depth Cisco ISE Mastery Training, subscribe to my YouTube channel Network Journey and join my instructor-led classes.
Fast-Track to Cisco ISE Mastery Pro
- I run a focused 4-month instructor-led CCIE Security journey (live labs, graded workbook drills, interview prep).
- Course outline & enrollment: https://course.networkjourney.com/ccie-security/
- What you get: weekly ISE labs (URT, Split & Full upgrades), production-style change windows, rollback drills, and 1:1 mentoring.
- Action: Fill the intake form on the course page → free readiness call + lab access checklist.
Enroll Now & Future‑Proof Your Career
Email: info@networkjourney.com
WhatsApp / Call: +91 97395 21088