Sagar Dhawan
- Posted on
[Day#4 PyATS Series] Creating Your First testbed.yaml (Multi-Vendor Testbed) using pyATS for Cisco
Table of Contents
Introduction on the Key Points
In Day 4 of our 101 Days of pyATS series, we’ll explore how to create your first testbed.yaml file. This file serves as the backbone for your automation scripts. Whether you are working with Cisco IOS, NX-OS, IOS-XR, or even non-Cisco platforms, pyATS provides a flexible, vendor-agnostic framework.
If you’re serious about automation and want to streamline your network testing, monitoring, and configuration validation — this guide is essential. We’ll cover multi-vendor integration, protocol specifications, CLI access patterns, and common YAML design best practices.
This is an essential skill in your journey of mastering Python for Network Engineer roles.
Topology Overview
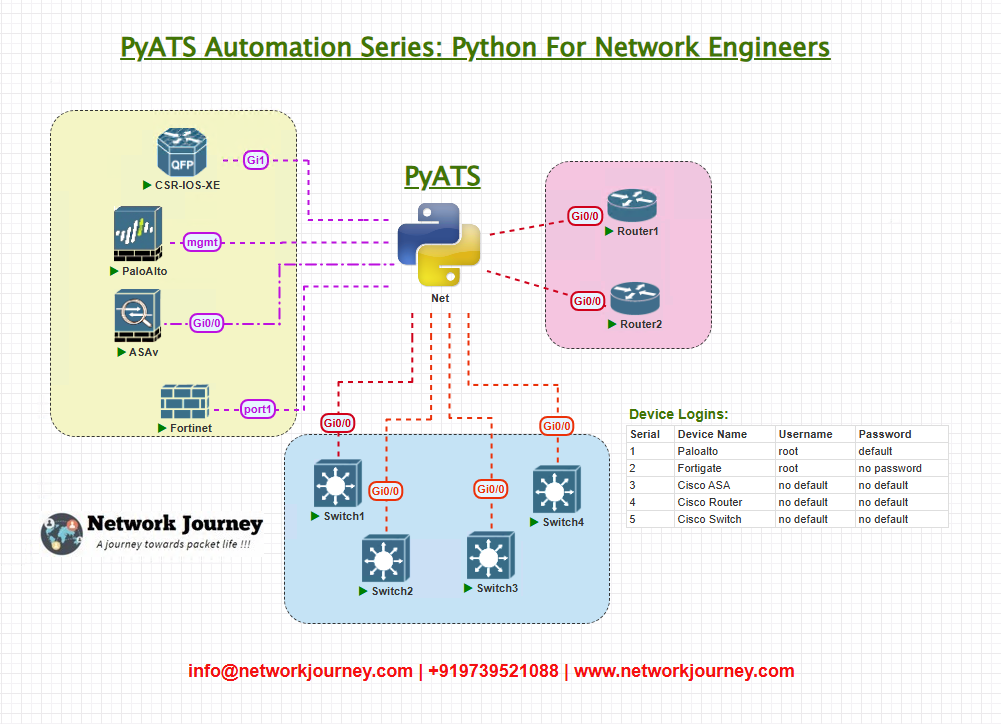
We’ll use a simple lab topology with 4 devices:
R01– Cisco IOS RouterSW01– Cisco NX-OS SwitchXR01– Cisco IOS-XR DeviceFIREWALL01– Third-party Firewall (example: Palo Alto)
These devices are accessible via SSH and will be represented within the testbed using the os, type, and connections fields.
Topology & Communications
All devices are reachable from your pyATS execution environment (e.g. your local machine or a central jump server). Communications are based on SSH (default port 22), and authentication is handled via username and password.
Workflow Script
We’ll use a simple script to validate connectivity using pyATS’s connect() method:
from pyats.topology import loader

testbed = loader.load('testbed.yml')

for device in testbed.devices.values():
    print(f"Connecting to {device.name}...")
    device.connect()
    print(f"Connected to {device.name} Successfully. !")
    device.disconnect()
Explanation by Line
Key YAML Fields:
devices: List of all devicesos: OS type (e.g. ios, nxos, iosxr, etc.)type: Logical classification (e.g. router, switch, firewall)connections.cli.ip: IP address for SSH connectioncredentials: Username and password for authentication
testbed.yml Example
devices:
  R01:
    os: ios
    type: router
    credentials:
      default:
        username: admin
        password: cisco
    connections:
      cli:
        protocol: ssh
        ip: 192.168.1.1

  SW01:
    os: nxos
    type: switch
    credentials:
      default:
        username: admin
        password: cisco
    connections:
      cli:
        protocol: ssh
        ip: 192.168.1.2

  XR01:
    os: iosxr
    type: router
    credentials:
      default:
        username: admin
        password: cisco
    connections:
      cli:
        protocol: ssh
        ip: 192.168.1.3

  FIREWALL01:
    os: generic
    type: firewall
    credentials:
      default:
        username: admin
        password: firewall123
    connections:
      cli:
        protocol: ssh
        ip: 192.168.1.4
Post-validation CLI Screenshots (Expected Output)
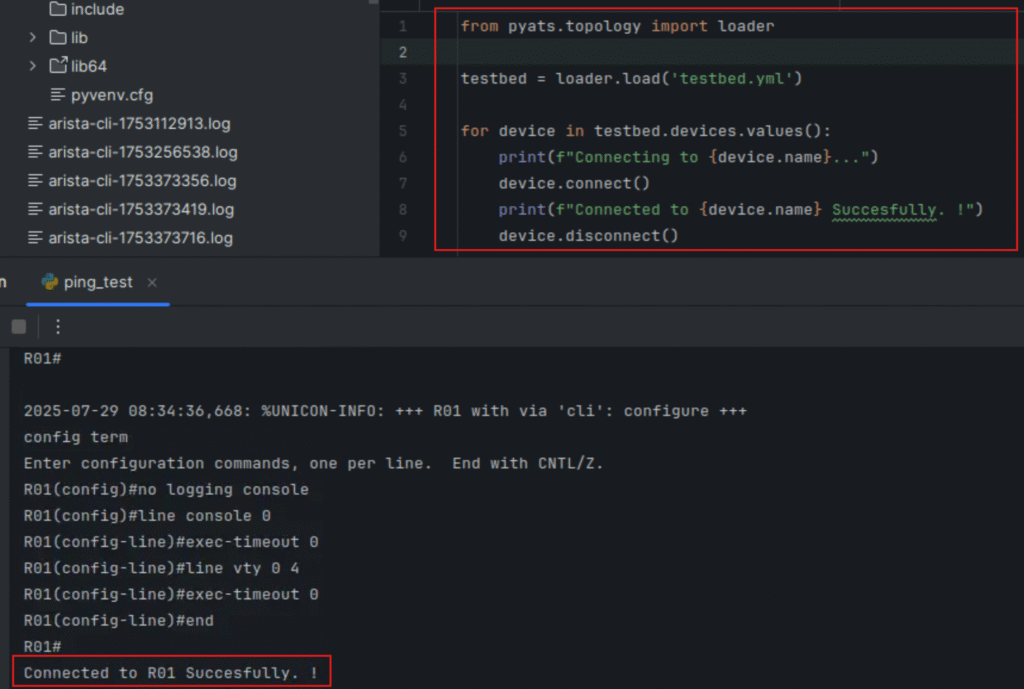
Connecting to R01...
Connected to R01 Successfully. !
Connecting to SW01...
Connected to SW01 Successfully. !
Connecting to XR01...
Connected to XR01 Successfully. !
Connecting to FIREWALL01...
Connected to FIREWALL01 Successfully. !
FAQs
1: What is the purpose of the testbed.yaml file in pyATS?
Answer:
The testbed.yaml file serves as the central configuration file in pyATS to define all devices, their credentials, and how to connect to them. It’s vendor-agnostic and allows you to run scripts against Cisco, Arista, Fortigate, Palo Alto, or any other platform by abstracting connection logic from your Python code.
Instead of hardcoding IPs and credentials, you keep your scripts clean by loading this YAML dynamically using:
from genie.testbed import load
testbed = load('testbed.yaml')
This makes your testing modular, scalable, and repeatable across different environments.
2: How can I validate if my testbed.yaml file is correctly formatted?
Answer:
To ensure your YAML file is syntactically and structurally valid, use the built-in validation command:
pyats validate testbed testbed.yaml
This will:
- Check for schema compliance
- Catch missing keys (like
connections) - Validate YAML indentation and data types
Validation before execution helps prevent runtime errors in your scripts.
3: Can I define multiple connection protocols (SSH, Telnet, Console) in the same testbed?
Answer:
Yes, pyATS supports multi-connection definitions per device. You can define multiple protocols under the connections: section and choose which one to use when writing your script.
Example:
connections:
  ssh:
    protocol: ssh
    ip: 192.168.1.1
  telnet:
    protocol: telnet
    ip: 192.168.1.1
Then, in your Python script, you can explicitly connect via one of them:
device.connect(via='telnet')
This is useful when certain vendors or lab environments only support telnet or console.
4: What should I do if a device fails to connect during script execution?
Answer:
If a device fails to connect (e.g., wrong IP, port down, SSH issue), pyATS will throw an exception like:
ConnectionError: Could not connect to device "R1"
You should wrap your device.connect() call in a try-except block to handle it gracefully:
try:
    device.connect()
except Exception as e:
    print(f"Connection to {device.name} failed: {e}")
Also, verify:
- Device reachability (ping/SSH)
- Correct protocol and port
- Credentials match
Adding logging for failures can help with troubleshooting large topologies.
5: How do I define device-specific credentials if defaults don’t apply to all?
Answer:
You can override the global default credentials by setting device-level credentials:
testbed:
  credentials:
    default:
      username: admin
      password: admin123

devices:
  R1:
    credentials:
      default:
        username: cisco
        password: cisco123
This way:
R1uses its own username/password.- All others fall back to the testbed-level default.
This is helpful in real environments where each vendor might have different login setups.
6: How do I handle non-standard SSH ports (e.g., 2222) in pyATS YAML?
Answer:
You can specify a custom port under the cli: connection like this:
connections:
  cli:
    protocol: ssh
    ip: 192.168.1.10
    port: 2222
In your script, this is transparent. When you call device.connect(), pyATS will use the specified port automatically.
This is especially useful in NAT’d or shared-lab environments where SSH ports are mapped differently.
7: What are the common os: values supported by pyATS?
Answer:
The os: field helps pyATS decide how to parse command outputs correctly. Here are some common values:
| Vendor | OS Value |
|---|---|
| Cisco IOS XE | iosxe |
| Cisco NX-OS | nxos |
| Cisco IOS XR | iosxr |
| Arista EOS | eos |
| Palo Alto PAN-OS | panos |
| Fortinet FortiOS | fortinet |
Make sure to match this value with the correct parser/genie support for accurate parsing and validation.
8: Can I group devices into roles (routers, switches, firewalls) for easier scripting?
Answer:
While YAML doesn’t support grouping natively, you can use custom attributes like type: or define device tags in your script to sort/group them:
devices:
  R1:
    type: router
  SW1:
    type: switch
  PA1:
    type: firewall
Then in Python:
for device in testbed.devices.values():
    if device.type == 'firewall':
        firewall_list.append(device)
This makes it easier to apply role-based logic in your automation scripts.
9: Can pyATS connect to cloud-hosted virtual appliances?
Answer:
Yes, as long as:
- The appliance has reachable IP from your control node
- SSH is enabled and reachable
- Proper credentials and protocol are set in the YAML
You can automate vSRX, CSR1000v, Palo Alto VM-Series, etc., just like physical devices. pyATS is protocol-based, not hardware-bound.
10: How do I keep my testbed.yaml file secure and avoid exposing credentials?
Answer:
Best practices for securing your testbed:
- Do not commit YAML files to Git with real passwords.
- Use
.gitignorefor sensitive testbed files. - Store credentials in environment variables or use pyATS Secrets Plugin.
- Encrypt YAML with Ansible Vault, GPG, or similar tools.
- Consider using a dynamic inventory generation tool (e.g., NetBox + script) that injects secrets at runtime.
Security is critical when automating production-grade networks.
YouTube Link
Watch the Complete Python for Network Engineer: Creating Your First testbed.yaml (Multi-Vendor Testbed) using pyATS for Cisco Lab Demo & Explanation on our channel:
Join Our Full Training
This post was just a glimpse of what’s possible with pyATS and vendor-agnostic automation.
Want to go deeper?
I am conducting a 3-month instructor-led program:
“Python + Ansible + API + Cisco DevNet for Network Engineers”
Explore full course: https://course.networkjourney.com/python-ansible-api-cisco-devnet-for-network-engineers/
Click below to view course outline and enroll:
Enroll Now & Future‑Proof Your Career
Email: info@networkjourney.com
WhatsApp / Call: +91 97395 21088
https://course.networkjourney.com/python-ansible-api-cisco-devnet-for-network-engineers
Whether you’re a beginner or a pro, this program will empower you to use Python for Network Engineers to automate real-world networks with confidence.
- Build testbeds
- Write automated tests
- Run CLI/API validations
- Handle multi-vendor environments
- Use REST APIs with Postman and Python
- Job-ready portfolio by Day 90!
Limited Seats – Register Now and Future-Proof Your Career!
![[Day #32 PyATS Series] Tracing End-to-End Path (Multi-Hop Traceroute Validation) Using pyATS for Cisco [Python for Network Engineer]](https://networkjourney.com/wp-content/uploads/2025/08/Day-32-PyATS-Series-Tracing-End-to-End-Path-Multi-Hop-Traceroute-Validation-Using-pyATS-for-Cisco-Python-for-Network-Engineer.png)
![[Day #76 PyATS Series] Automate Zero-Touch Provisioning Validation Using pyATS for Cisco [Python for Network Engineer]](https://networkjourney.com/wp-content/uploads/2025/09/Day-76-PyATS-Series-Automate-Zero-Touch-Provisioning-Validation-Using-pyATS-for-Cisco-Python-for-Network-Engineer-470x274.png)
![IGMP Snooping and Configuration – Mastering Multicast Efficiency [CCNP ENTERPRISE]_networkjourney](https://networkjourney.com/wp-content/uploads/2025/07/IGMP-Snooping-and-Configuration-–-Mastering-Multicast-Efficiency.png)